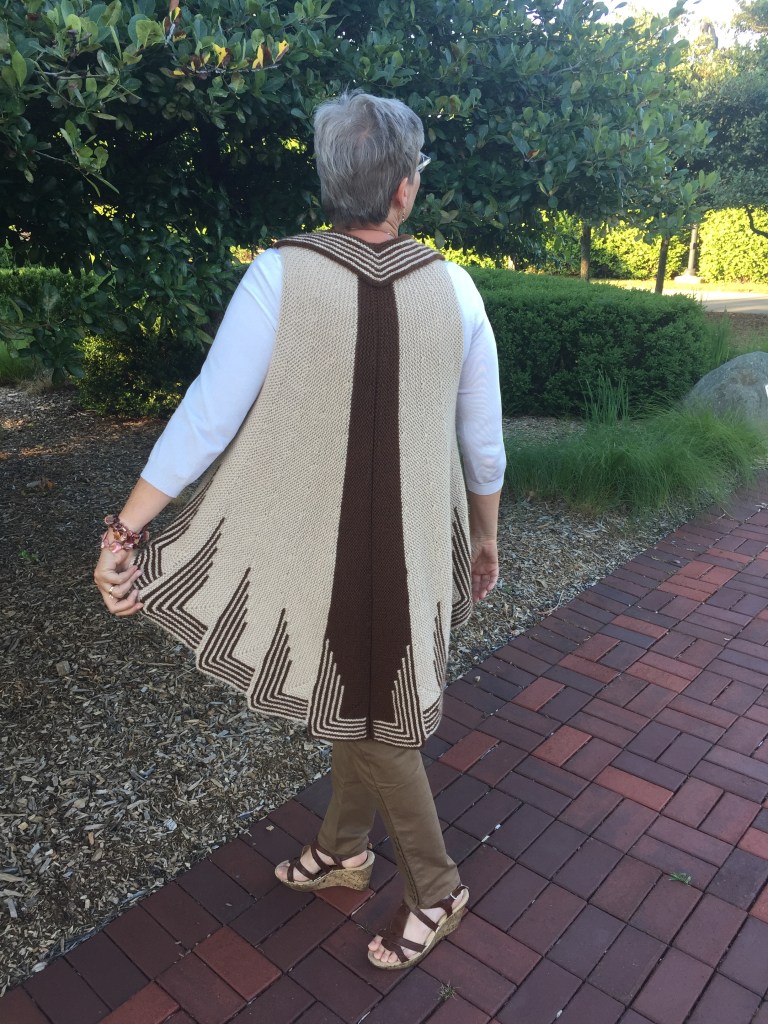
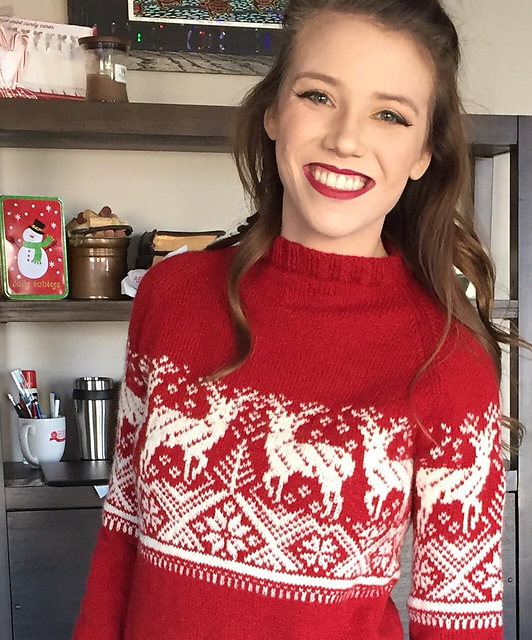
I’m looking for test knitters for this new chocolate-inspired pattern. If you are interested in helping me fine tune and proof-read the pattern and charts, I will send you the final version of the pattern (free), a coupon code for another free pattern (from my self-published patterns), and chocolate truffles (if you want them). My target date for finishing and publishing the pattern is January 2020.
Techniques Required:
provisional cast on
short rows
reading charts (there are also row-by-row directions)
Kitchener Stitch/grafting
blocking
seaming
I will have tutorials on each of these techniques in up-coming posts.
Materials Required:
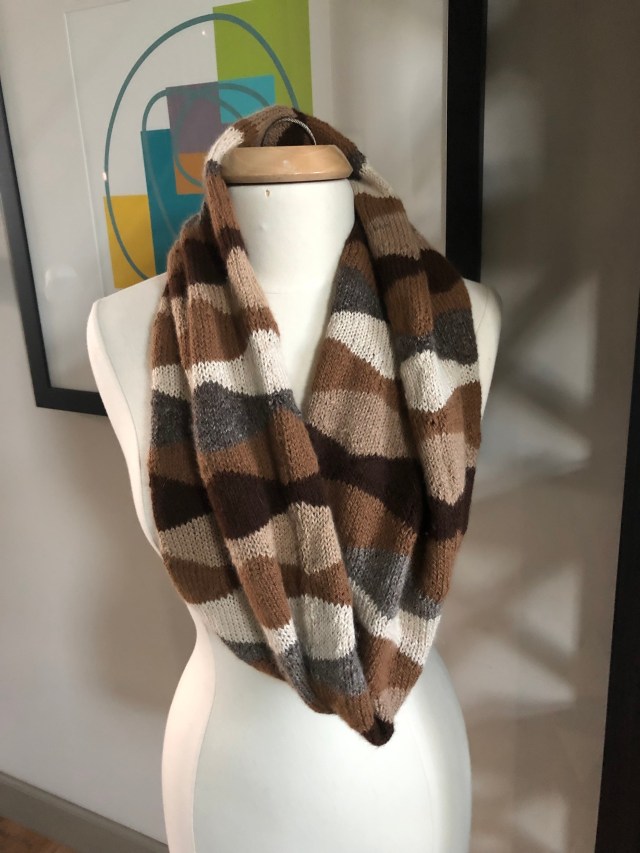
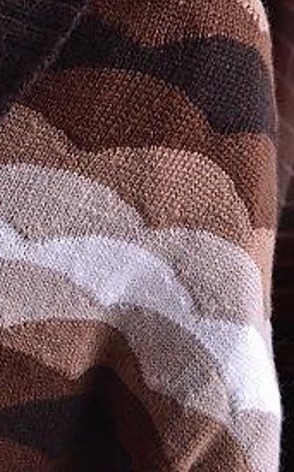
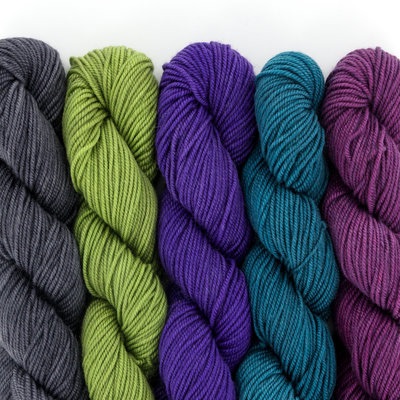
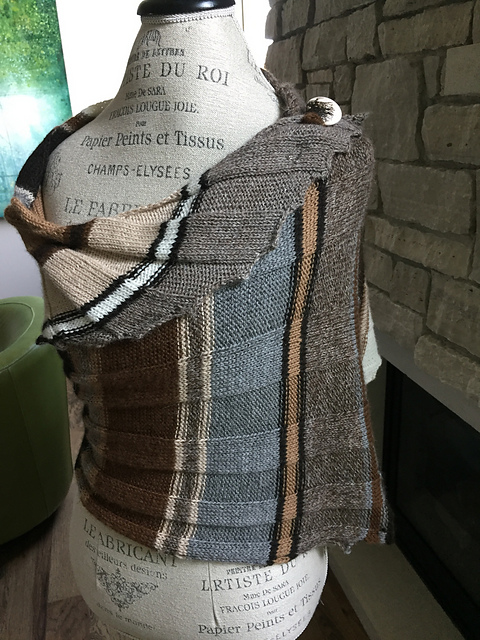
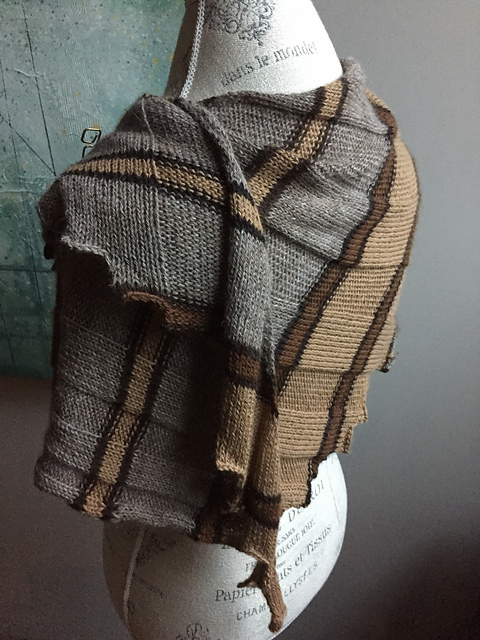
a total of 780 yards of fingering weight yarn, in multiple colors. I used: 130 yards ecru, 130 yards of light fawn, 130 yards of rose gray, 130 yards of dark brown, and 260 yards of medium brown alpaca (Der Bauernhof Farms) for the color scheme above, but you can use any color combination that you like. Each section of scallops requires about 25 yards of yarn, so this could be a stash-buster.
US 4/3.5 mm needles.
stitch markers
Gauge
22 sts x 32 rows in a 4 x 4 inches swatch. Slight variation in gauge will affect the width and length of the cowl, but are not critical to the finished fit or appearance of this project.
Expectations
I would like weekly feedback on your progress- updates, and questions by e-mail or Ravelry messages (mbaur).
You should make a project page on Ravelry and link it to the pattern once it is published. If you use the code: TEST-MB-TTRJQJ as your pattern name, Ravelry will automatically link to the finished pattern as soon as it is published.
Feedback on the pattern should be through e-mail or Ravelry messages and not through the public project page.
Once complete, a final photo of the blocked cowl added to your project page.
If you are interested, let me know in the comments and I will send the draft pattern to you by e-mail.
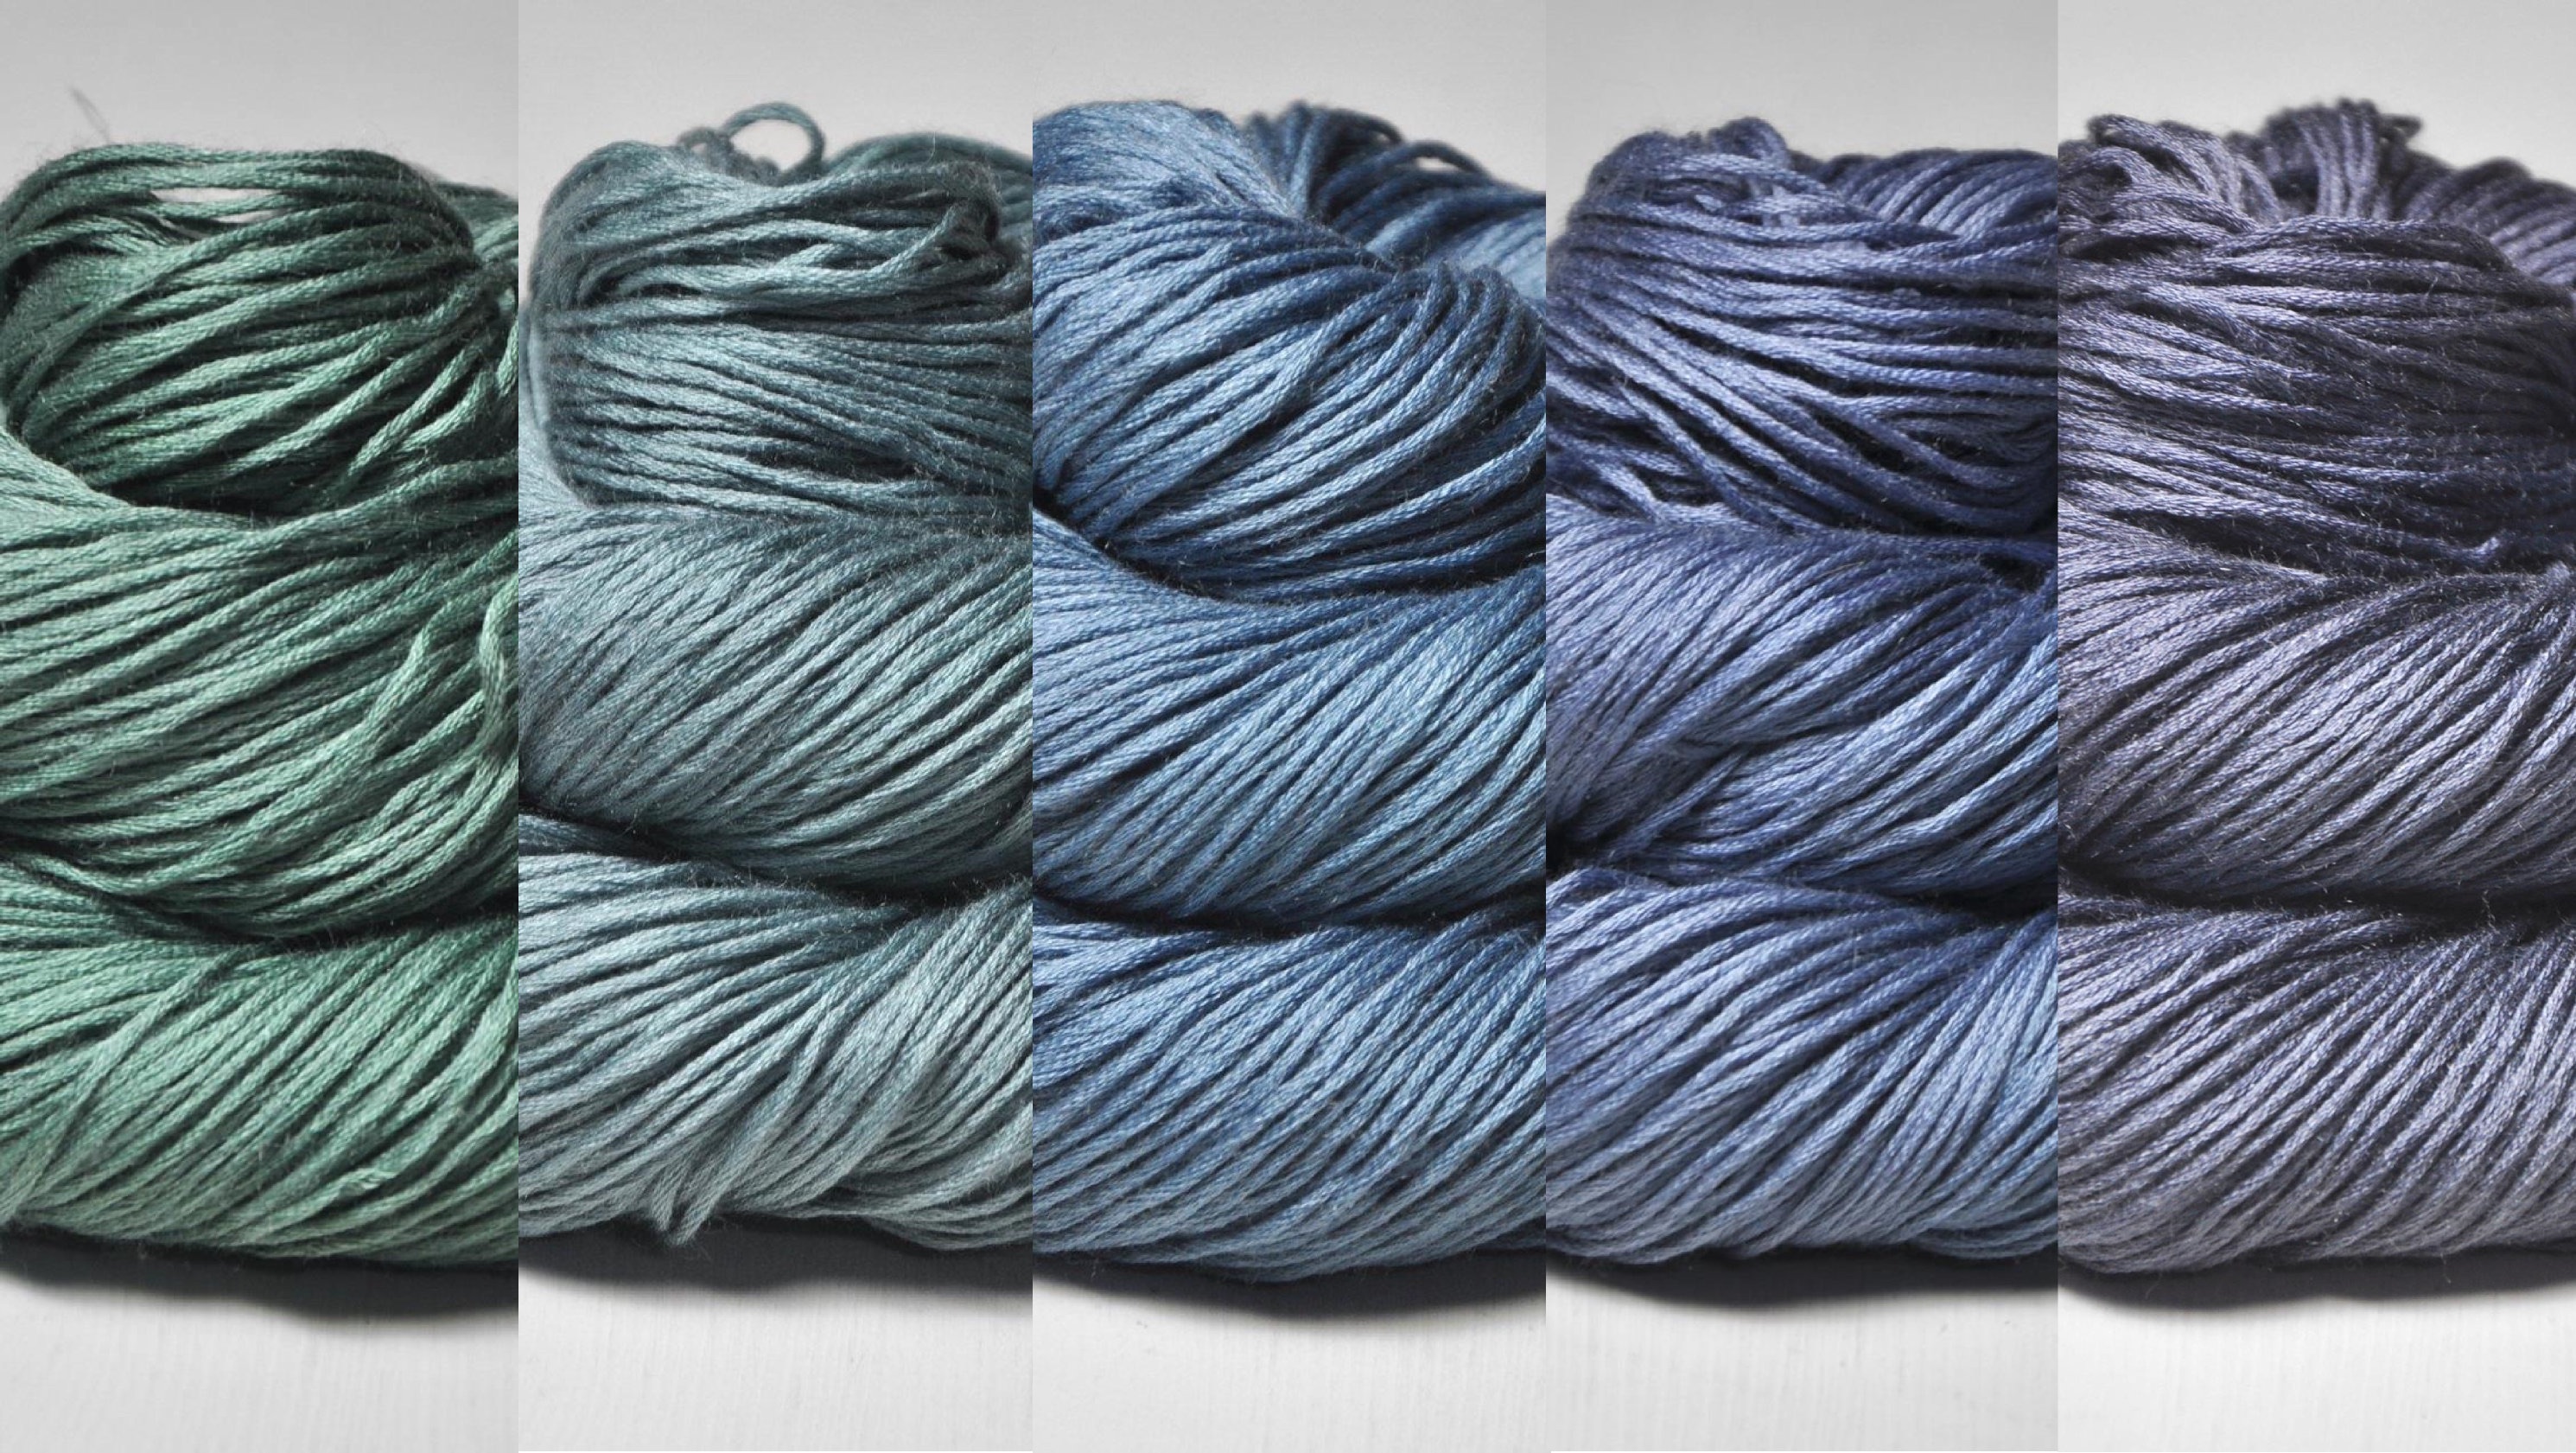
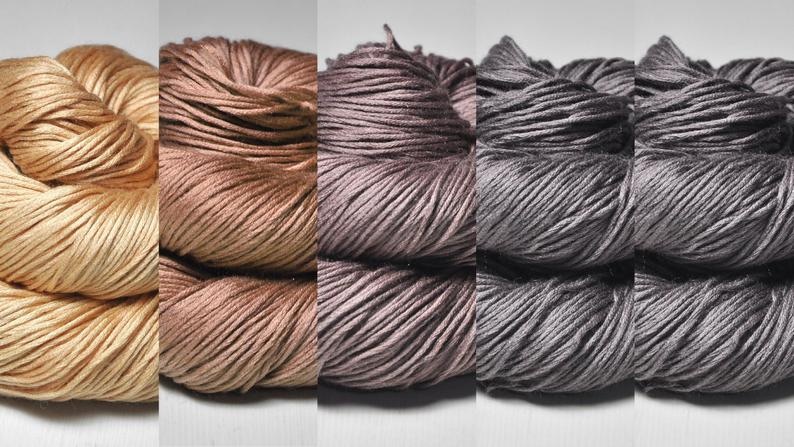
Possible Color Schemes
I think this would be lovely in a gradient set as well. Pictured below are the natural colors of alpaca in a different order – ranging from white to dark brown – and three gradient set samples (examples from DyeForYarn Etsy shop and Wonderland Yarns).
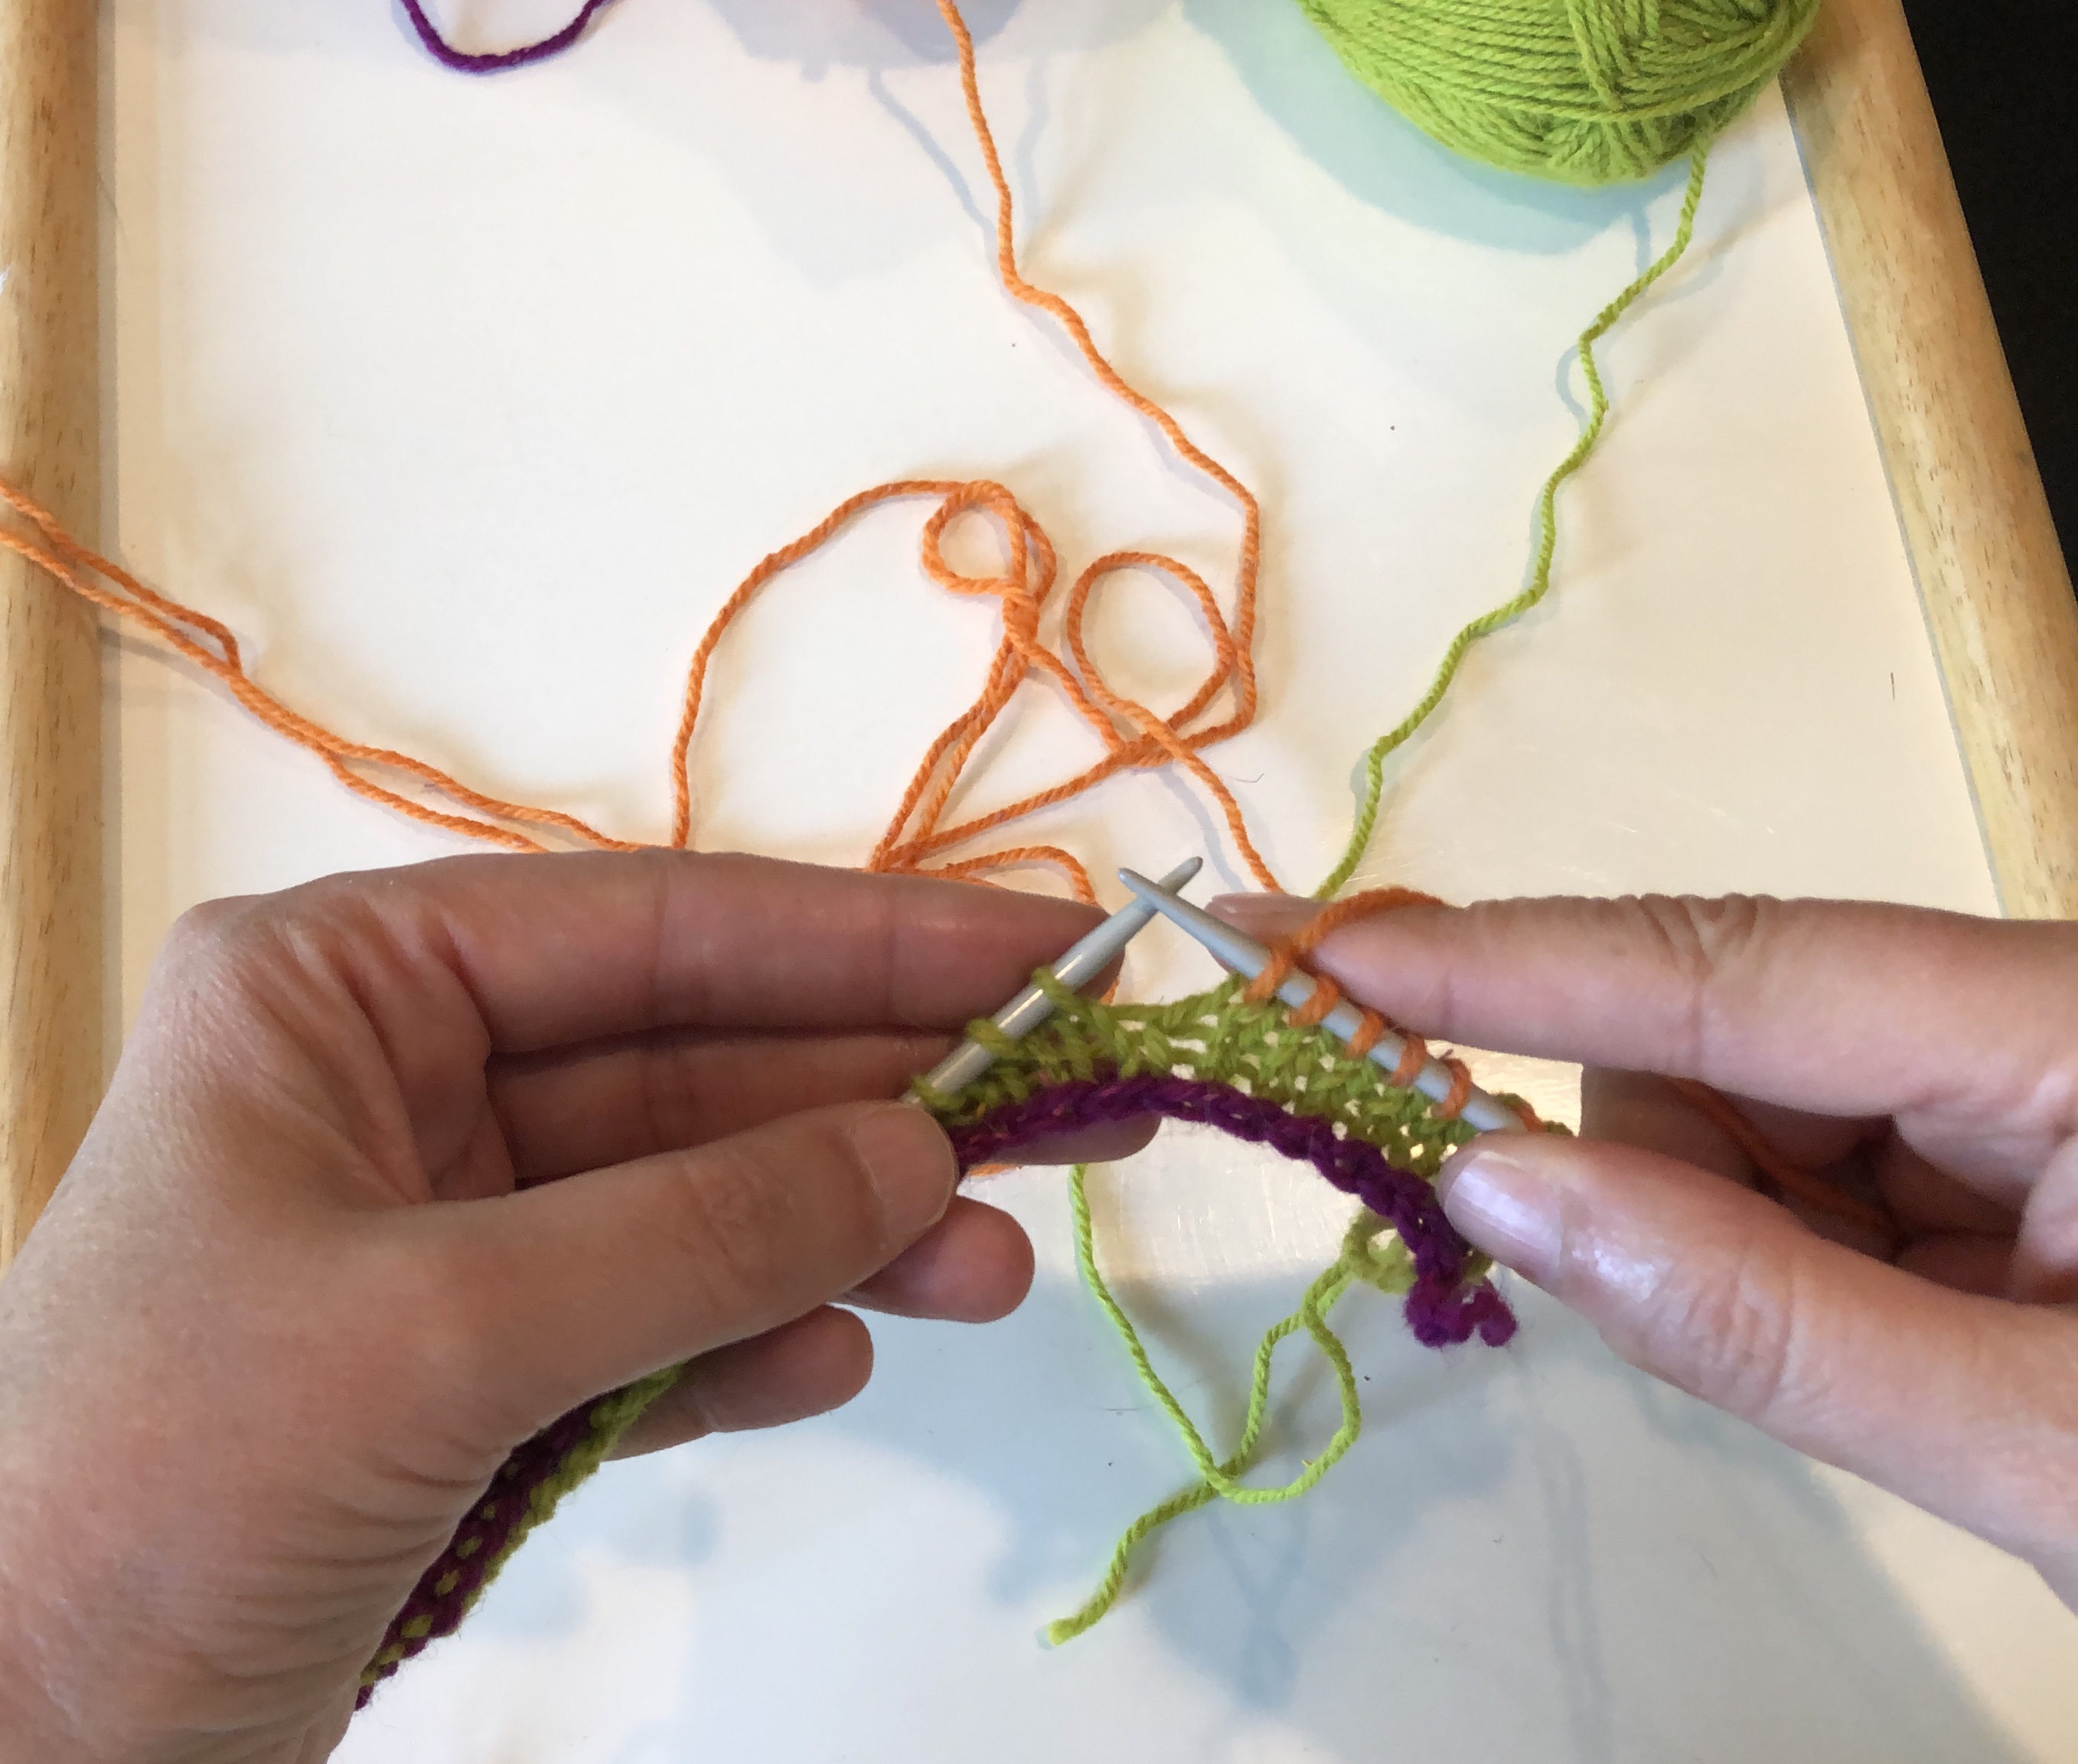
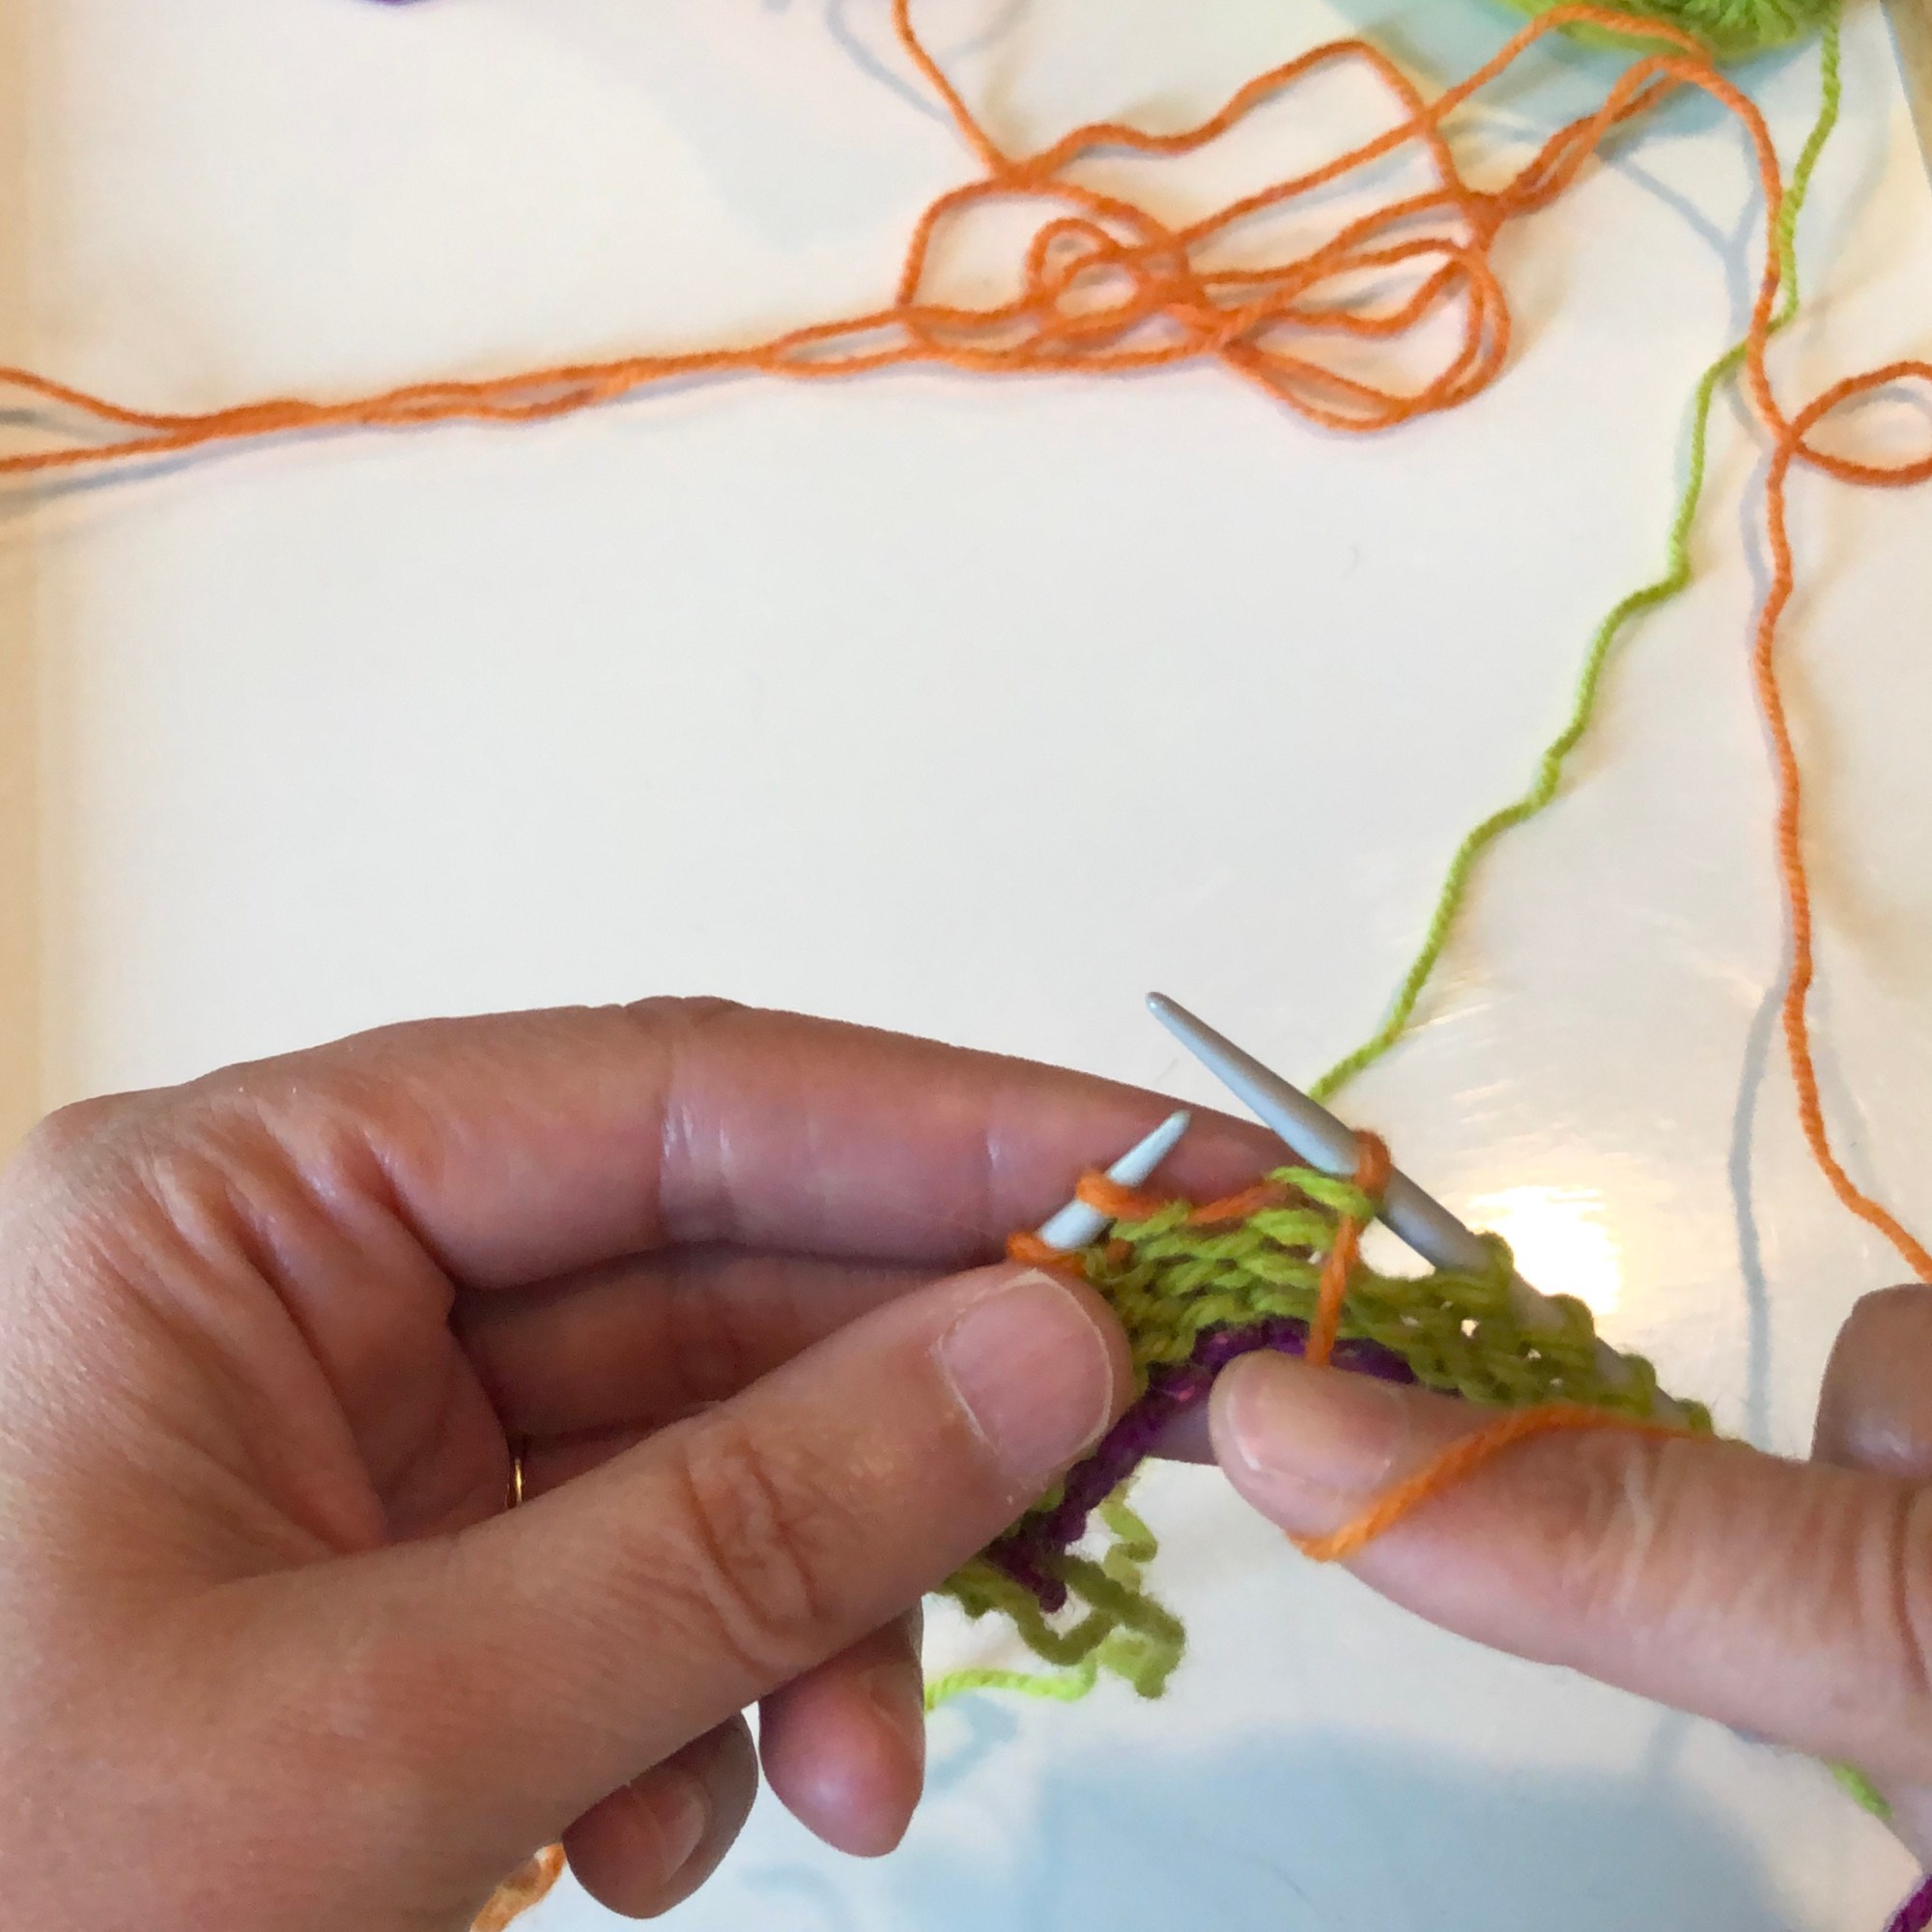
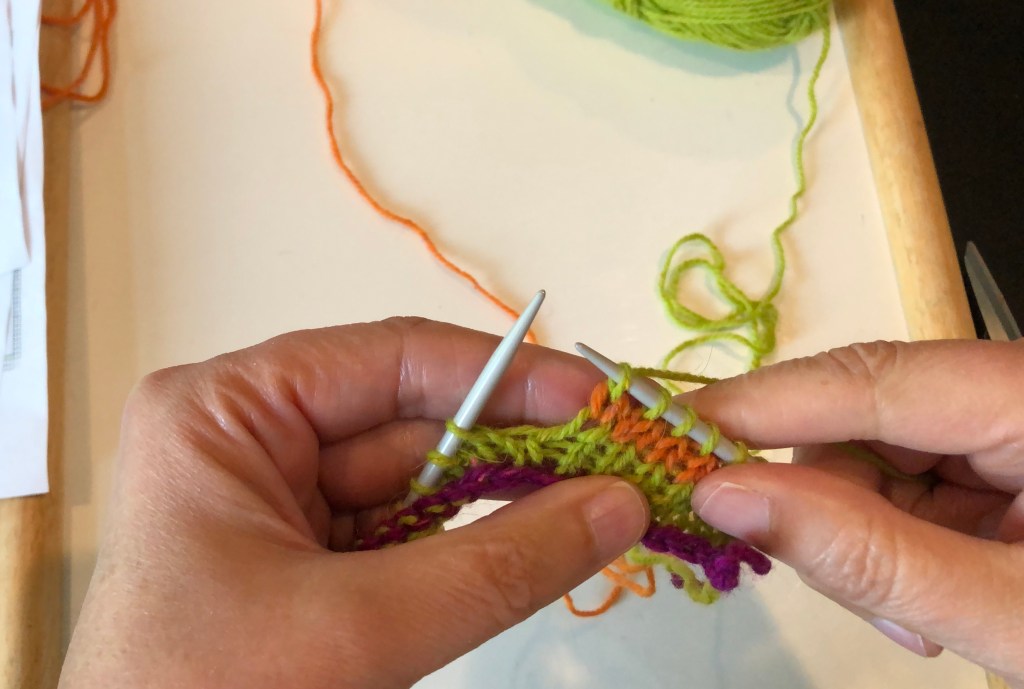
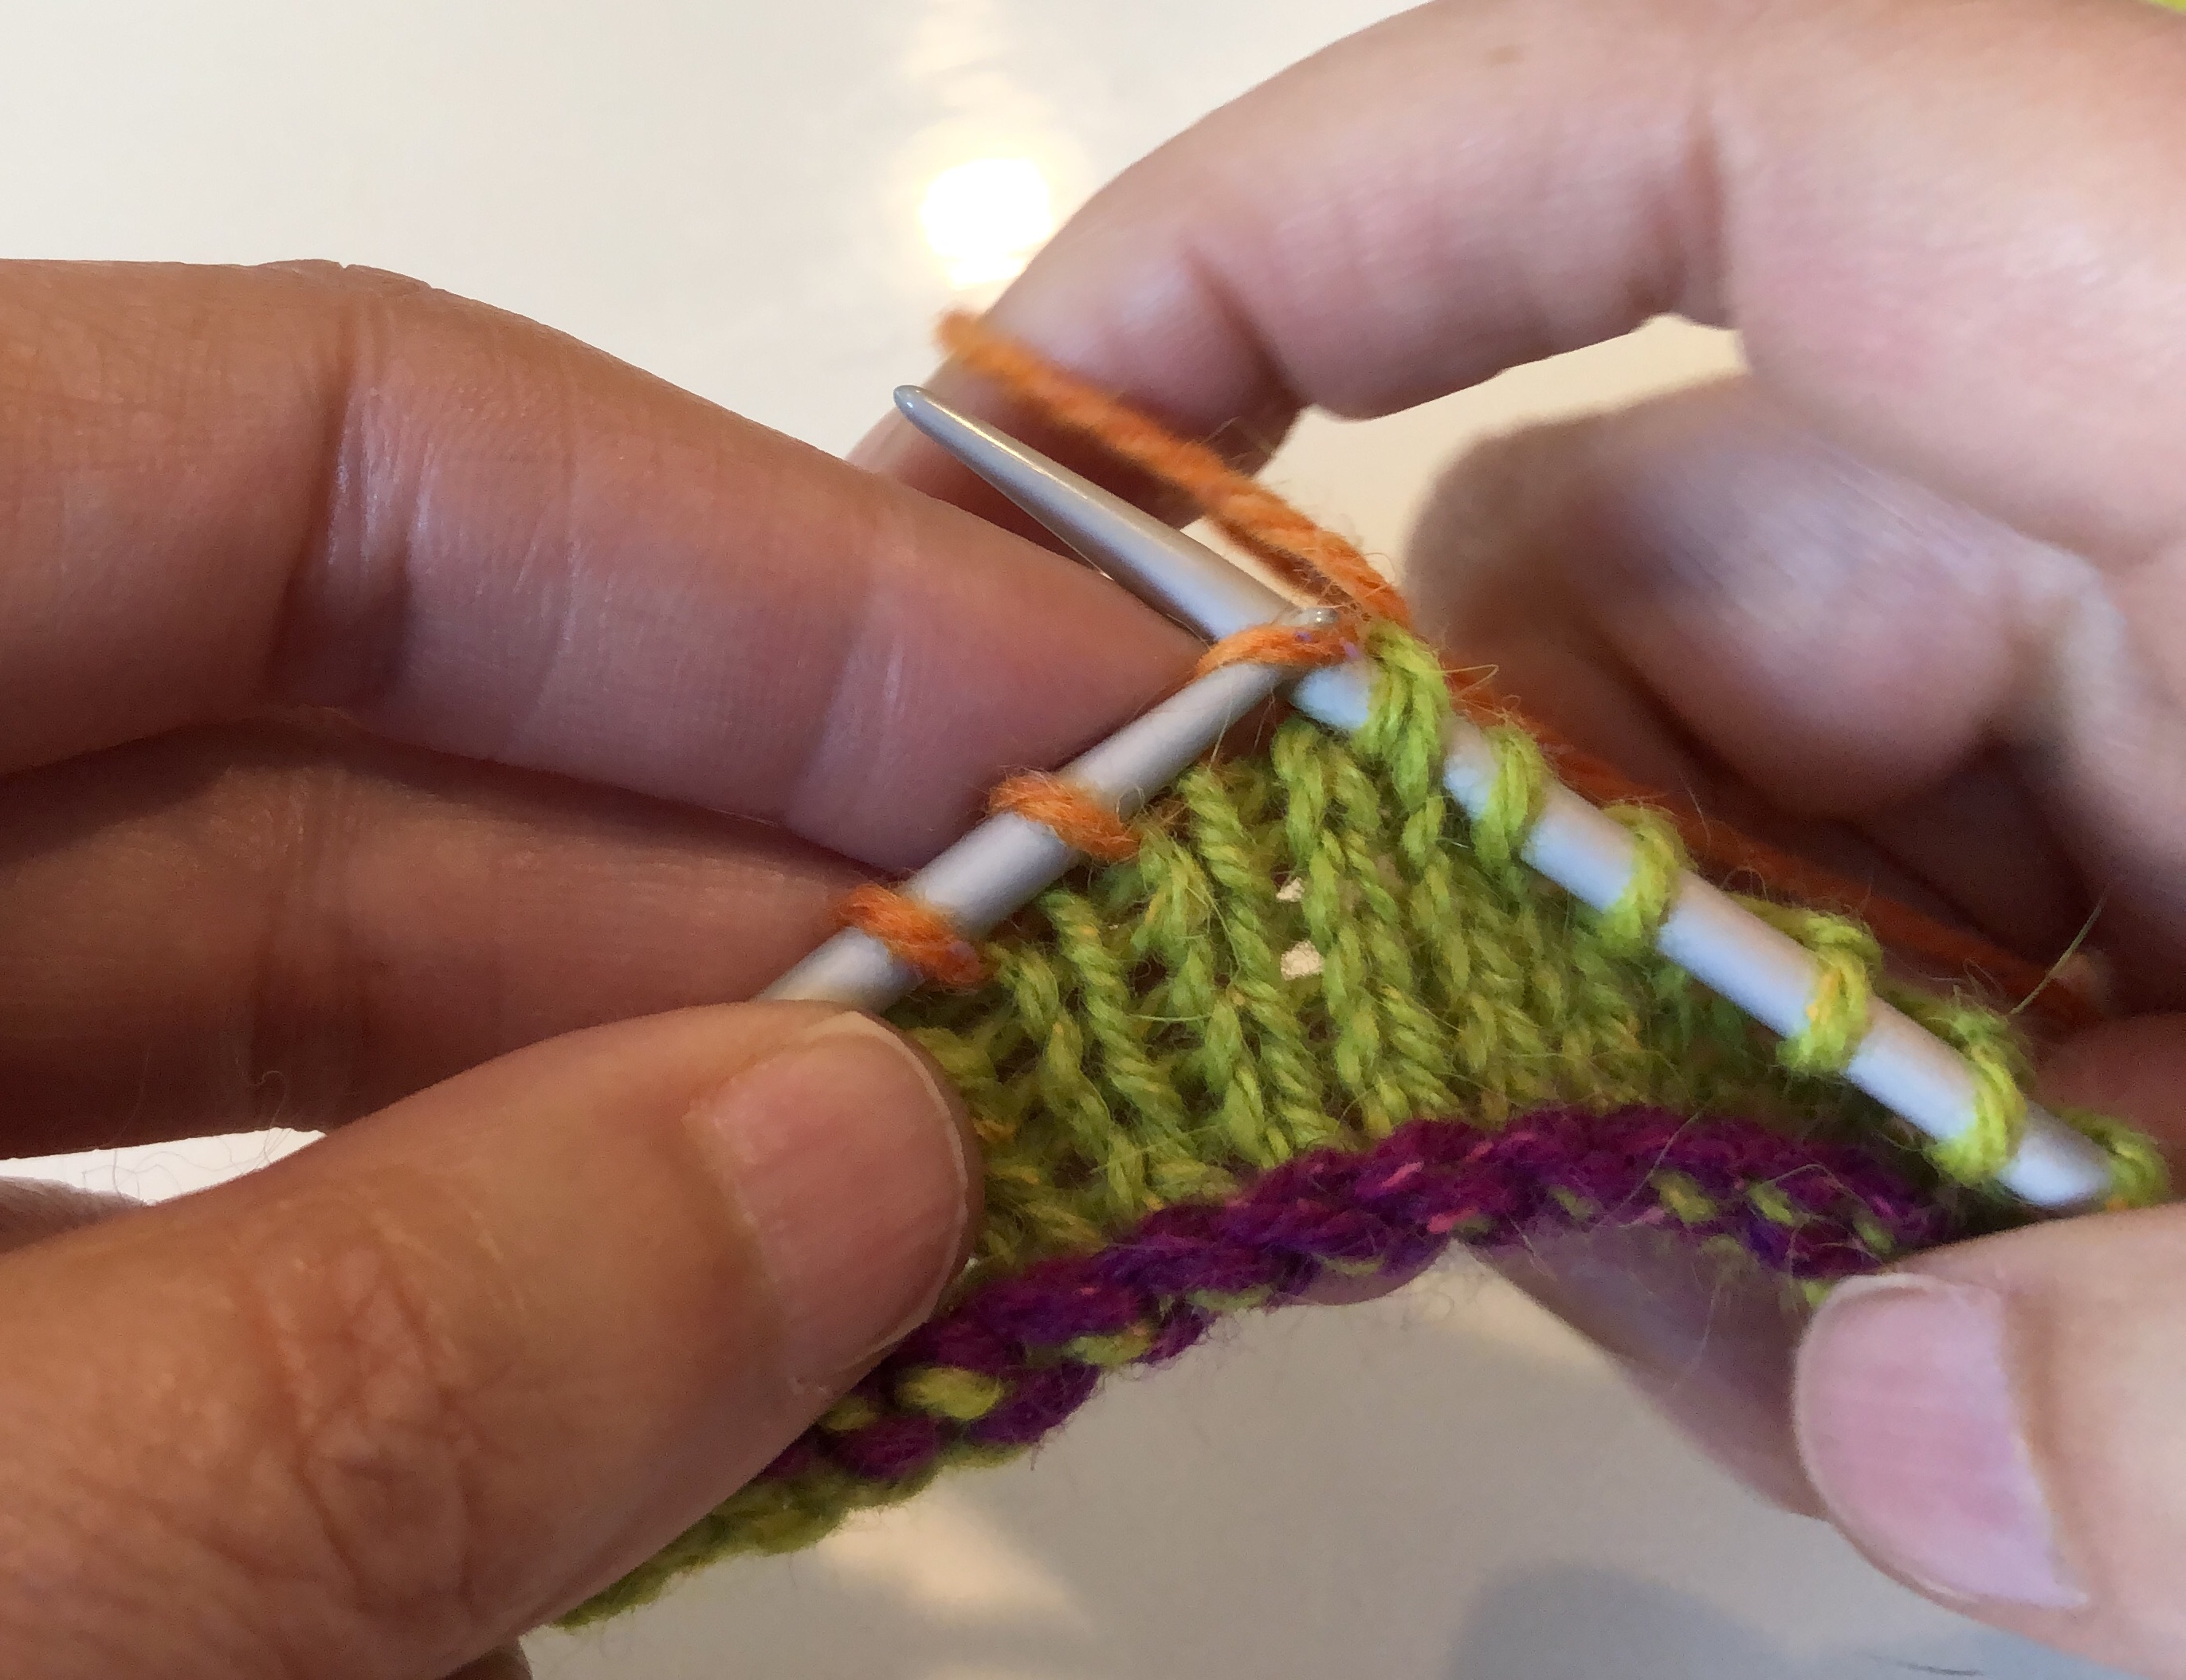
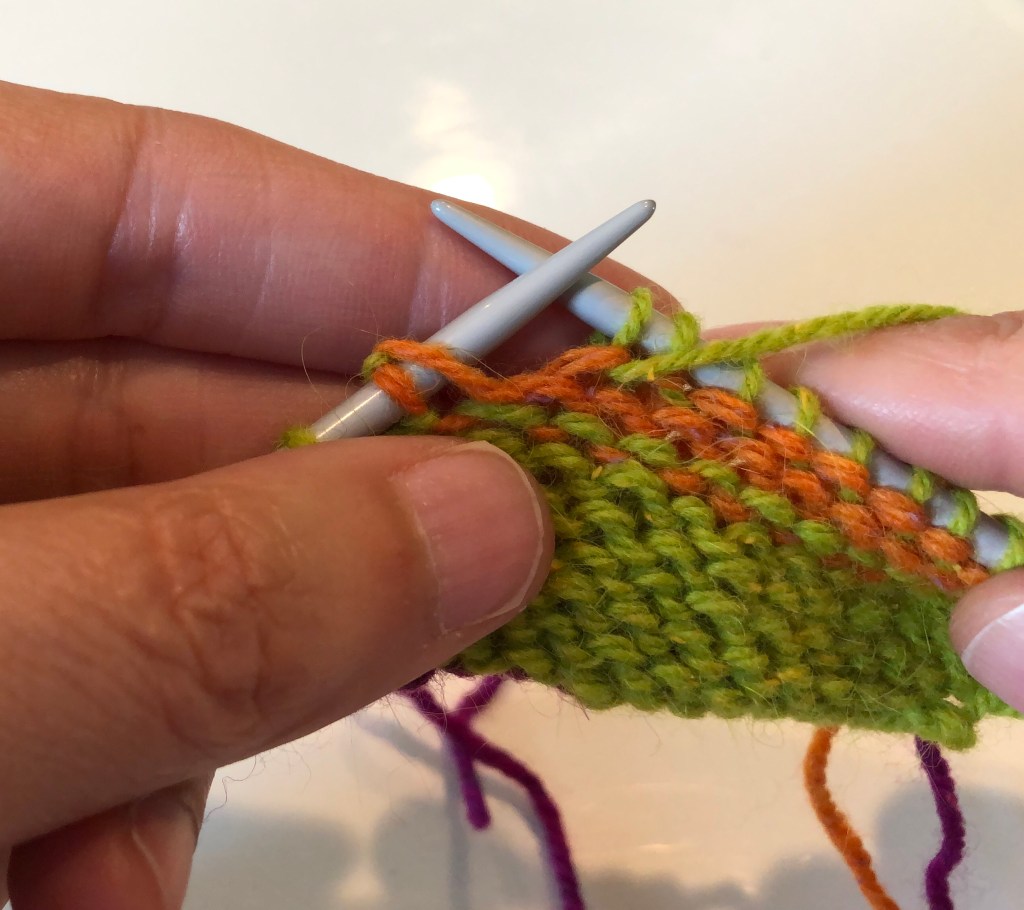
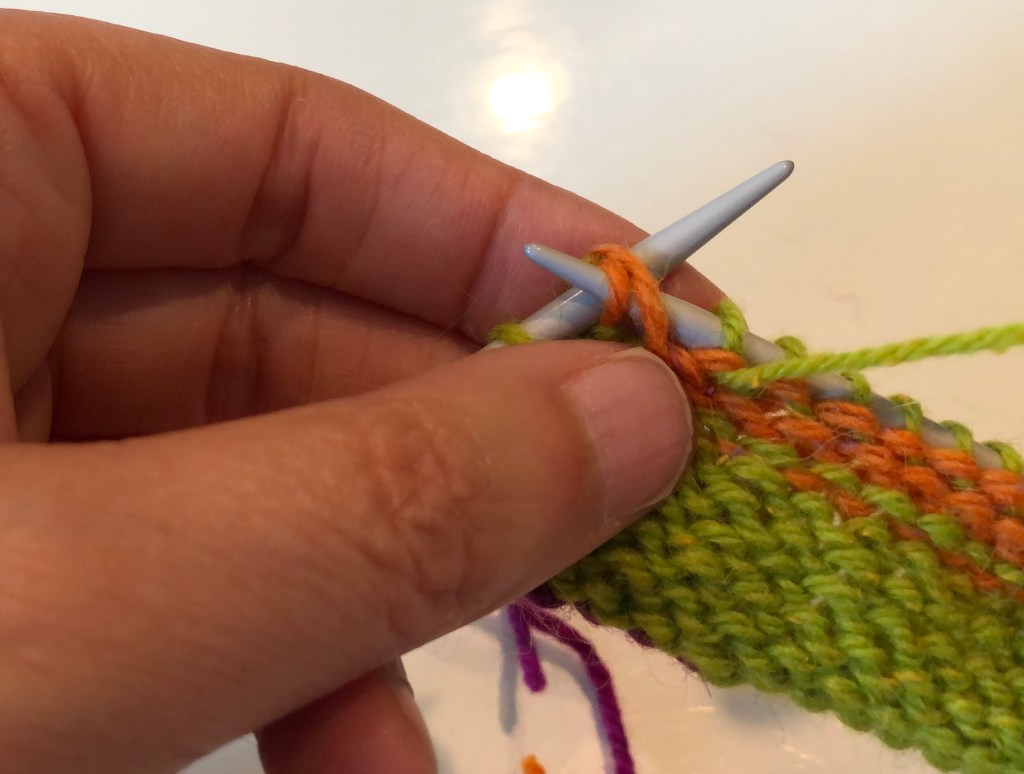
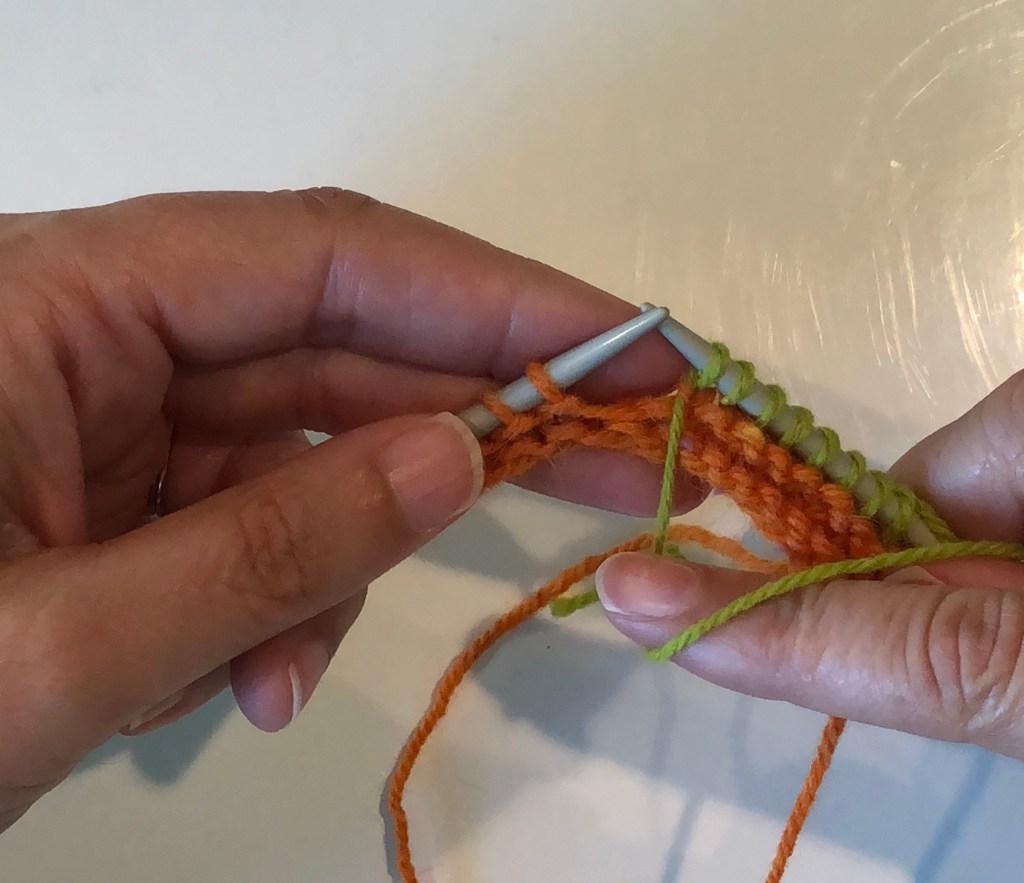
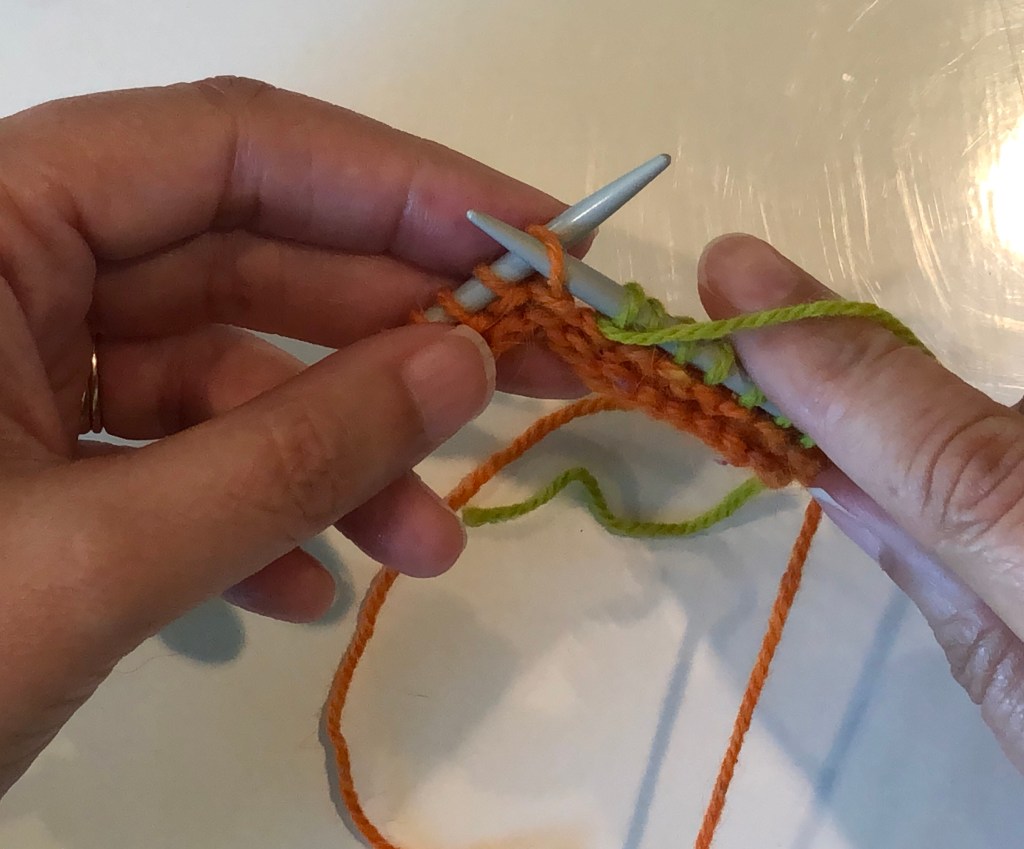
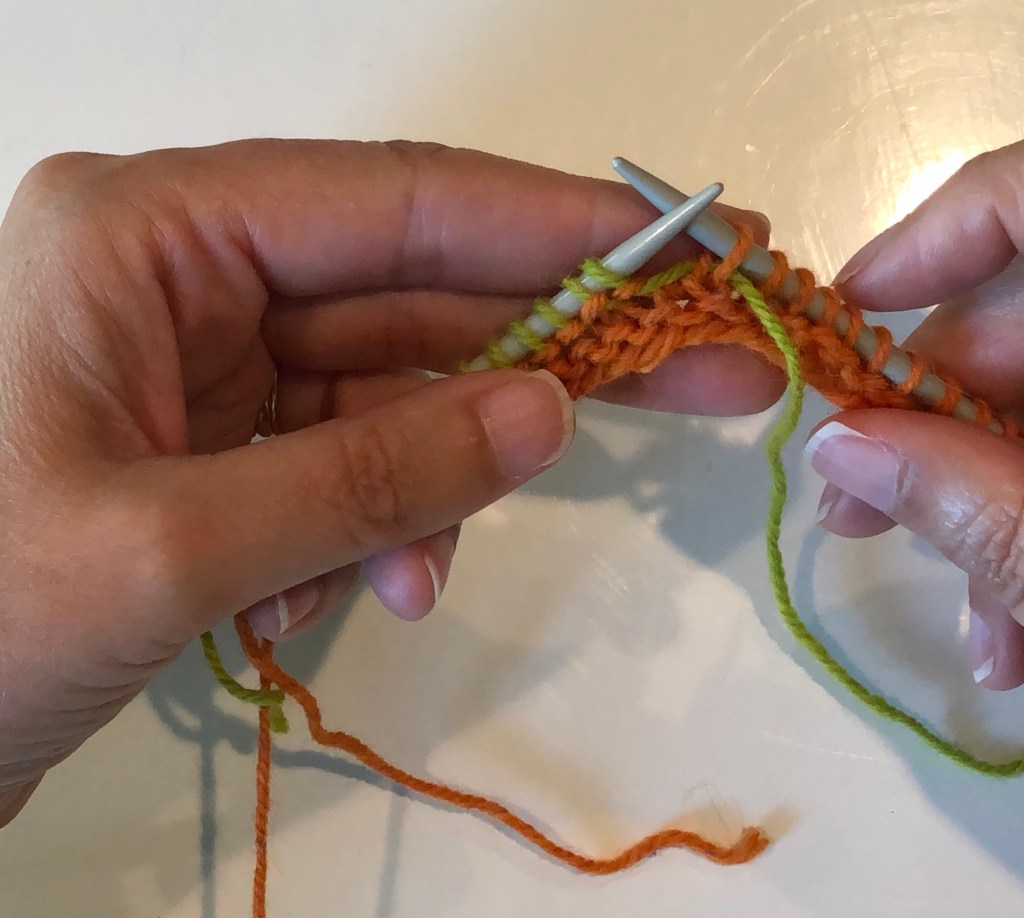
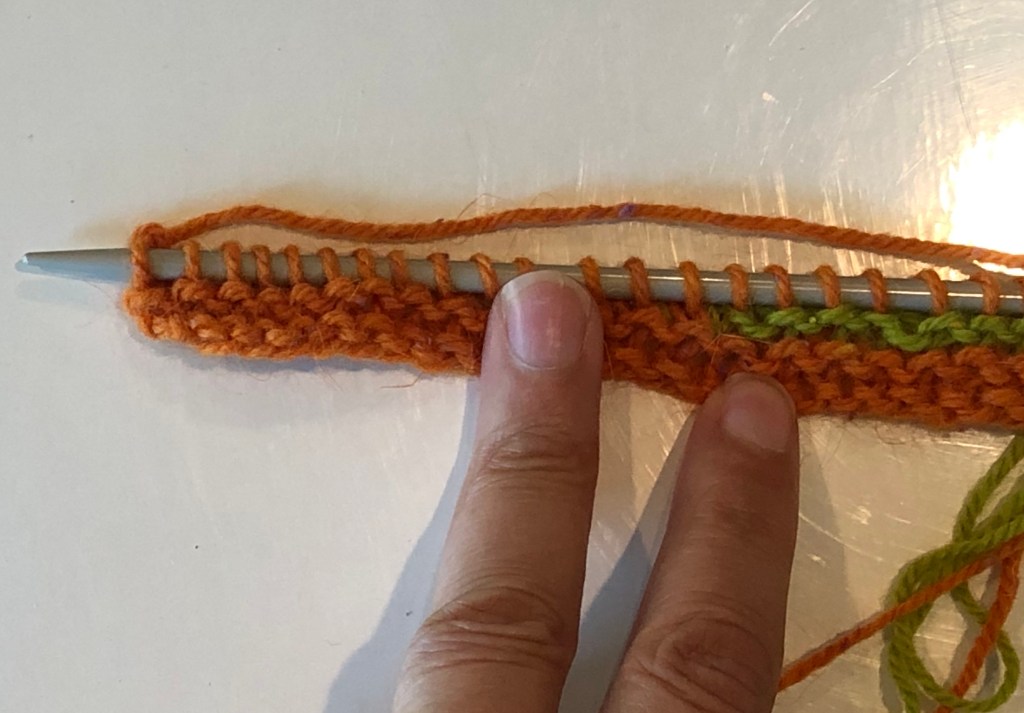
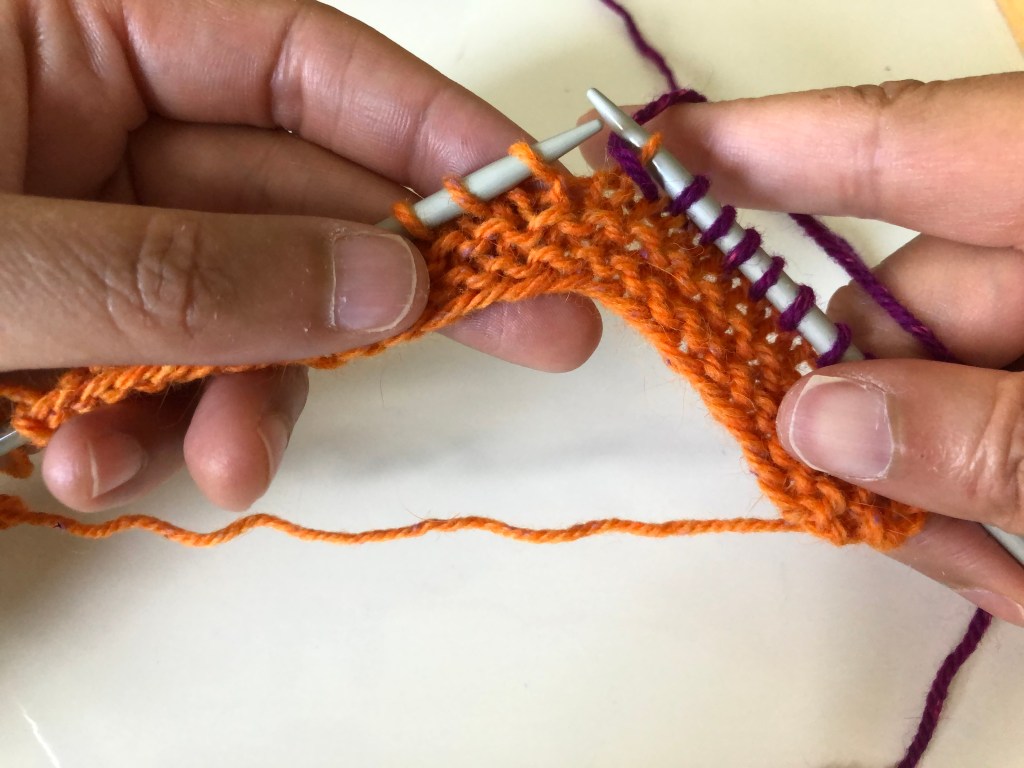
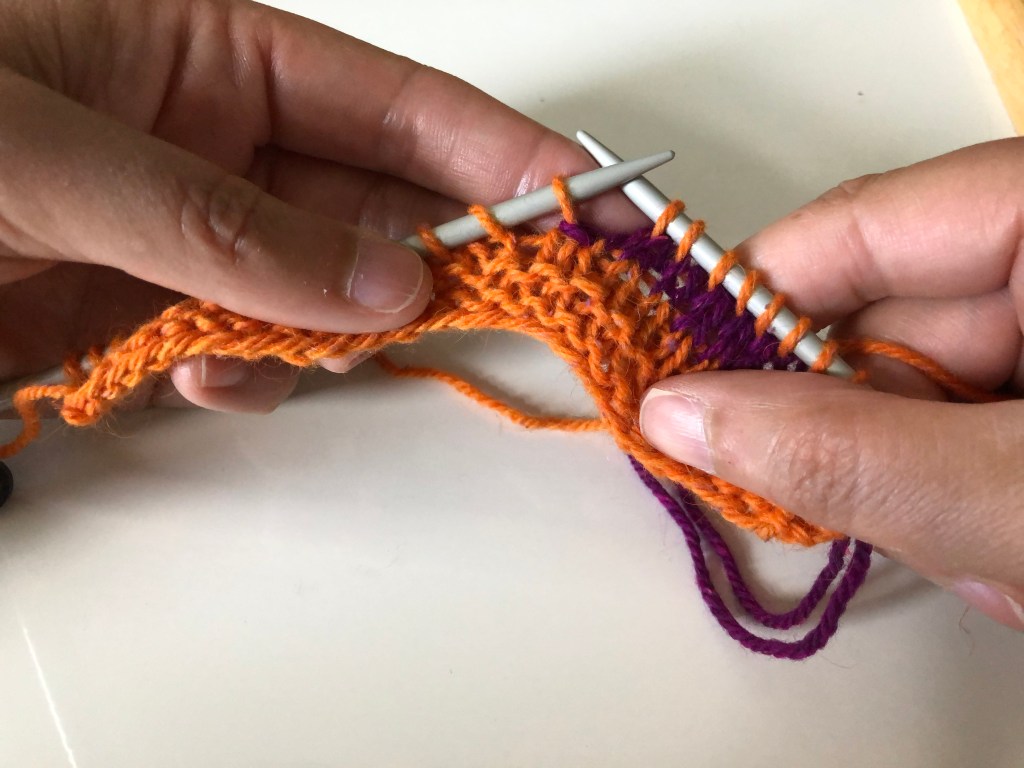
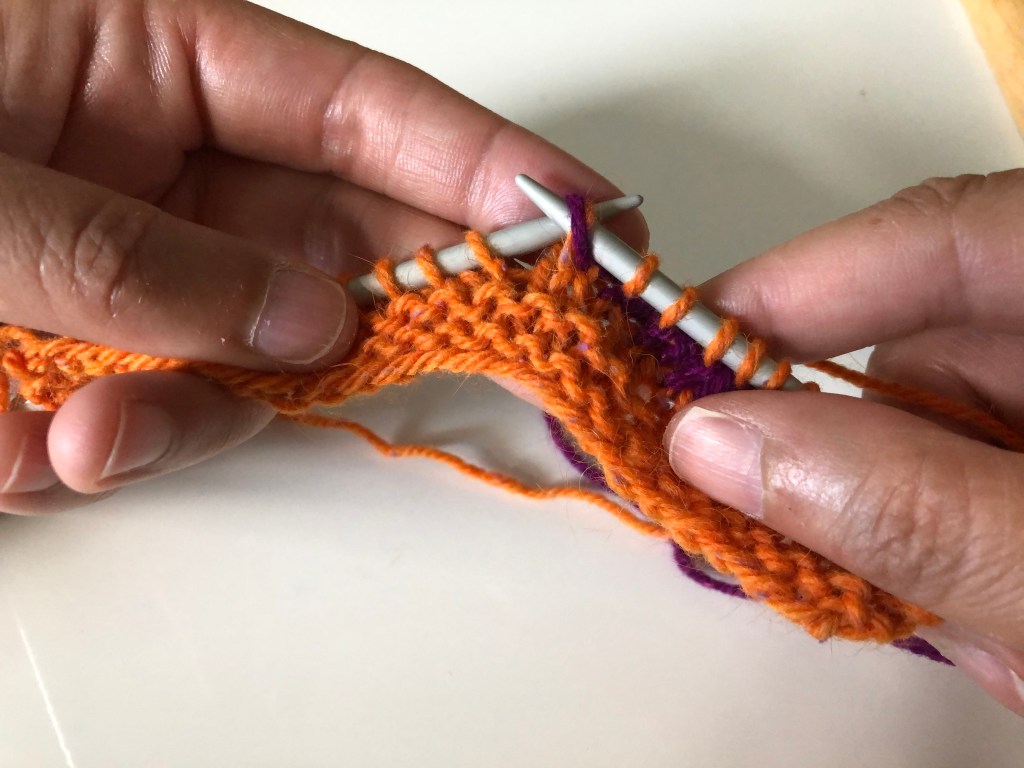
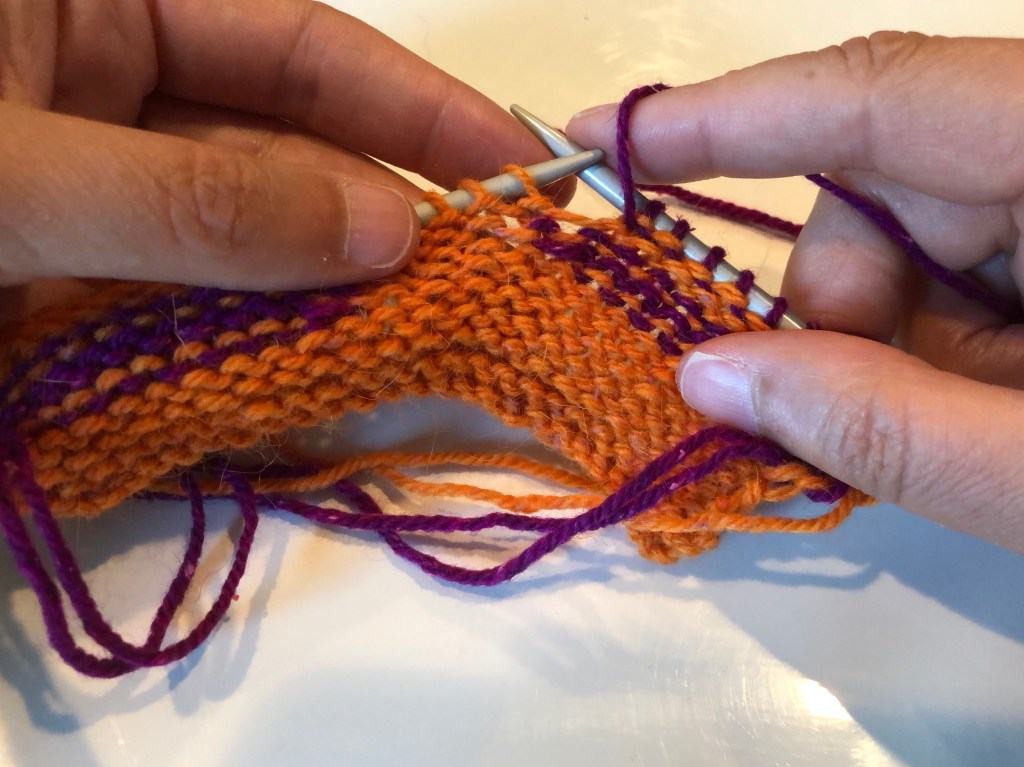
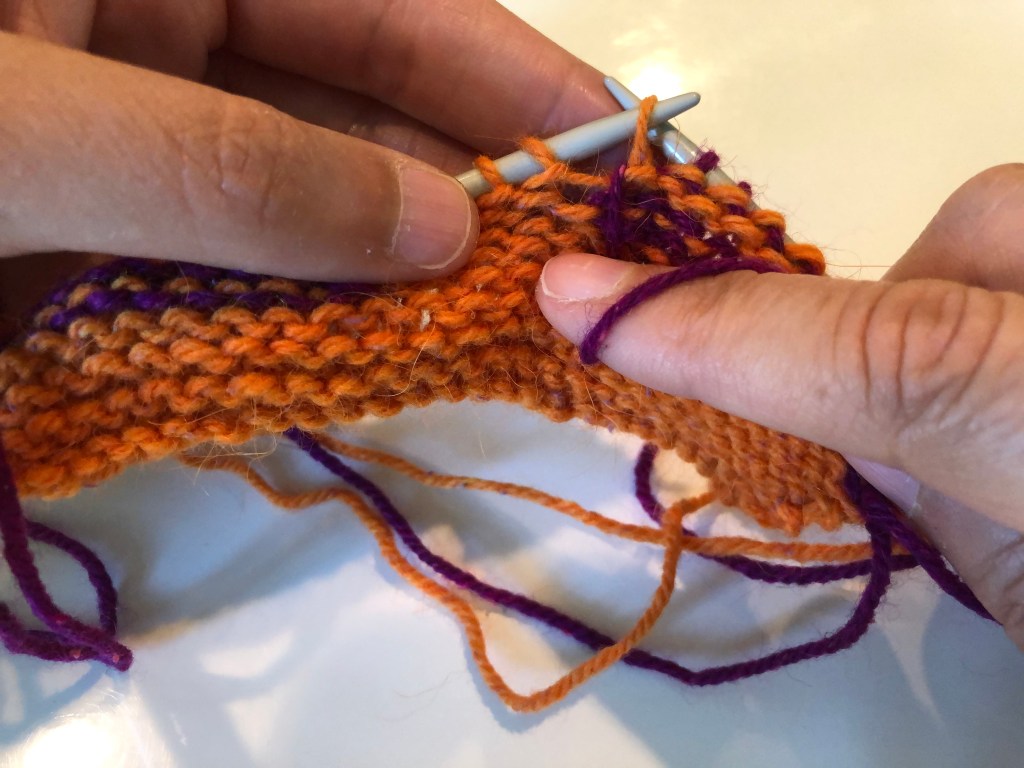
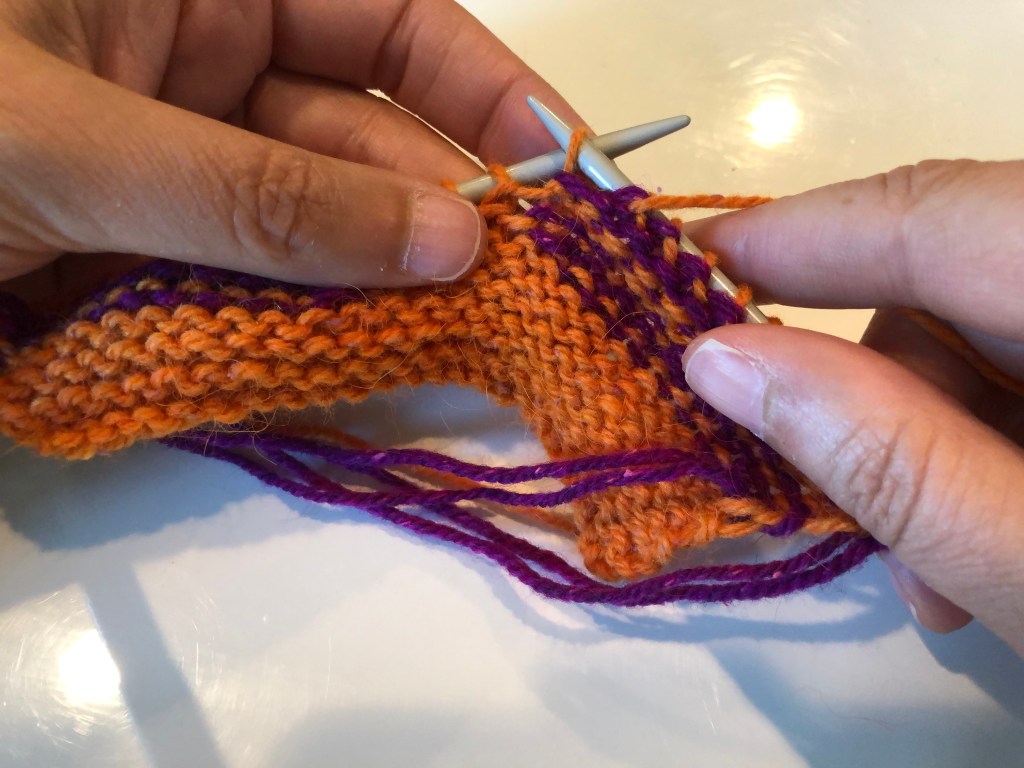
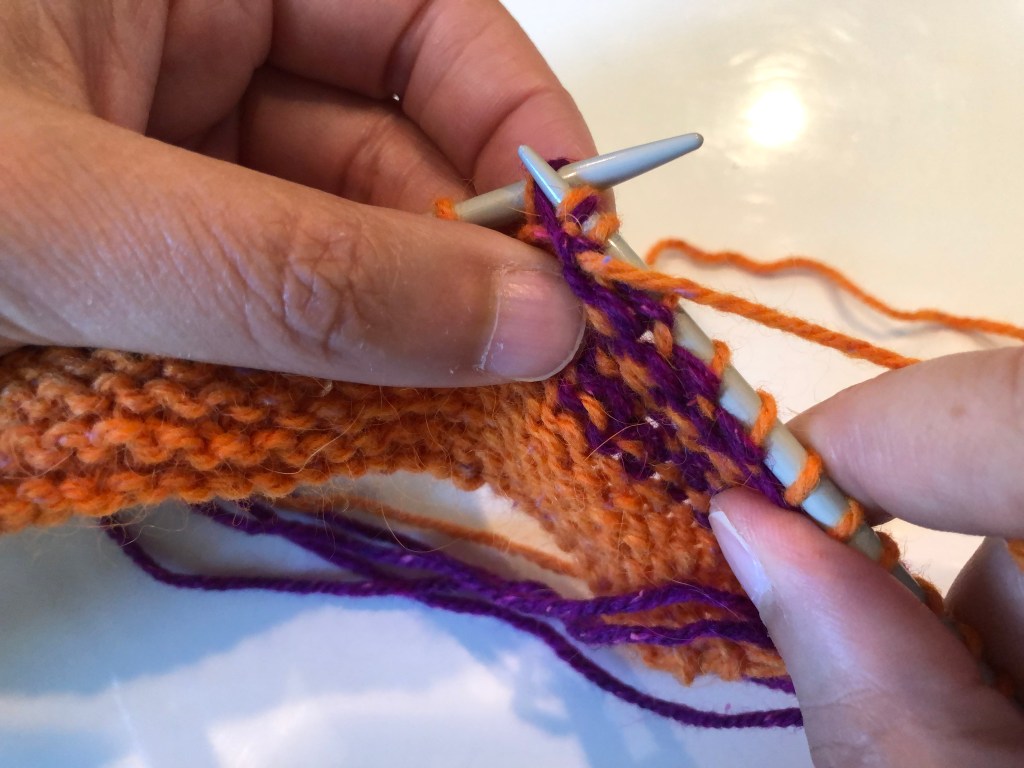
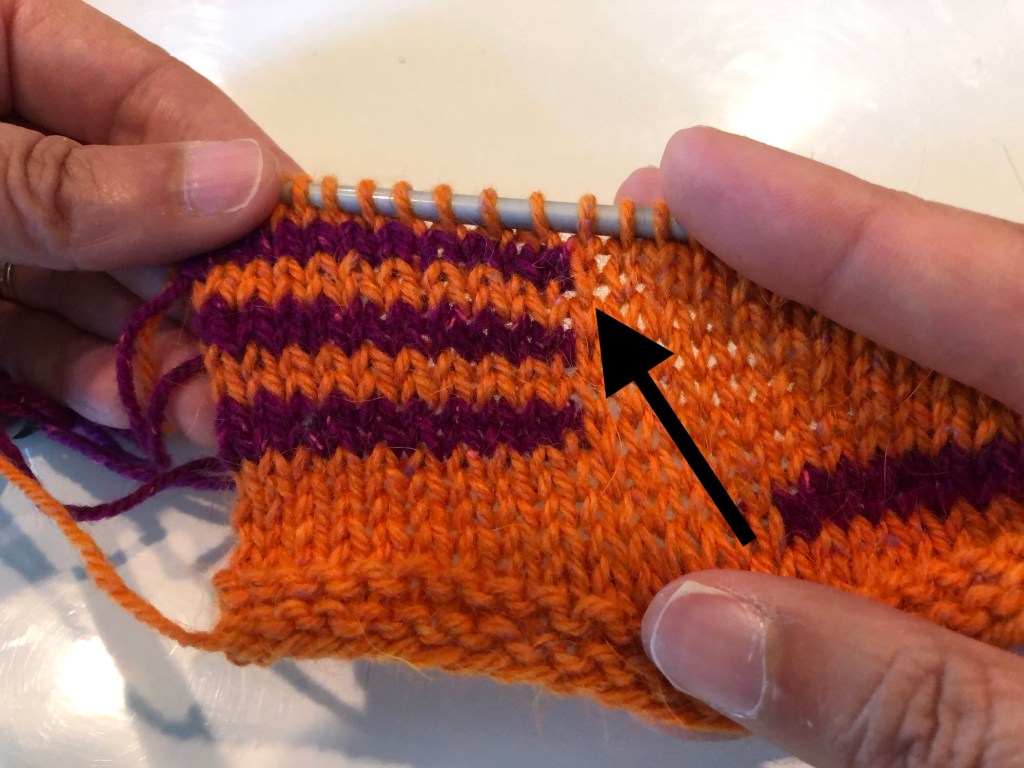
My preferred method for short rows in stockinette stitch, is known as the German-style short row. I like to refer to it as the up-and-over method, because you pull the working yarn of the turned stitch up and over the needle before you begin working the next row. Like wrap-and-turn short rows, there are two parts: working the turn and working through the turned stitch.
Working the Turn: Right Side of Stockinette
For this type of short row, you will work up to the turning point and turn the work. Easy!
Next, you will transfer the first stitch (purlwise) to the right-hand needle.
After you have transferred the stitch, you pull the working yarn up-and-over the right-hand needle, and then move the working yarn back to the front to begin purling the stitches in the wrong side row.
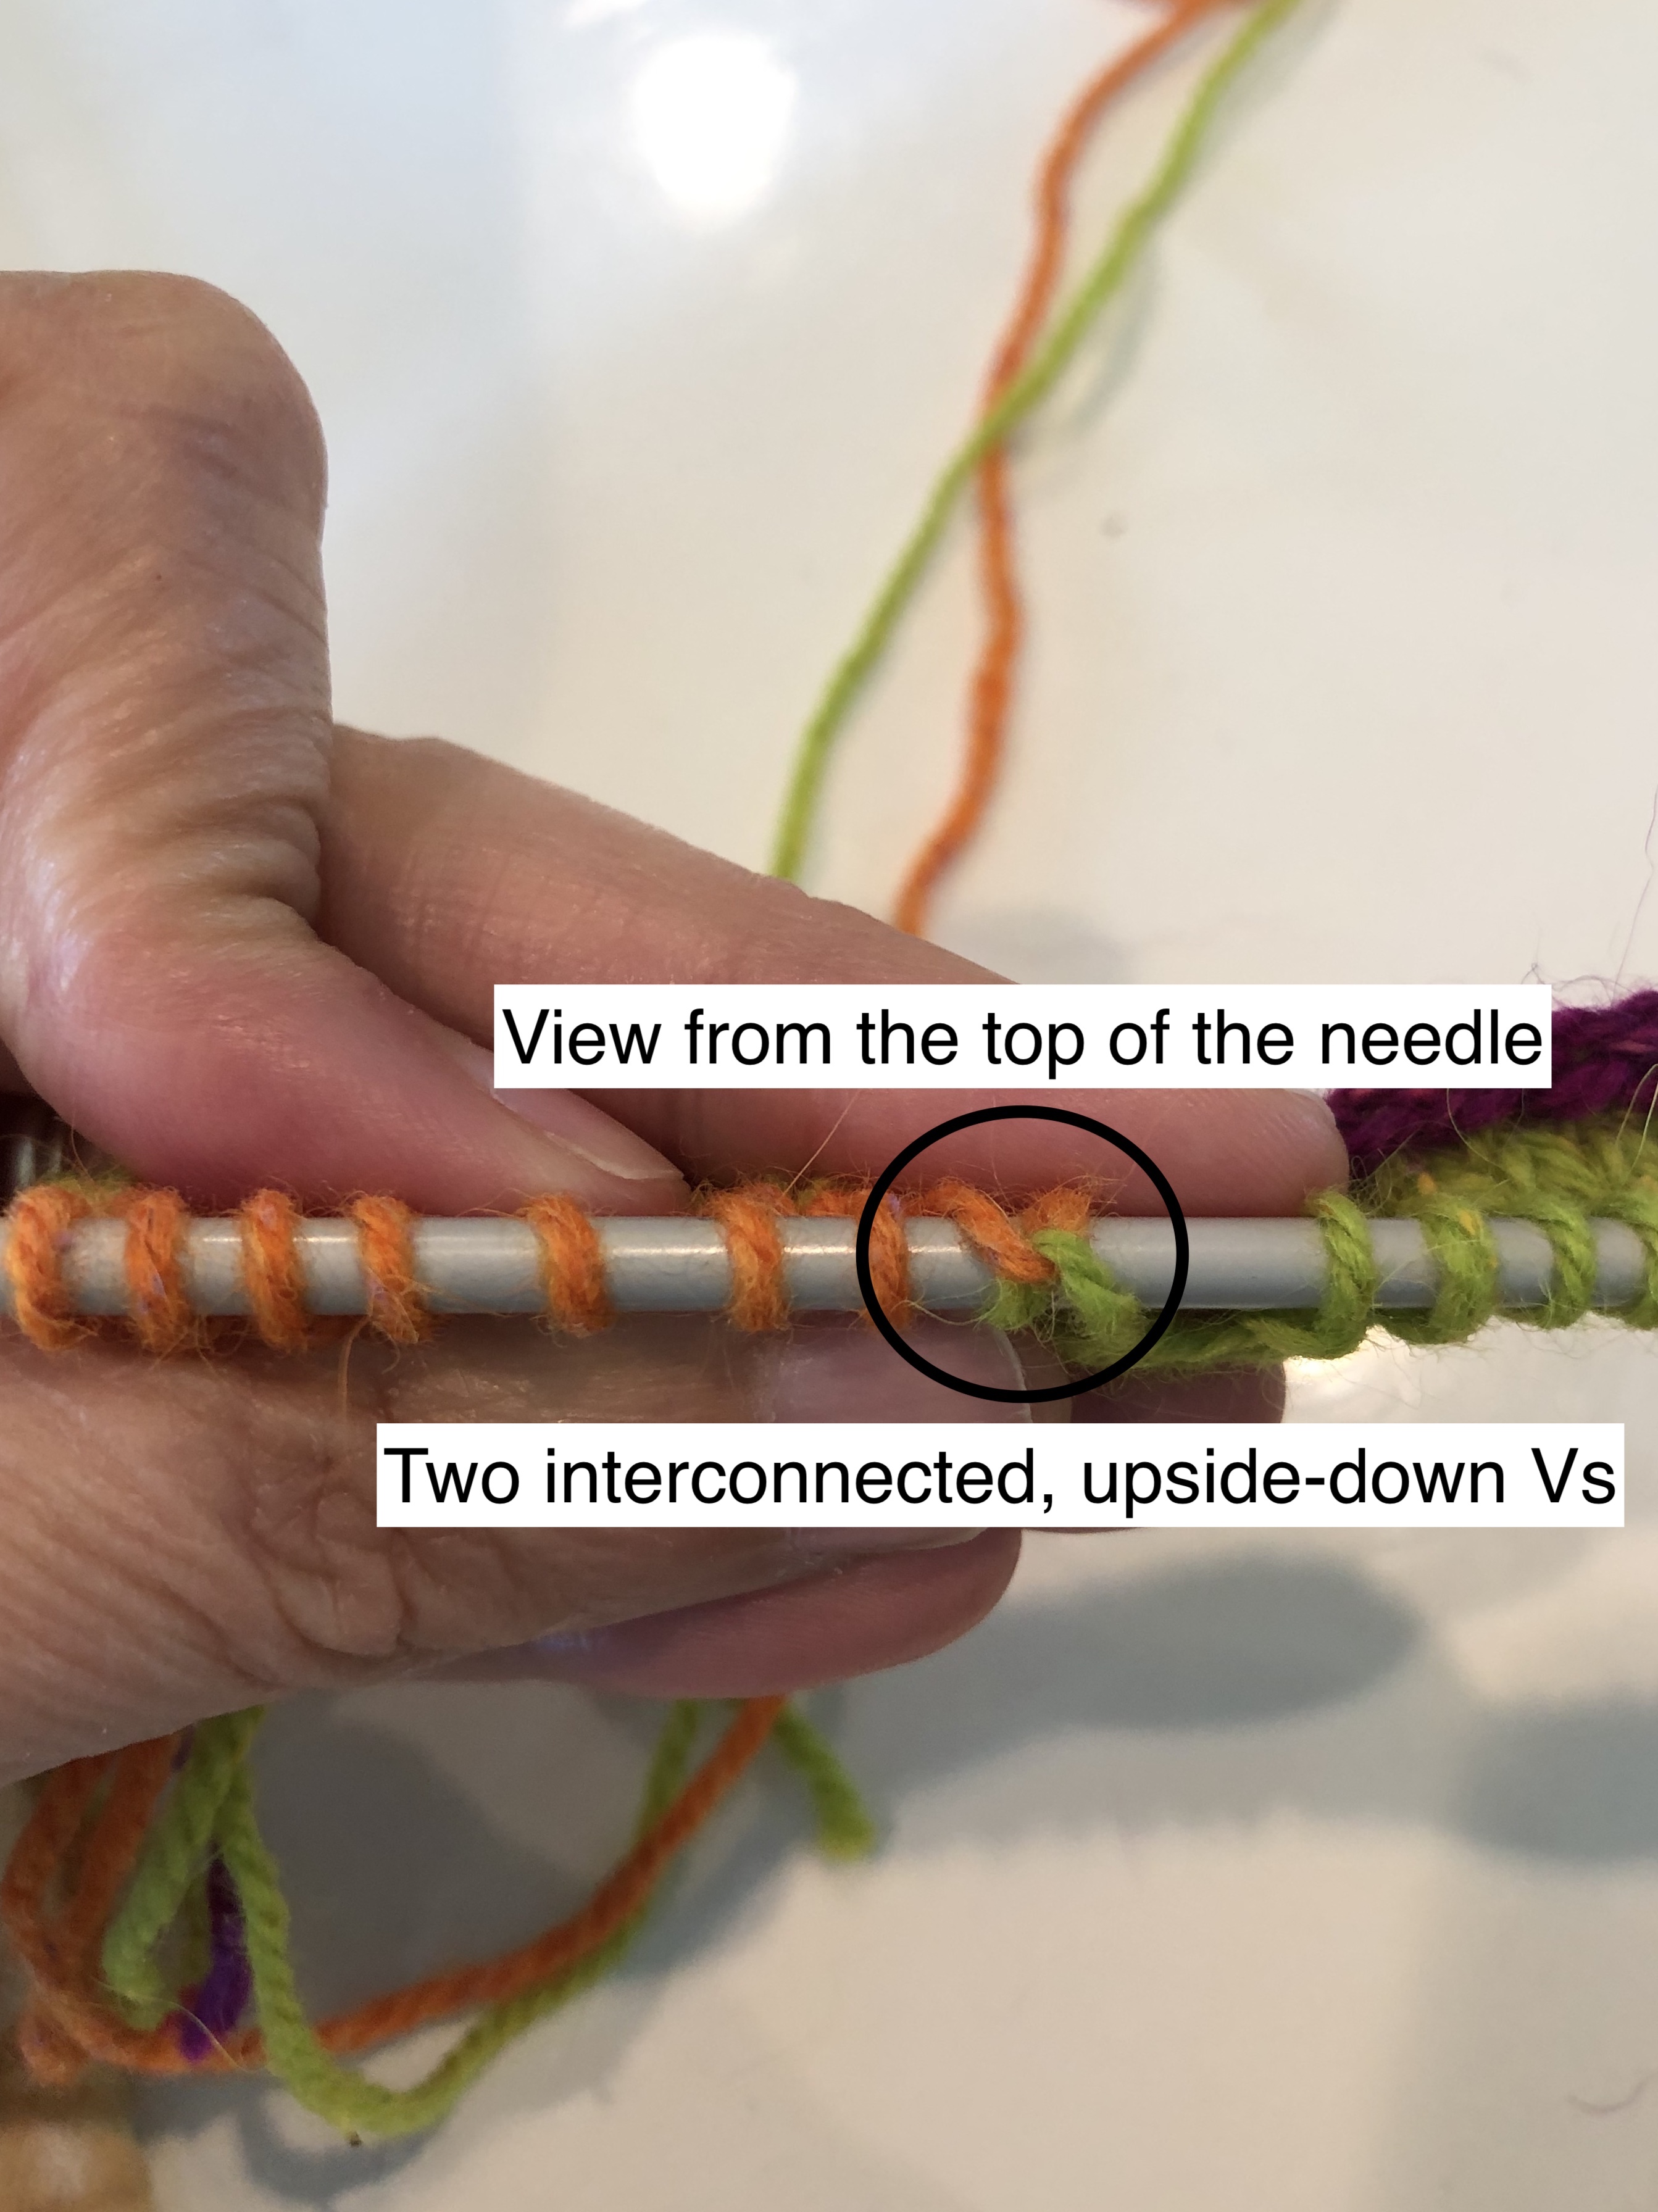
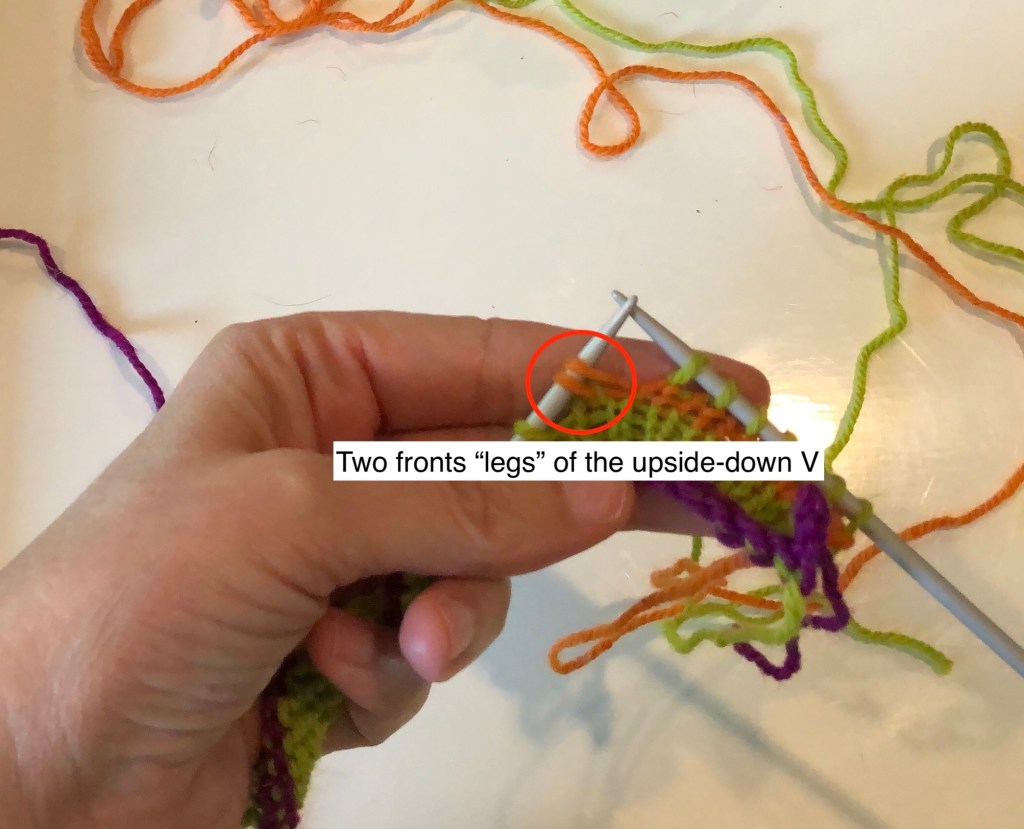
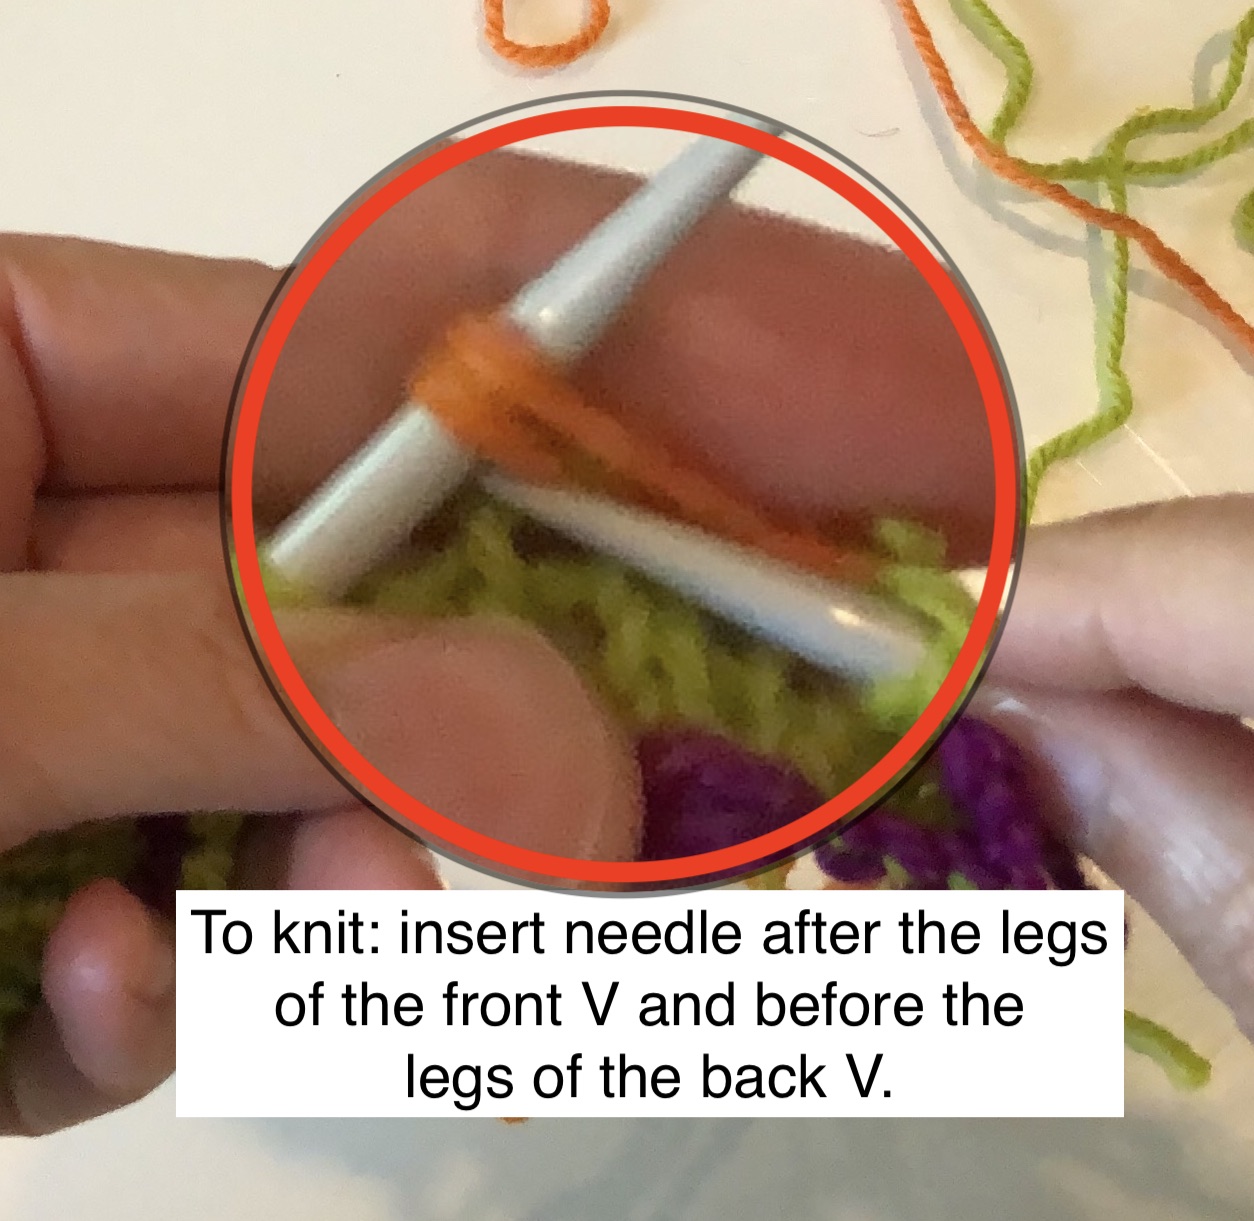
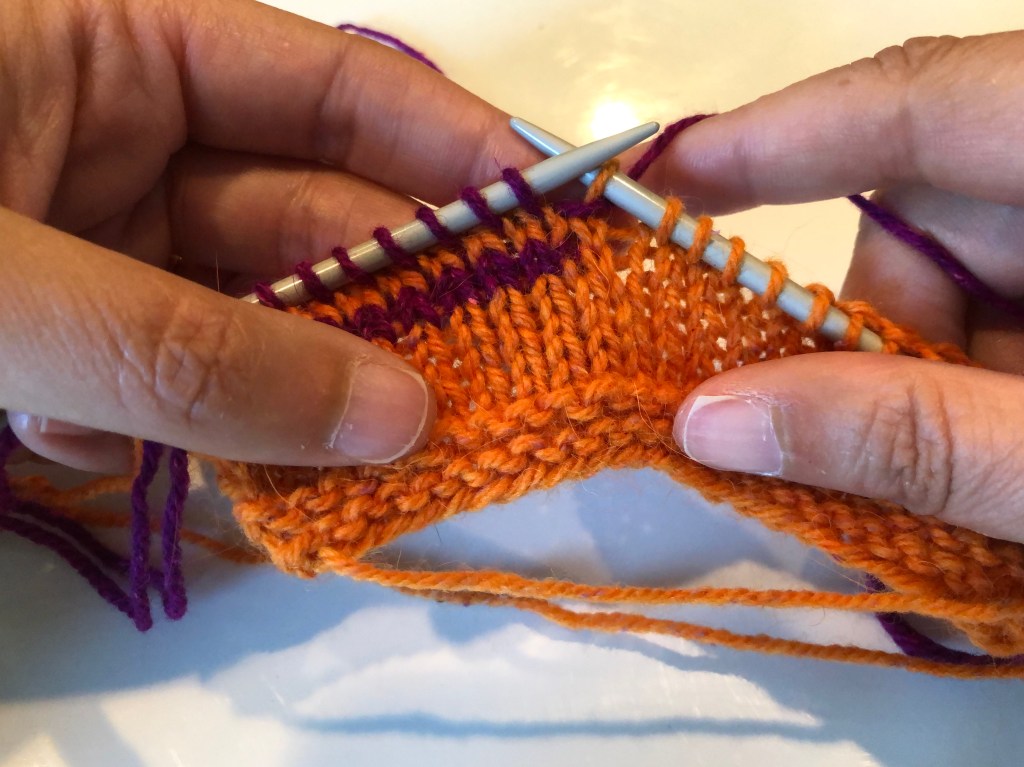
The stitch that you pulled up-and-over will look a little funky – kind of like two interconnected upside-down Vs straddling the needle. You will definitely recognize it when you go to work through the short row.
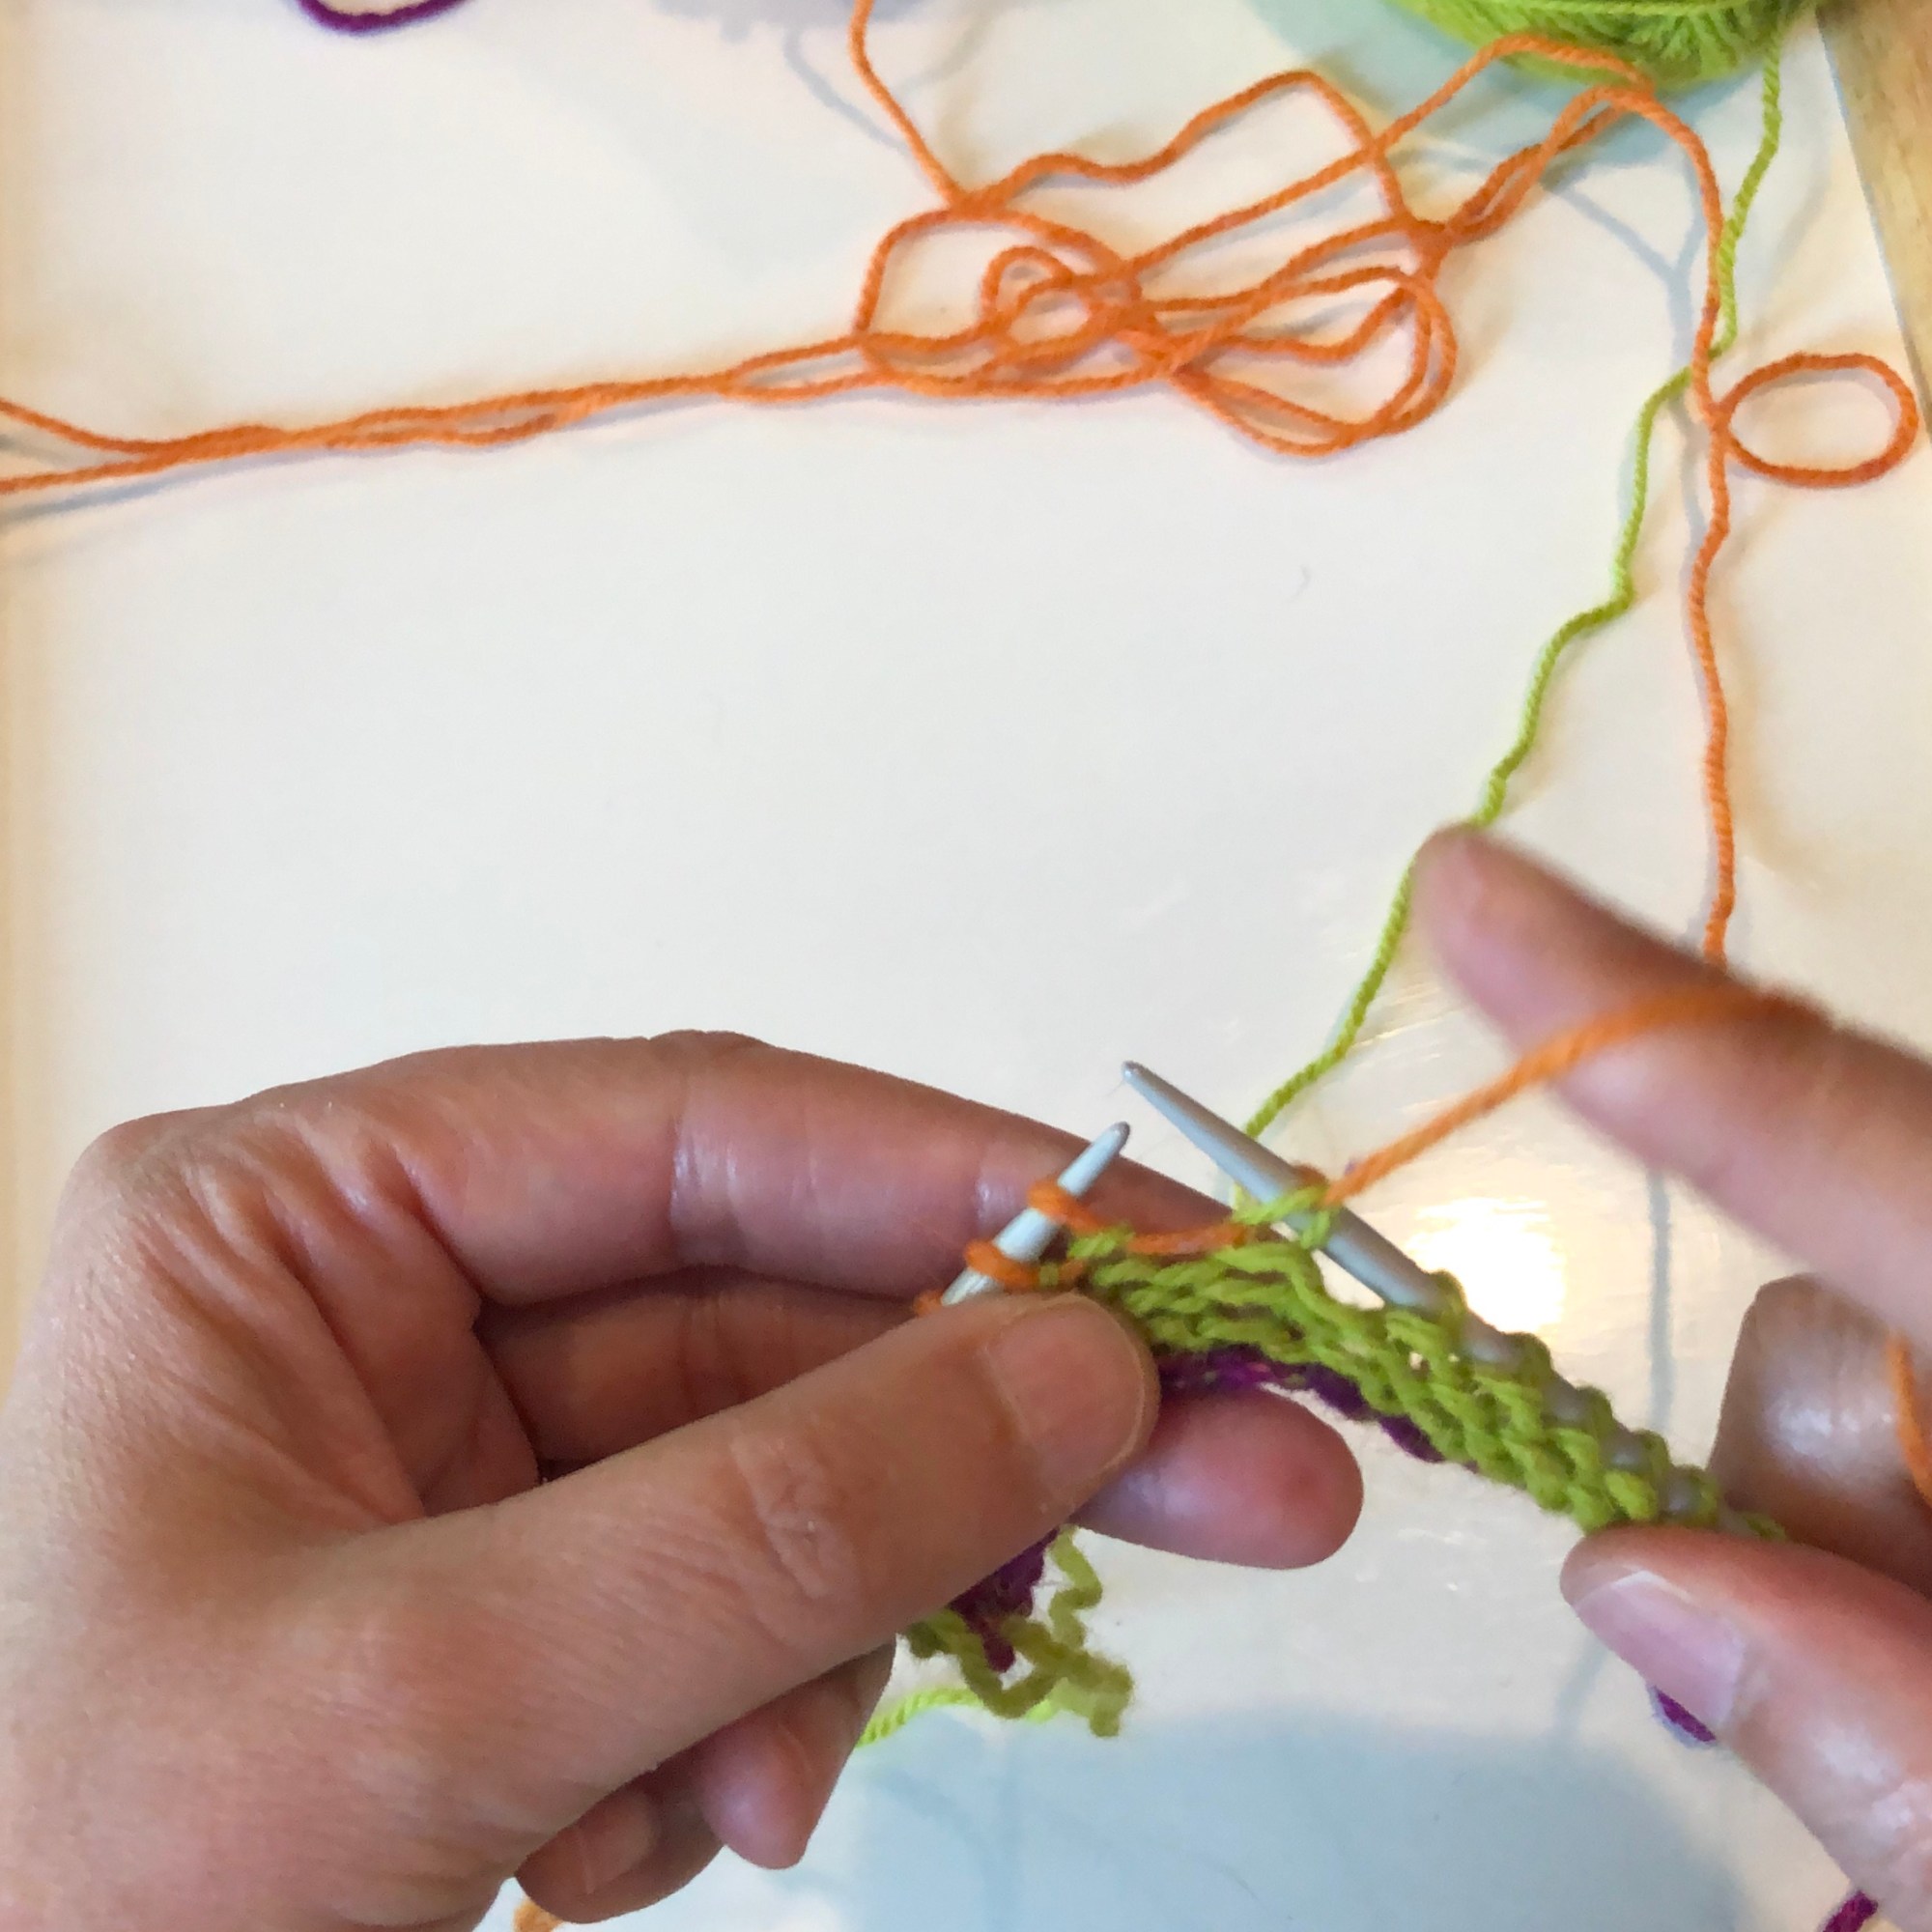
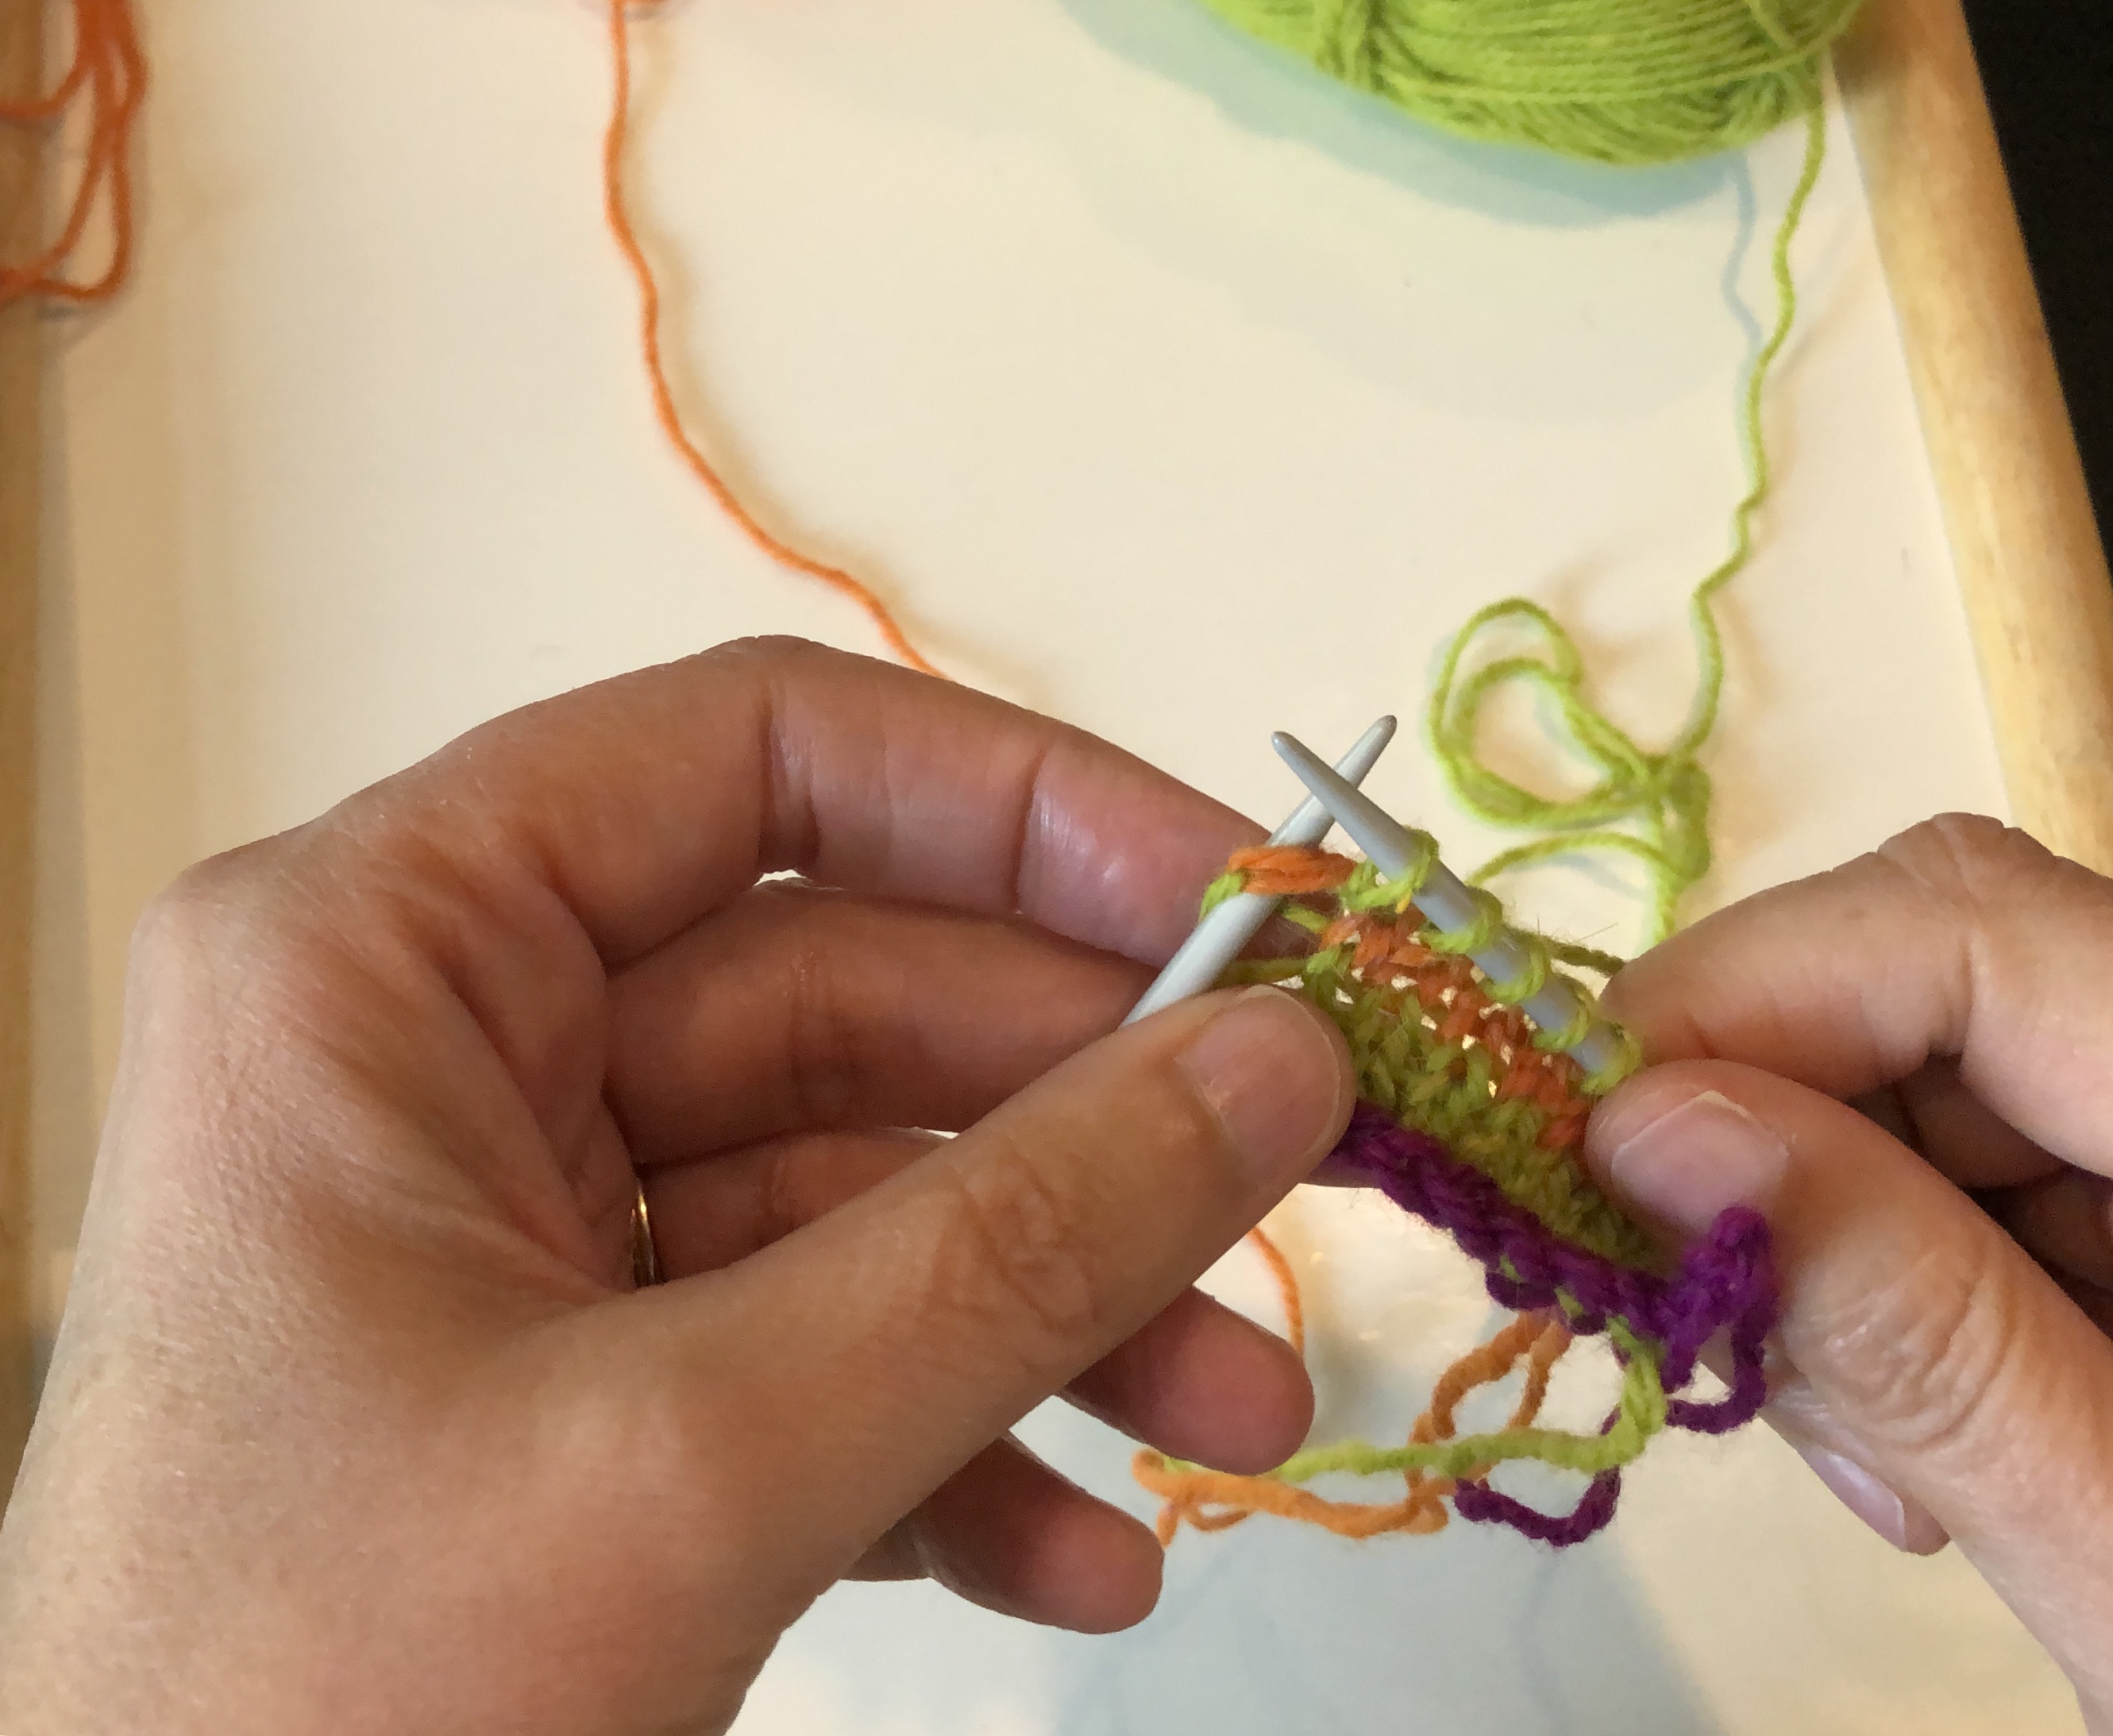
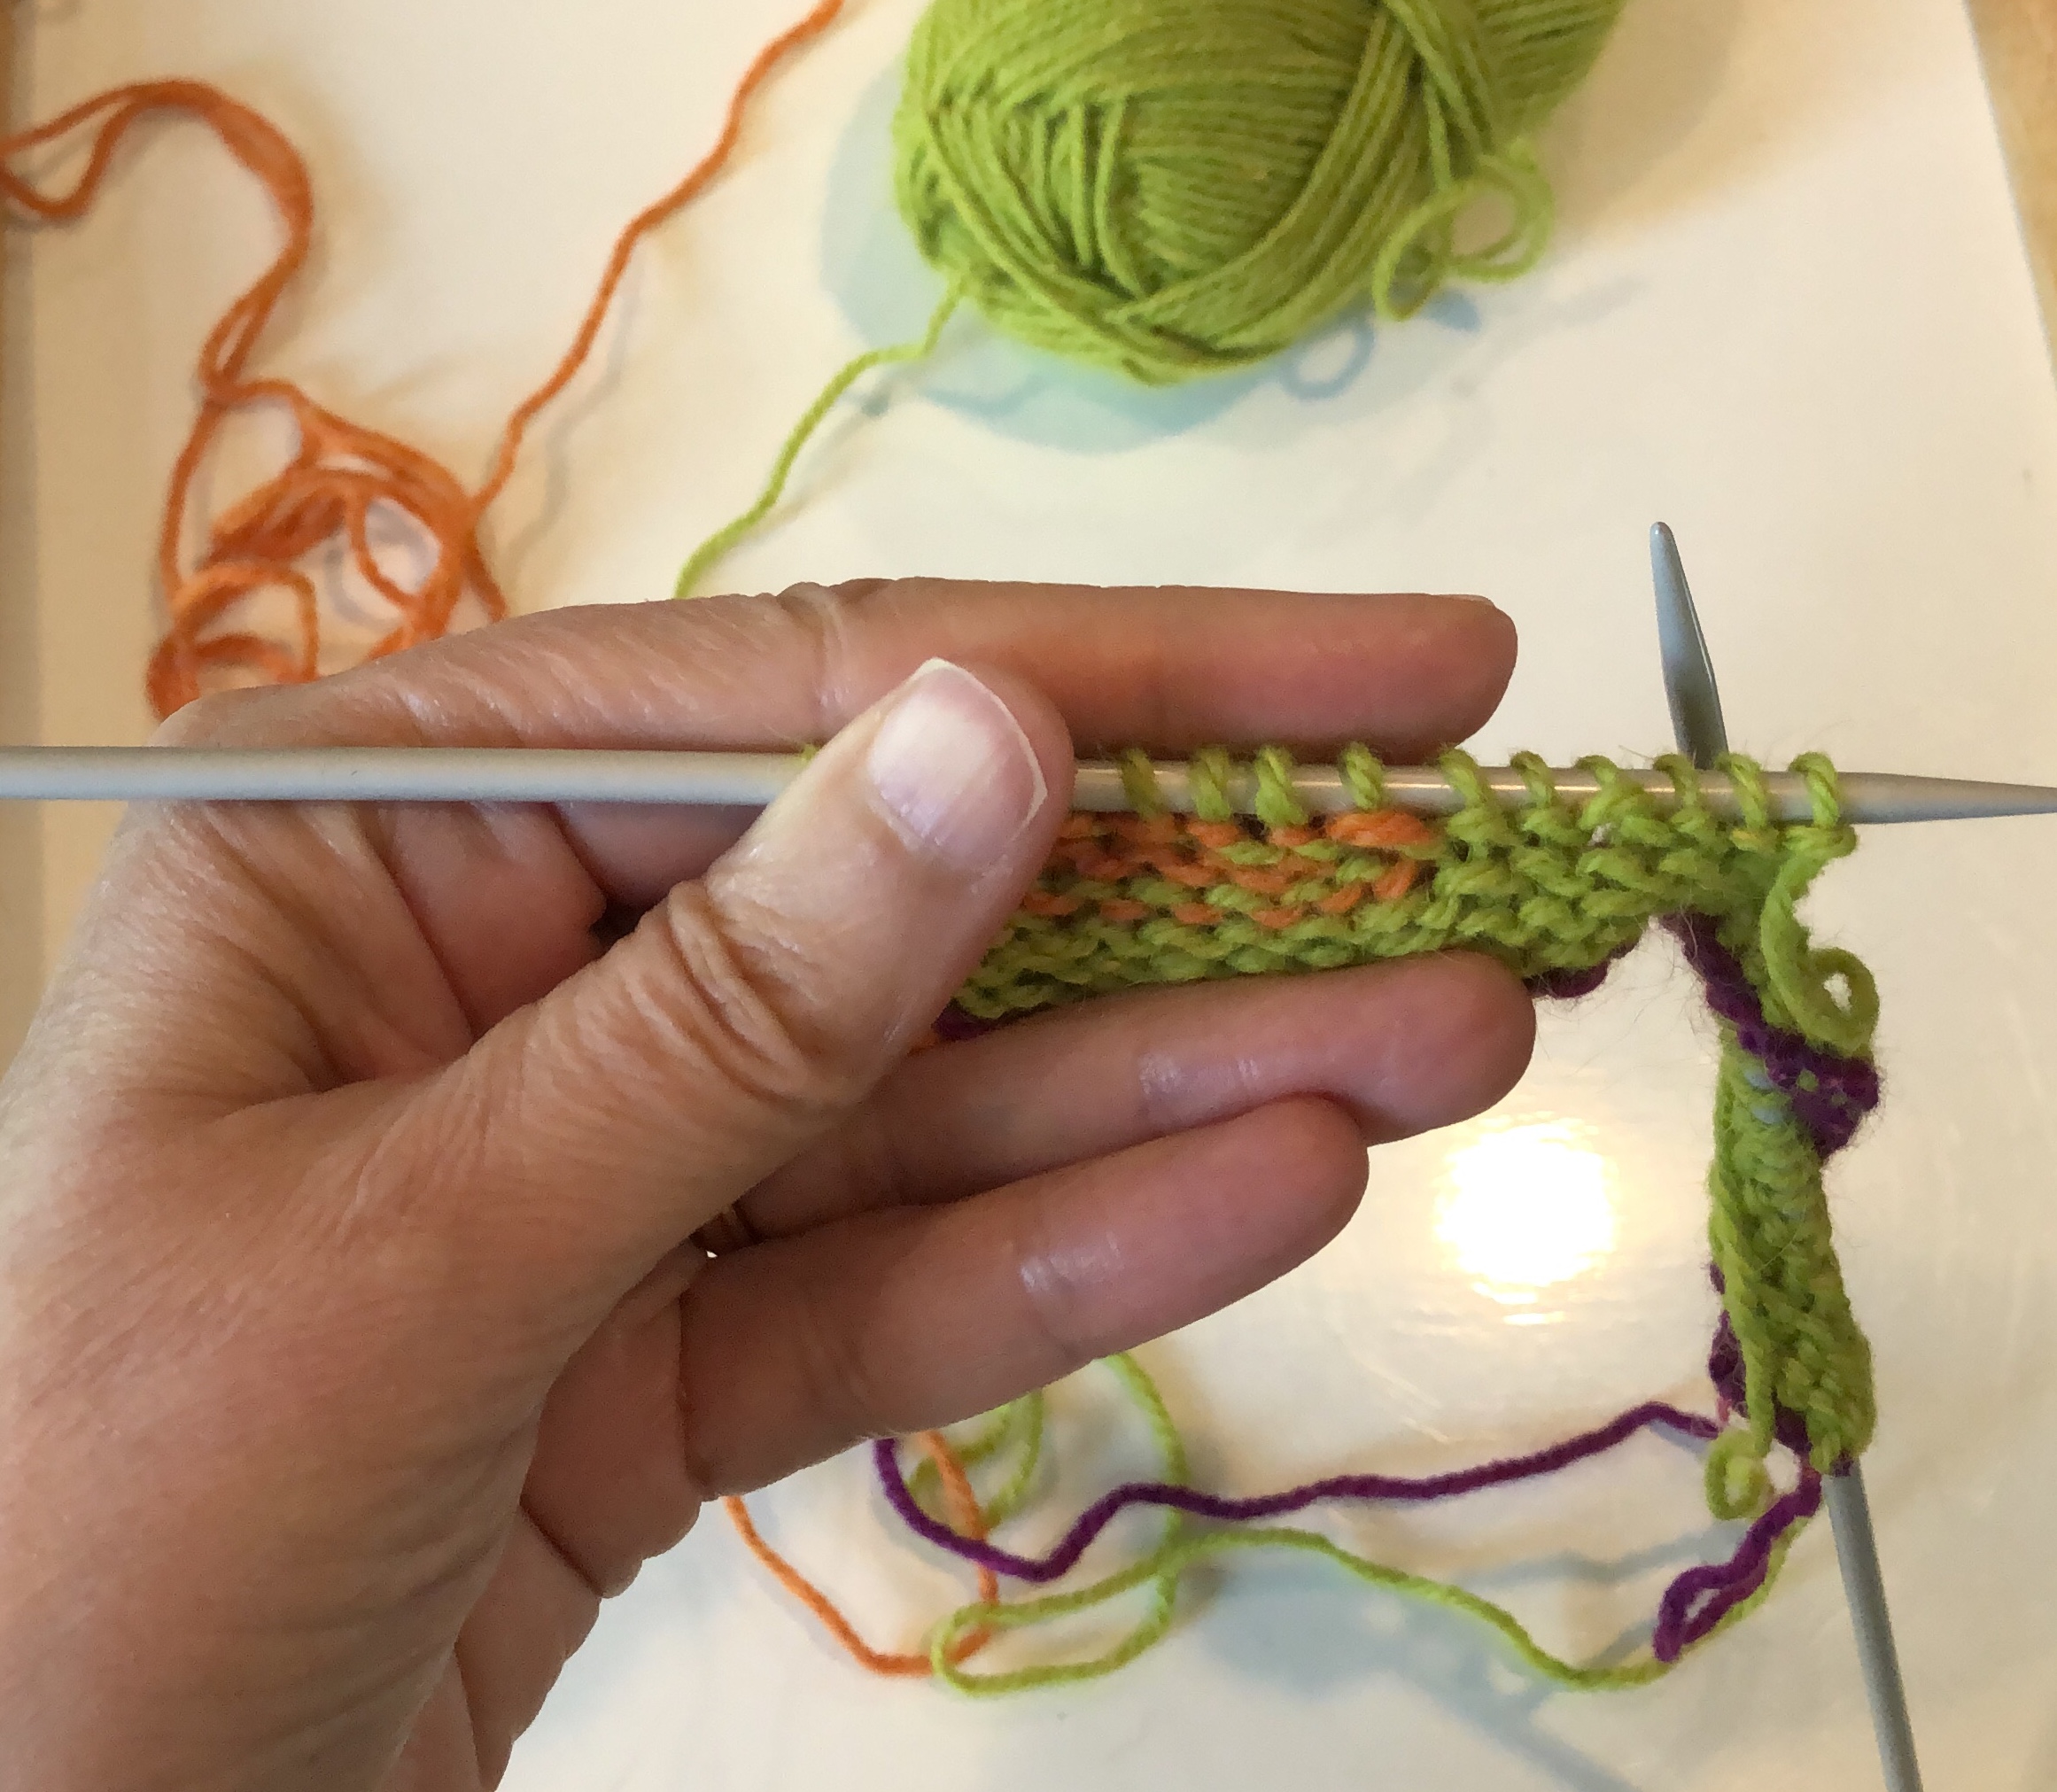
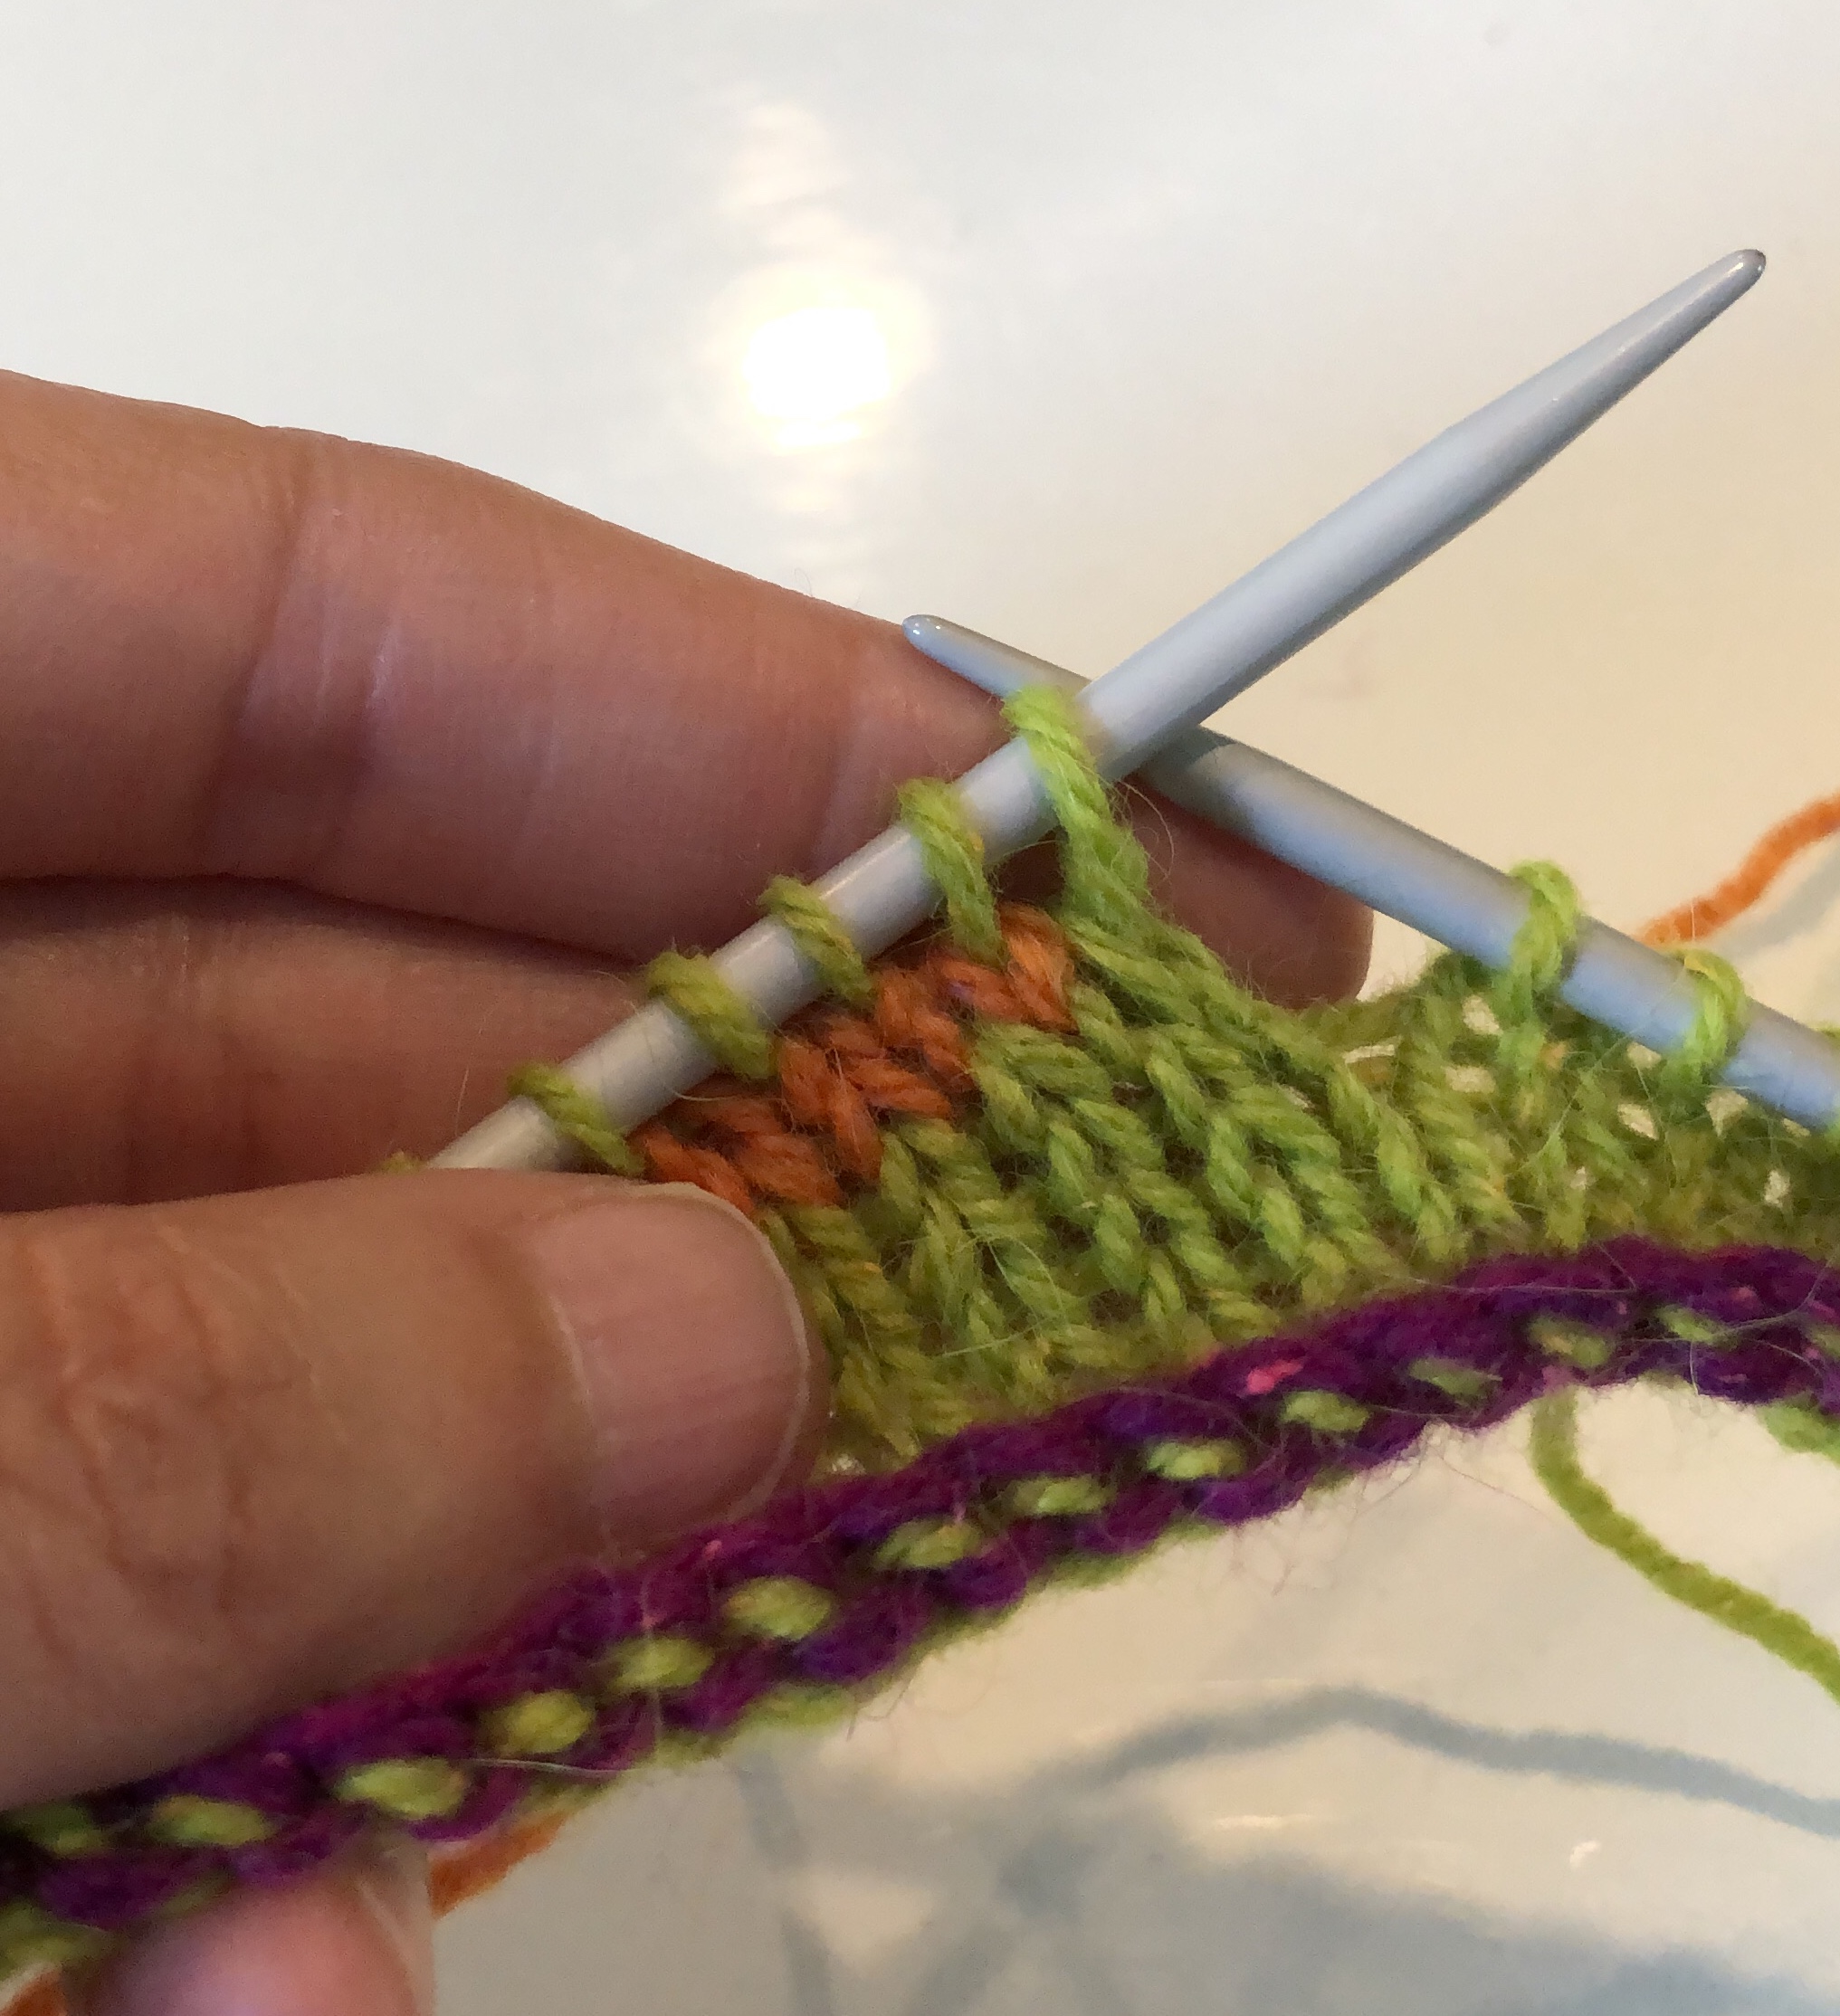
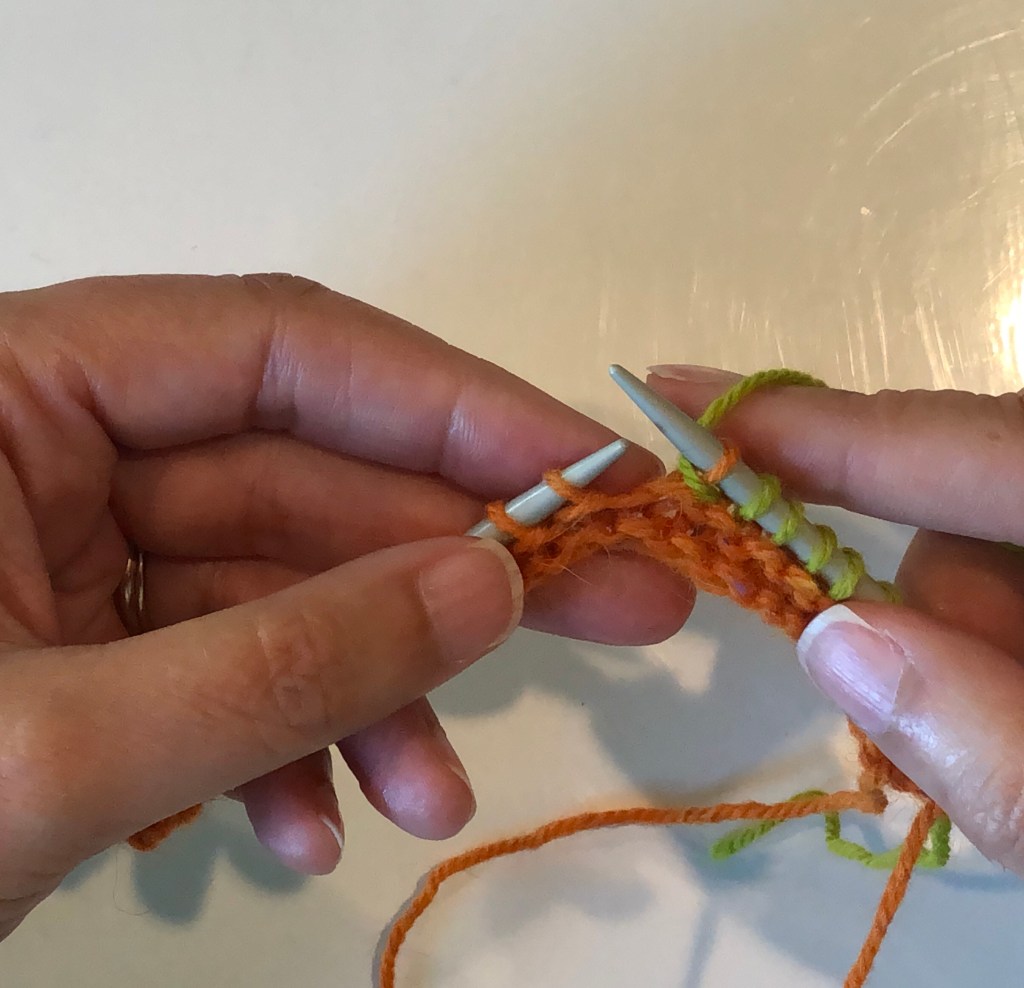
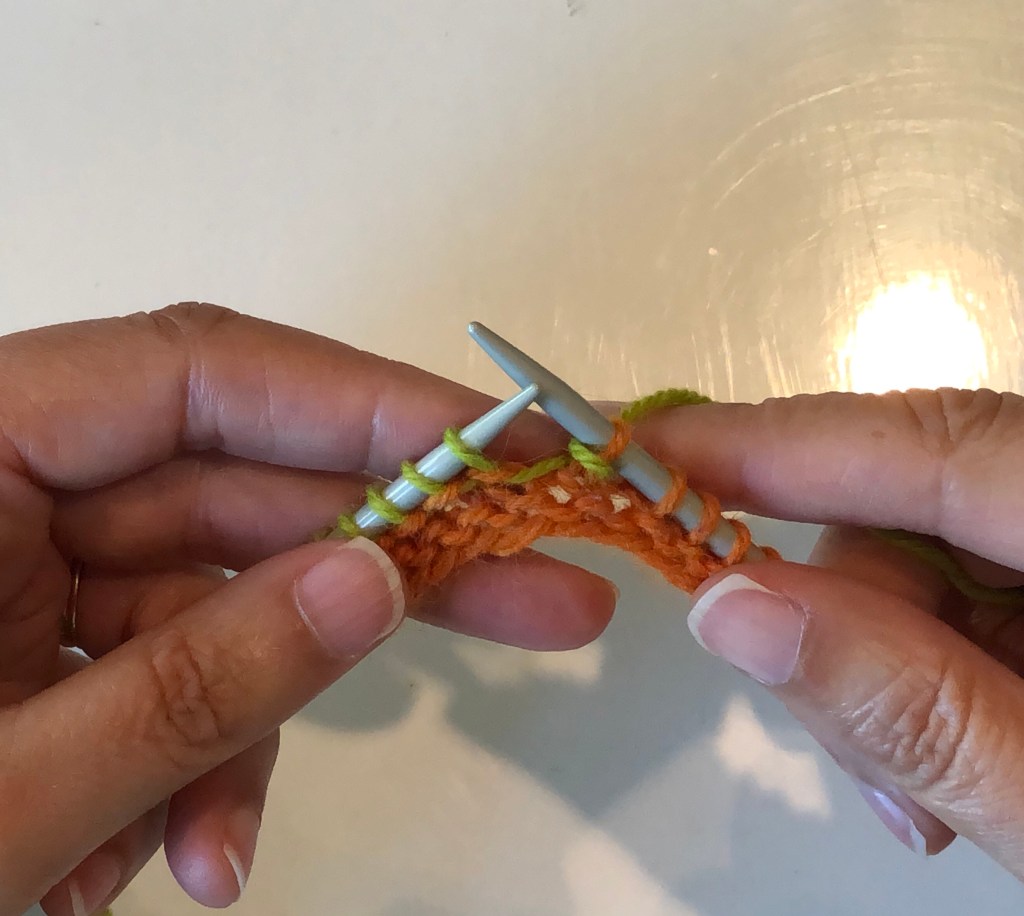
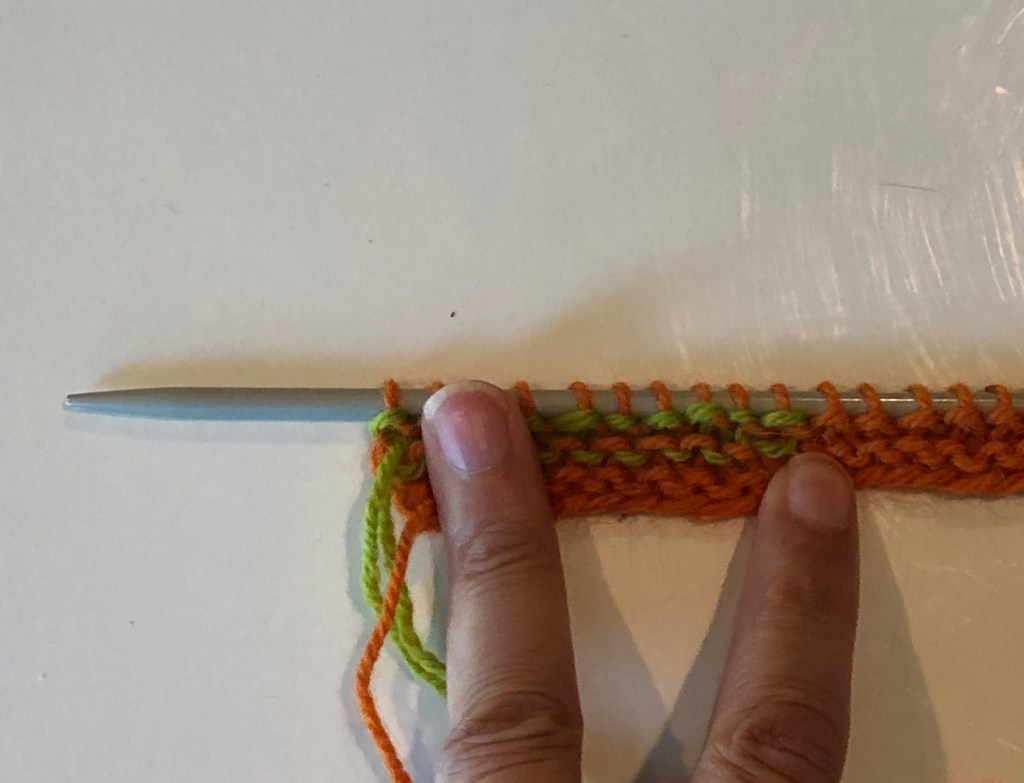
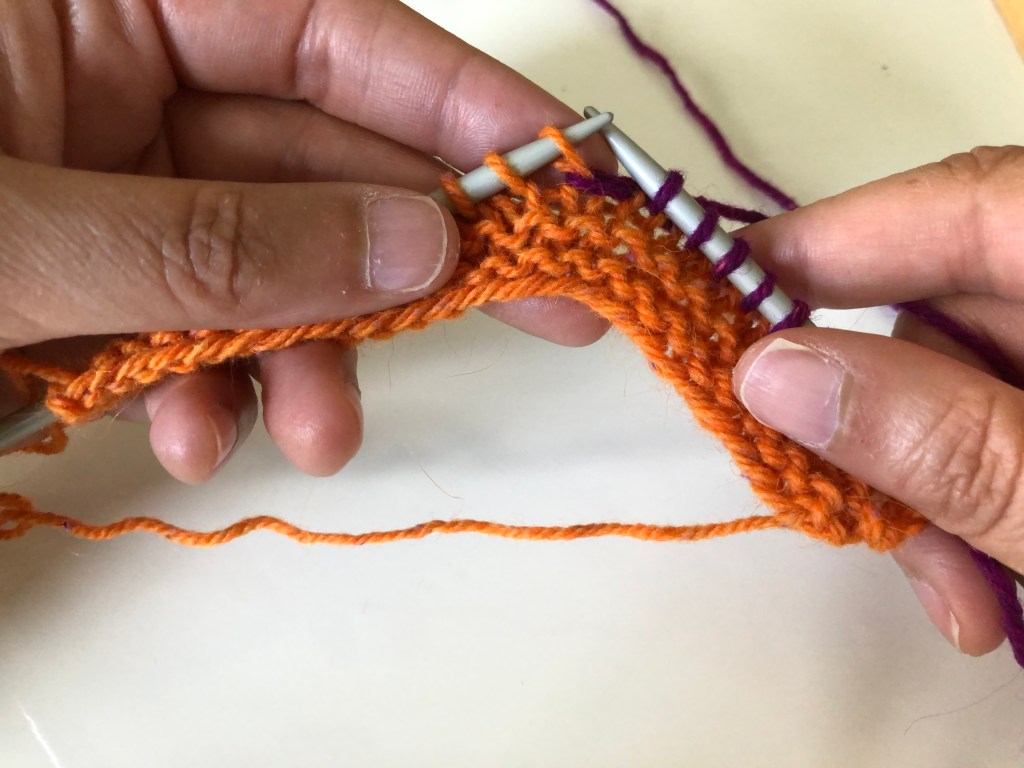
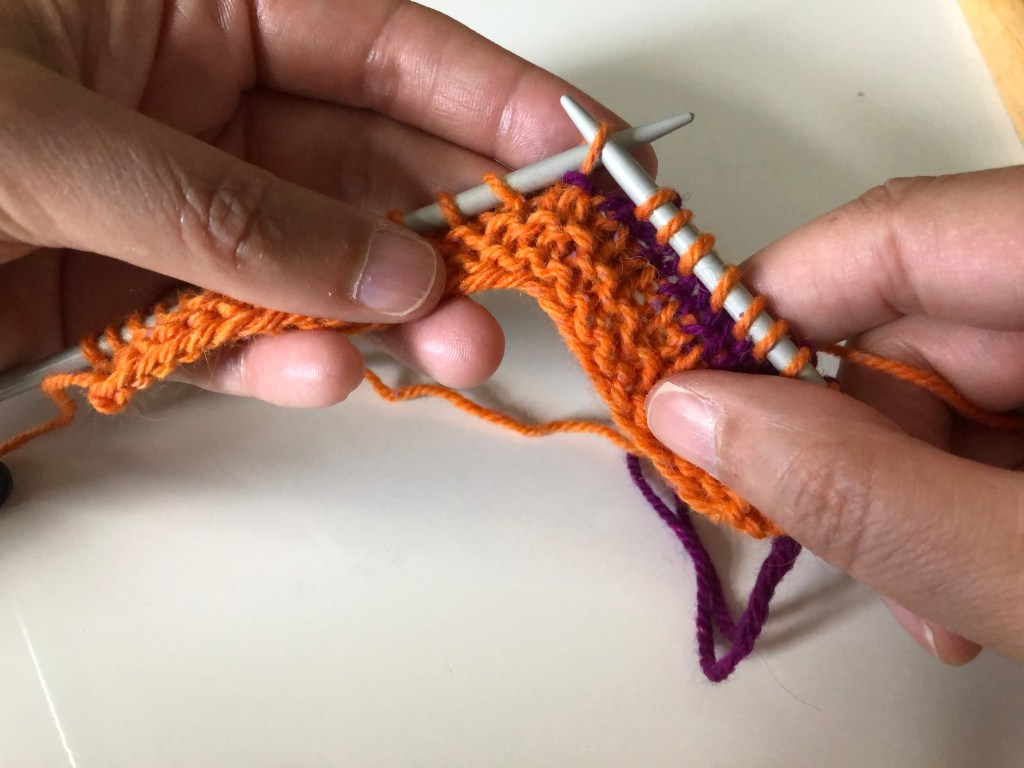
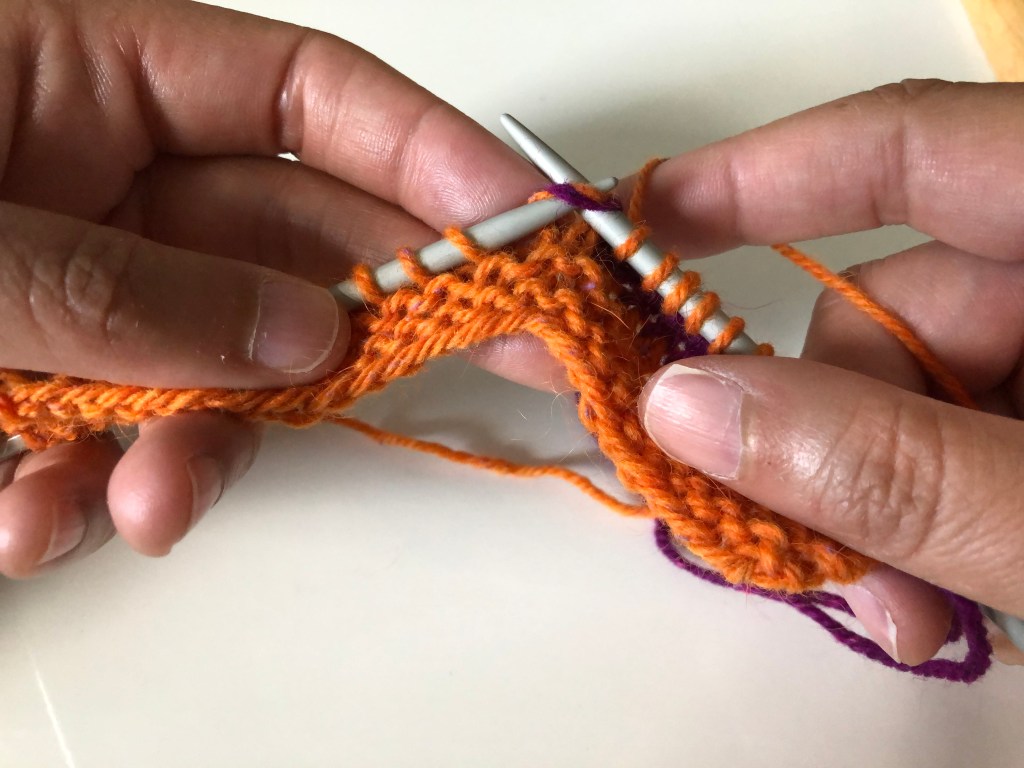
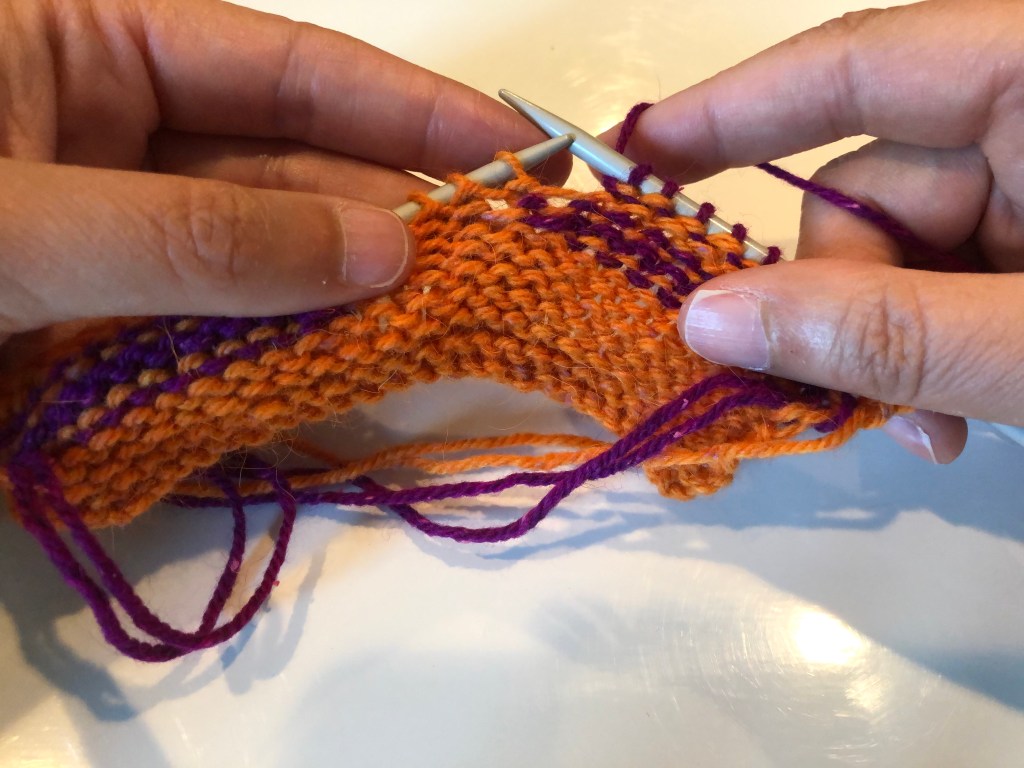
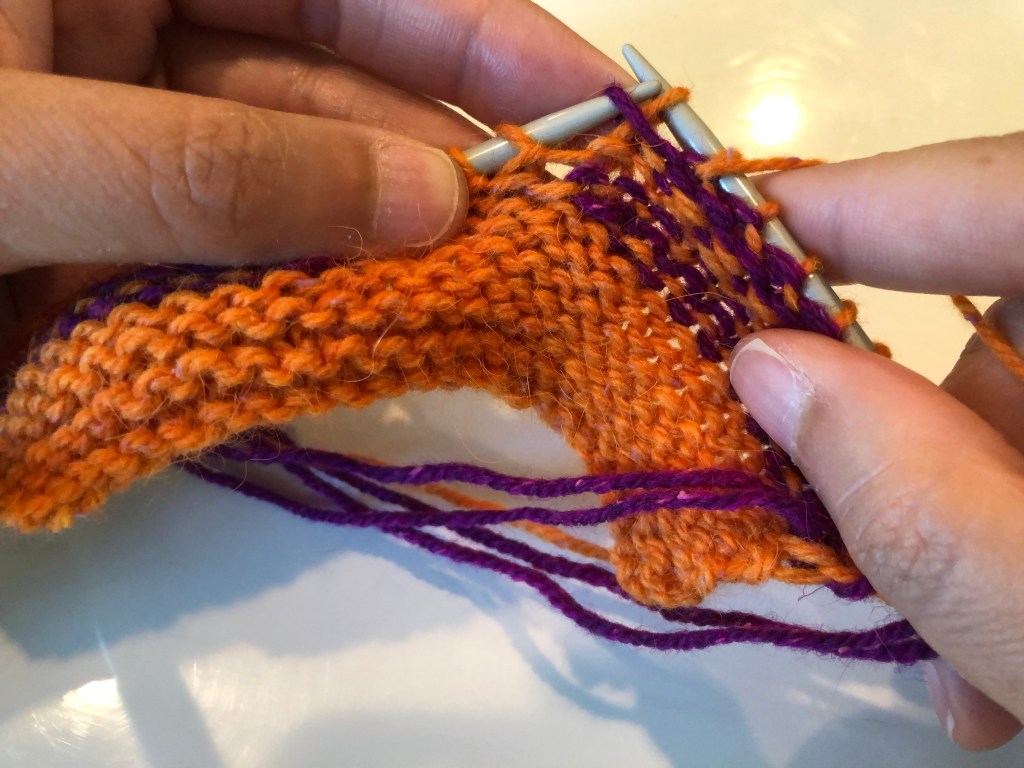
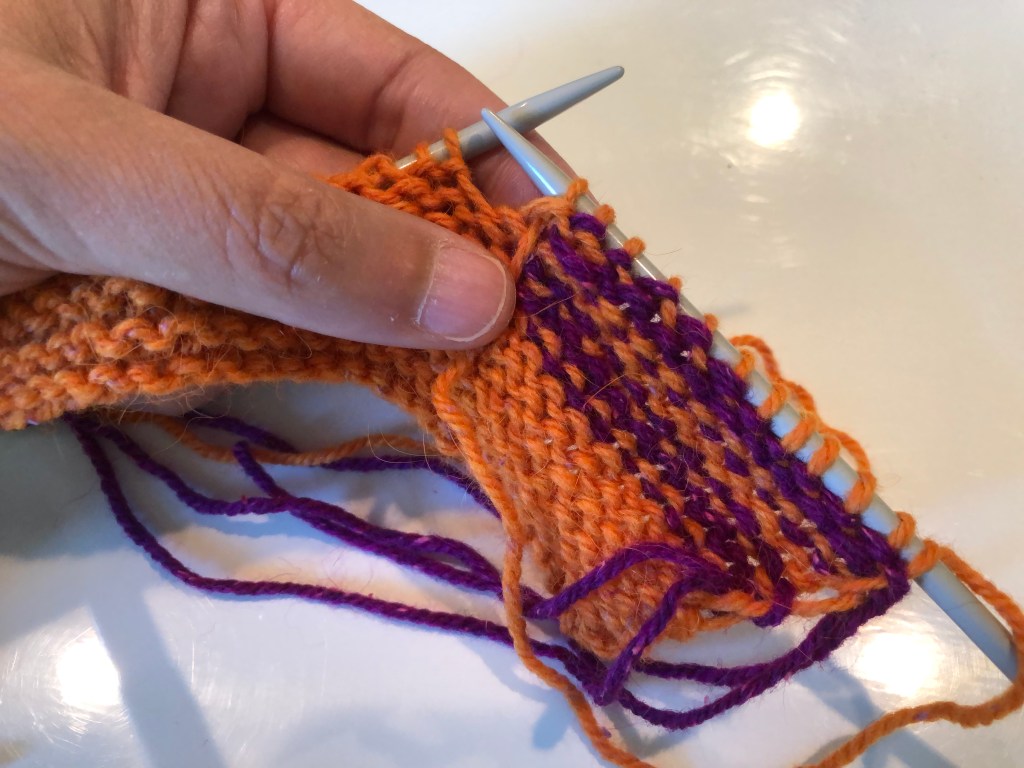
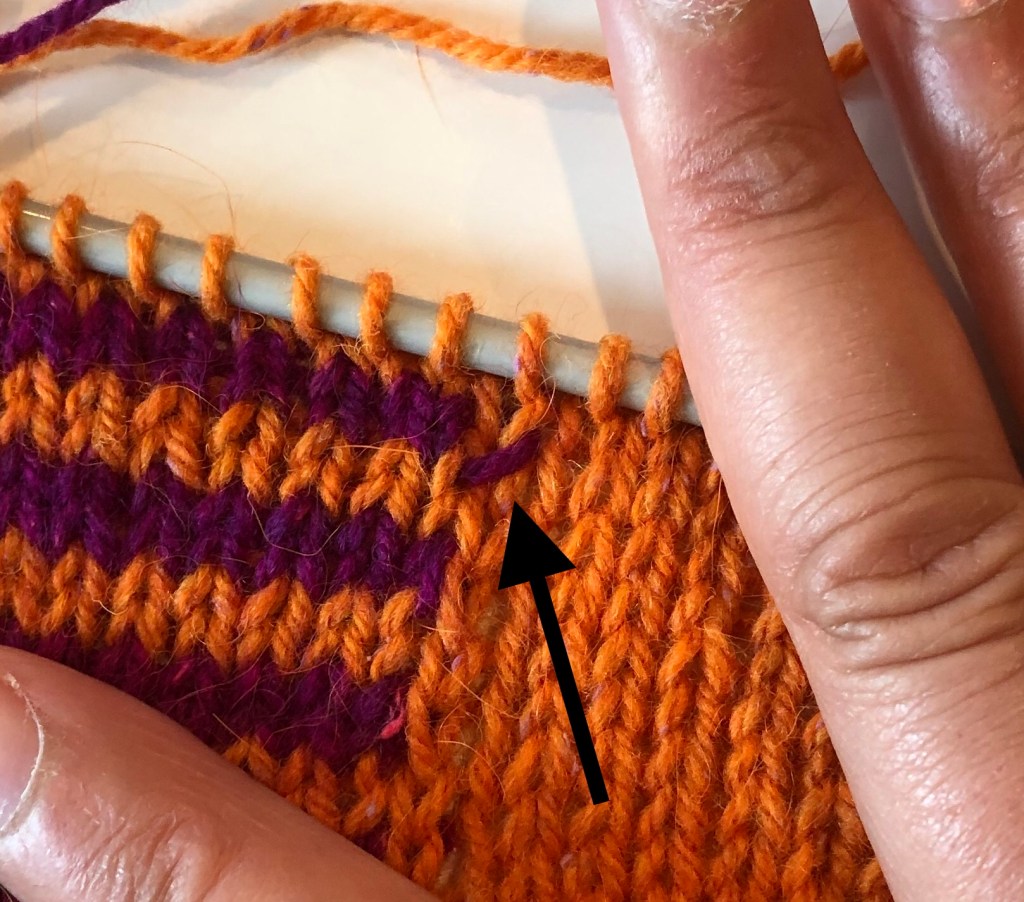
Working Through the Turn
To work up to the “up-and-over” stitch, insert the needle (as if to knit) after the two “legs” of the front V and before the “legs” of the back V and knit the stitch. The two legs of the front V will be on the right side of the inserted needle and the two legs of the back V will be on the left side of the inserted needle. Like magic, the stitch looks like a normal knitted stitch. You should be able to see a second loop nestled behind the stitch.
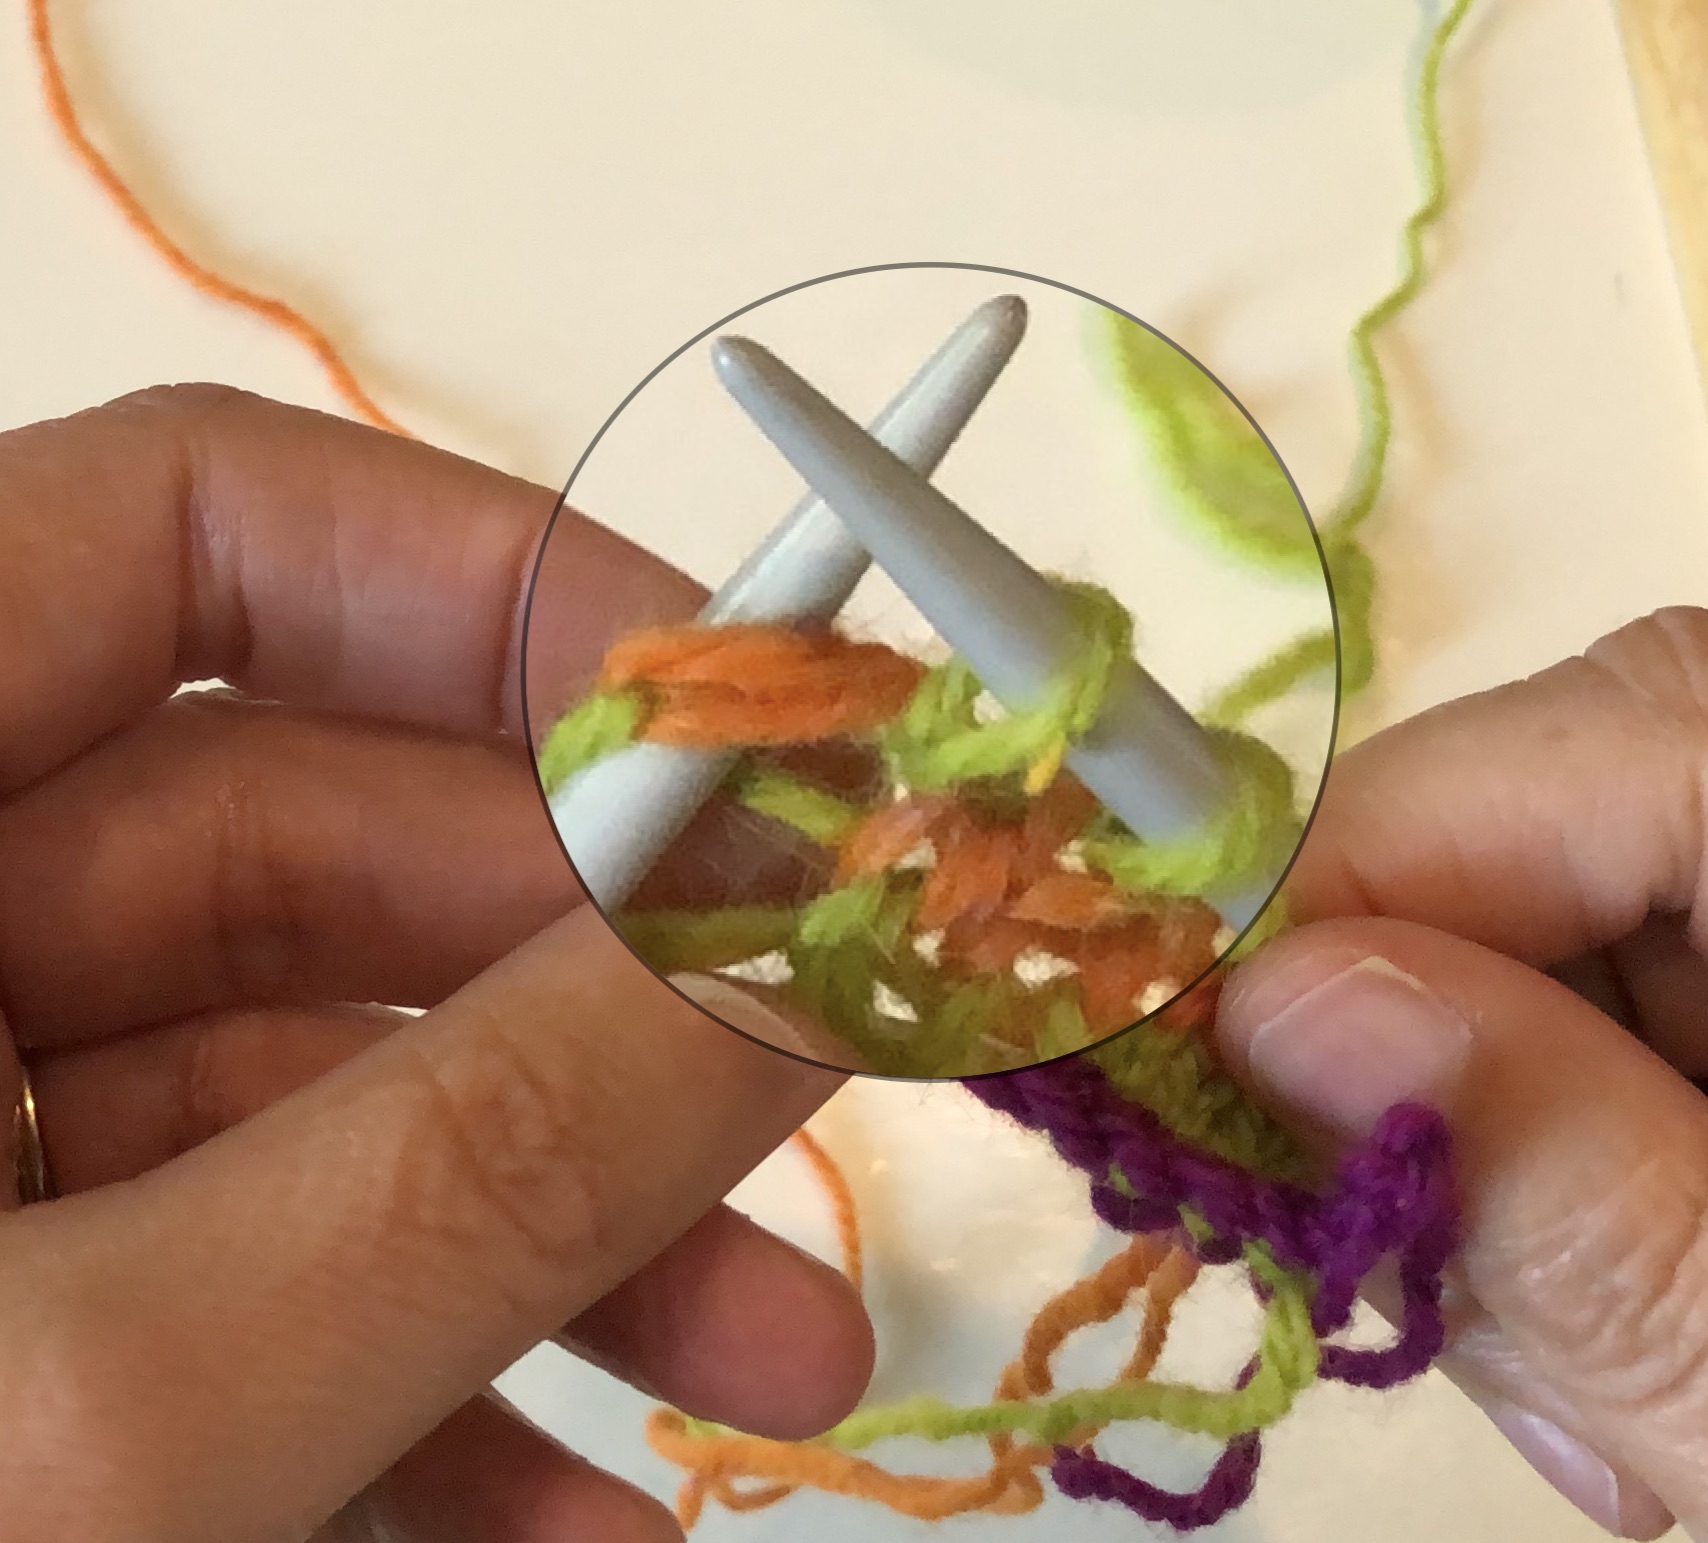
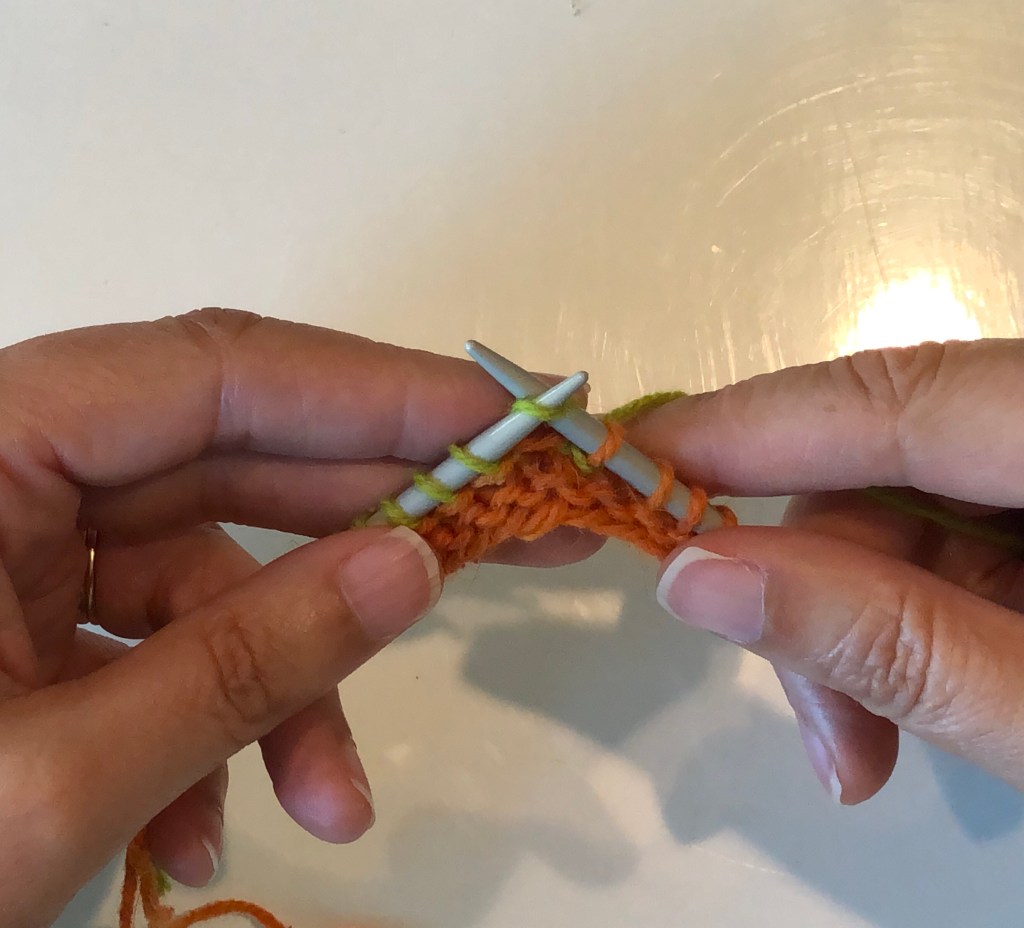
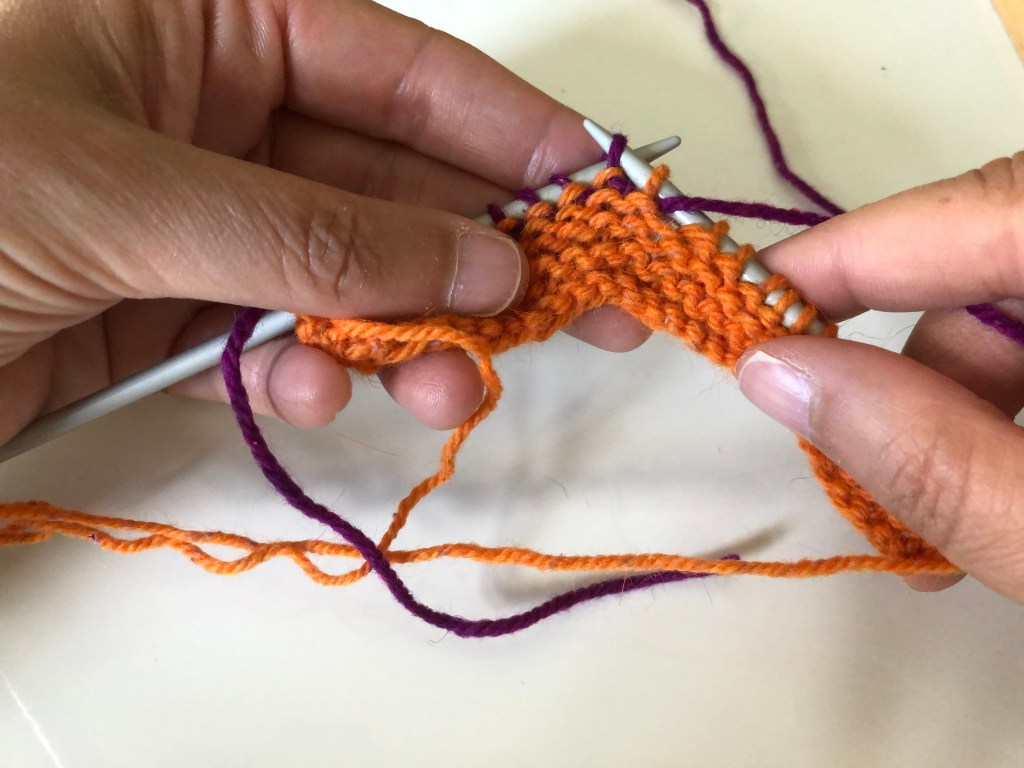
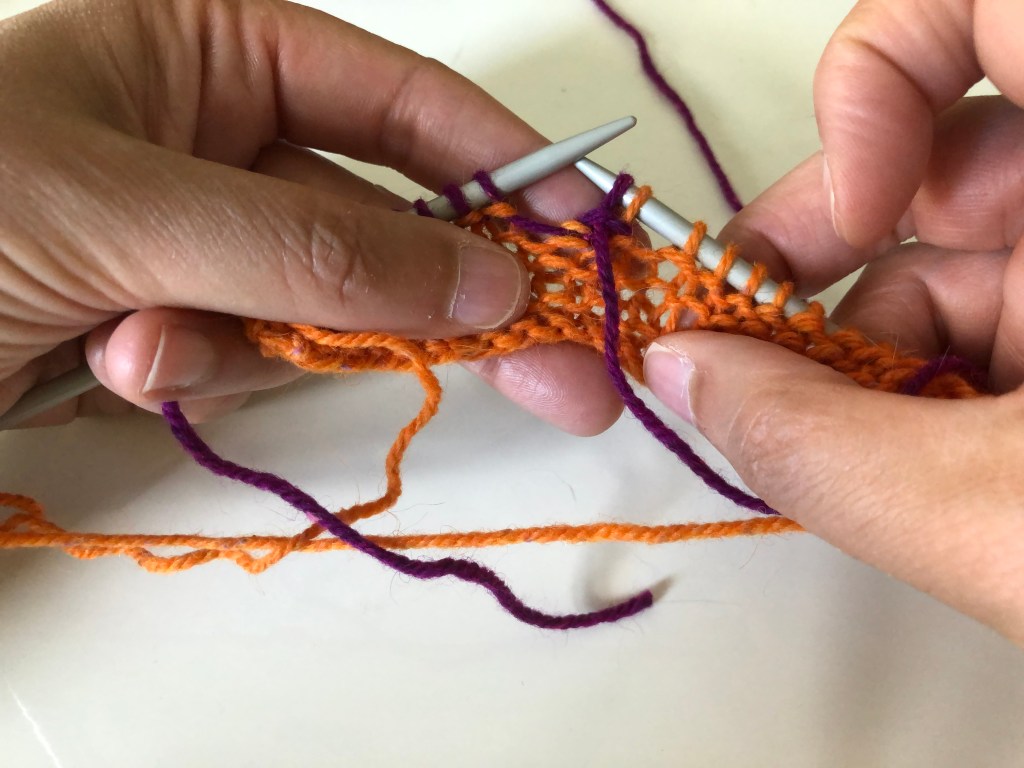
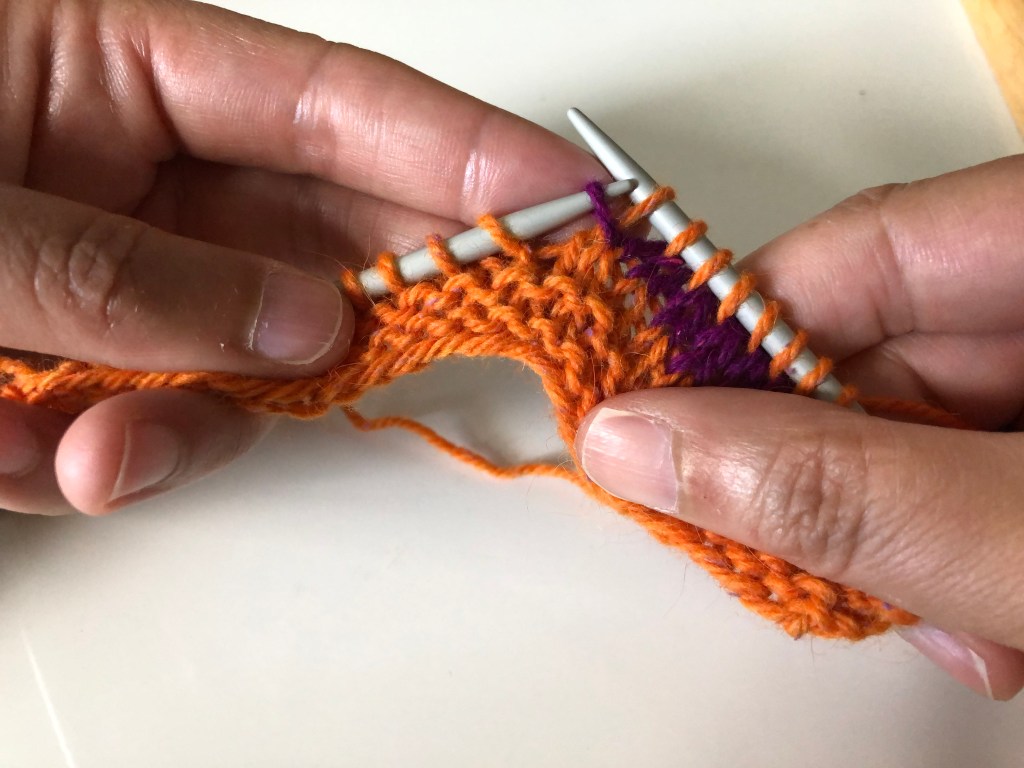
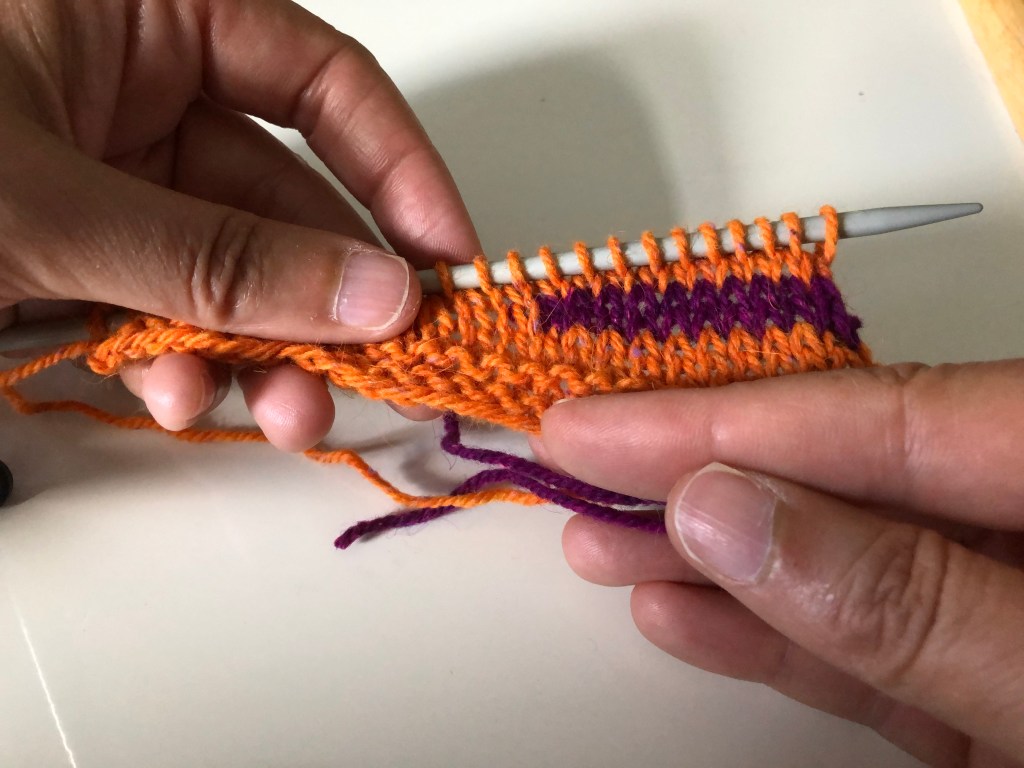
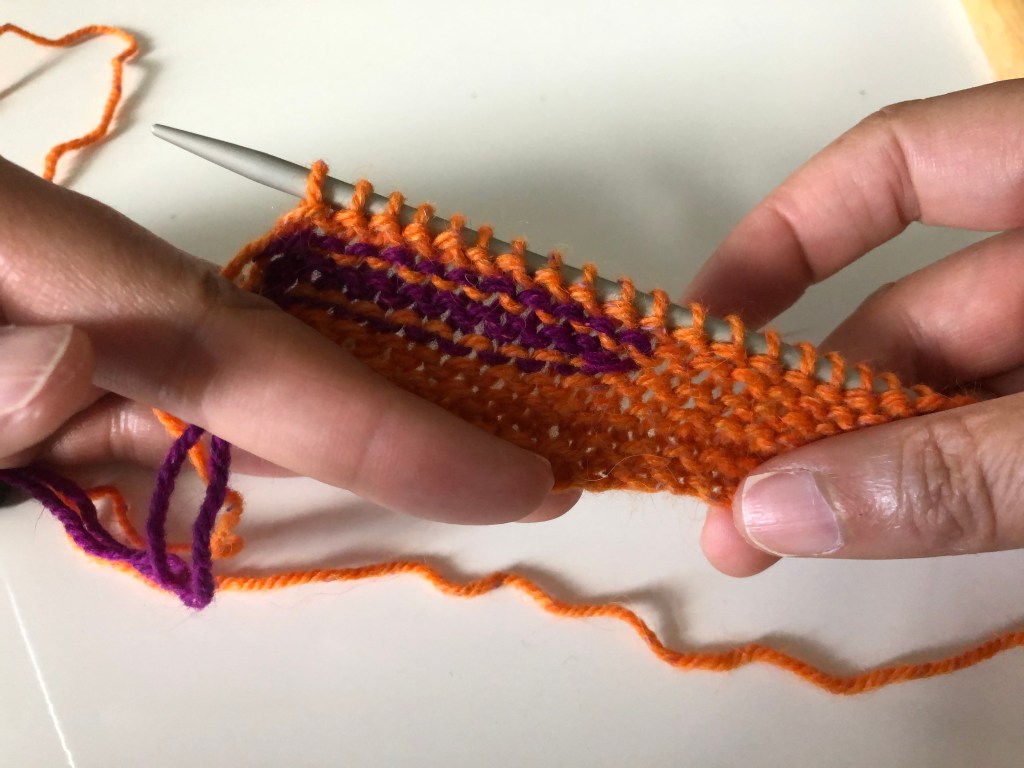
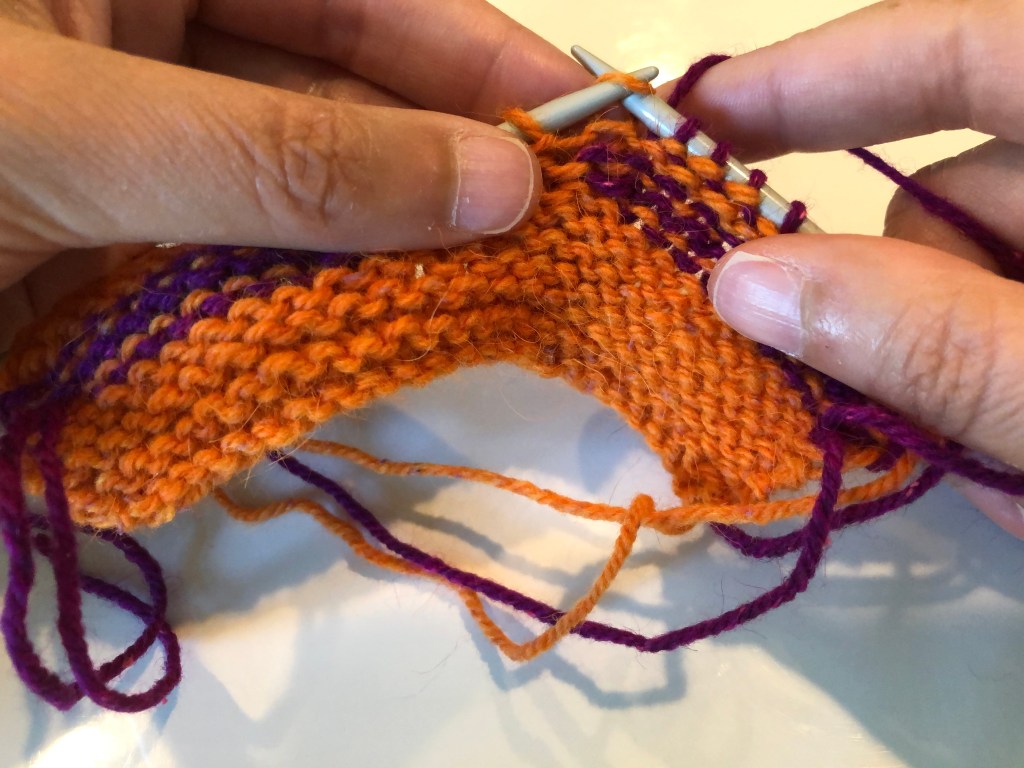
Finished Look: Front and Back
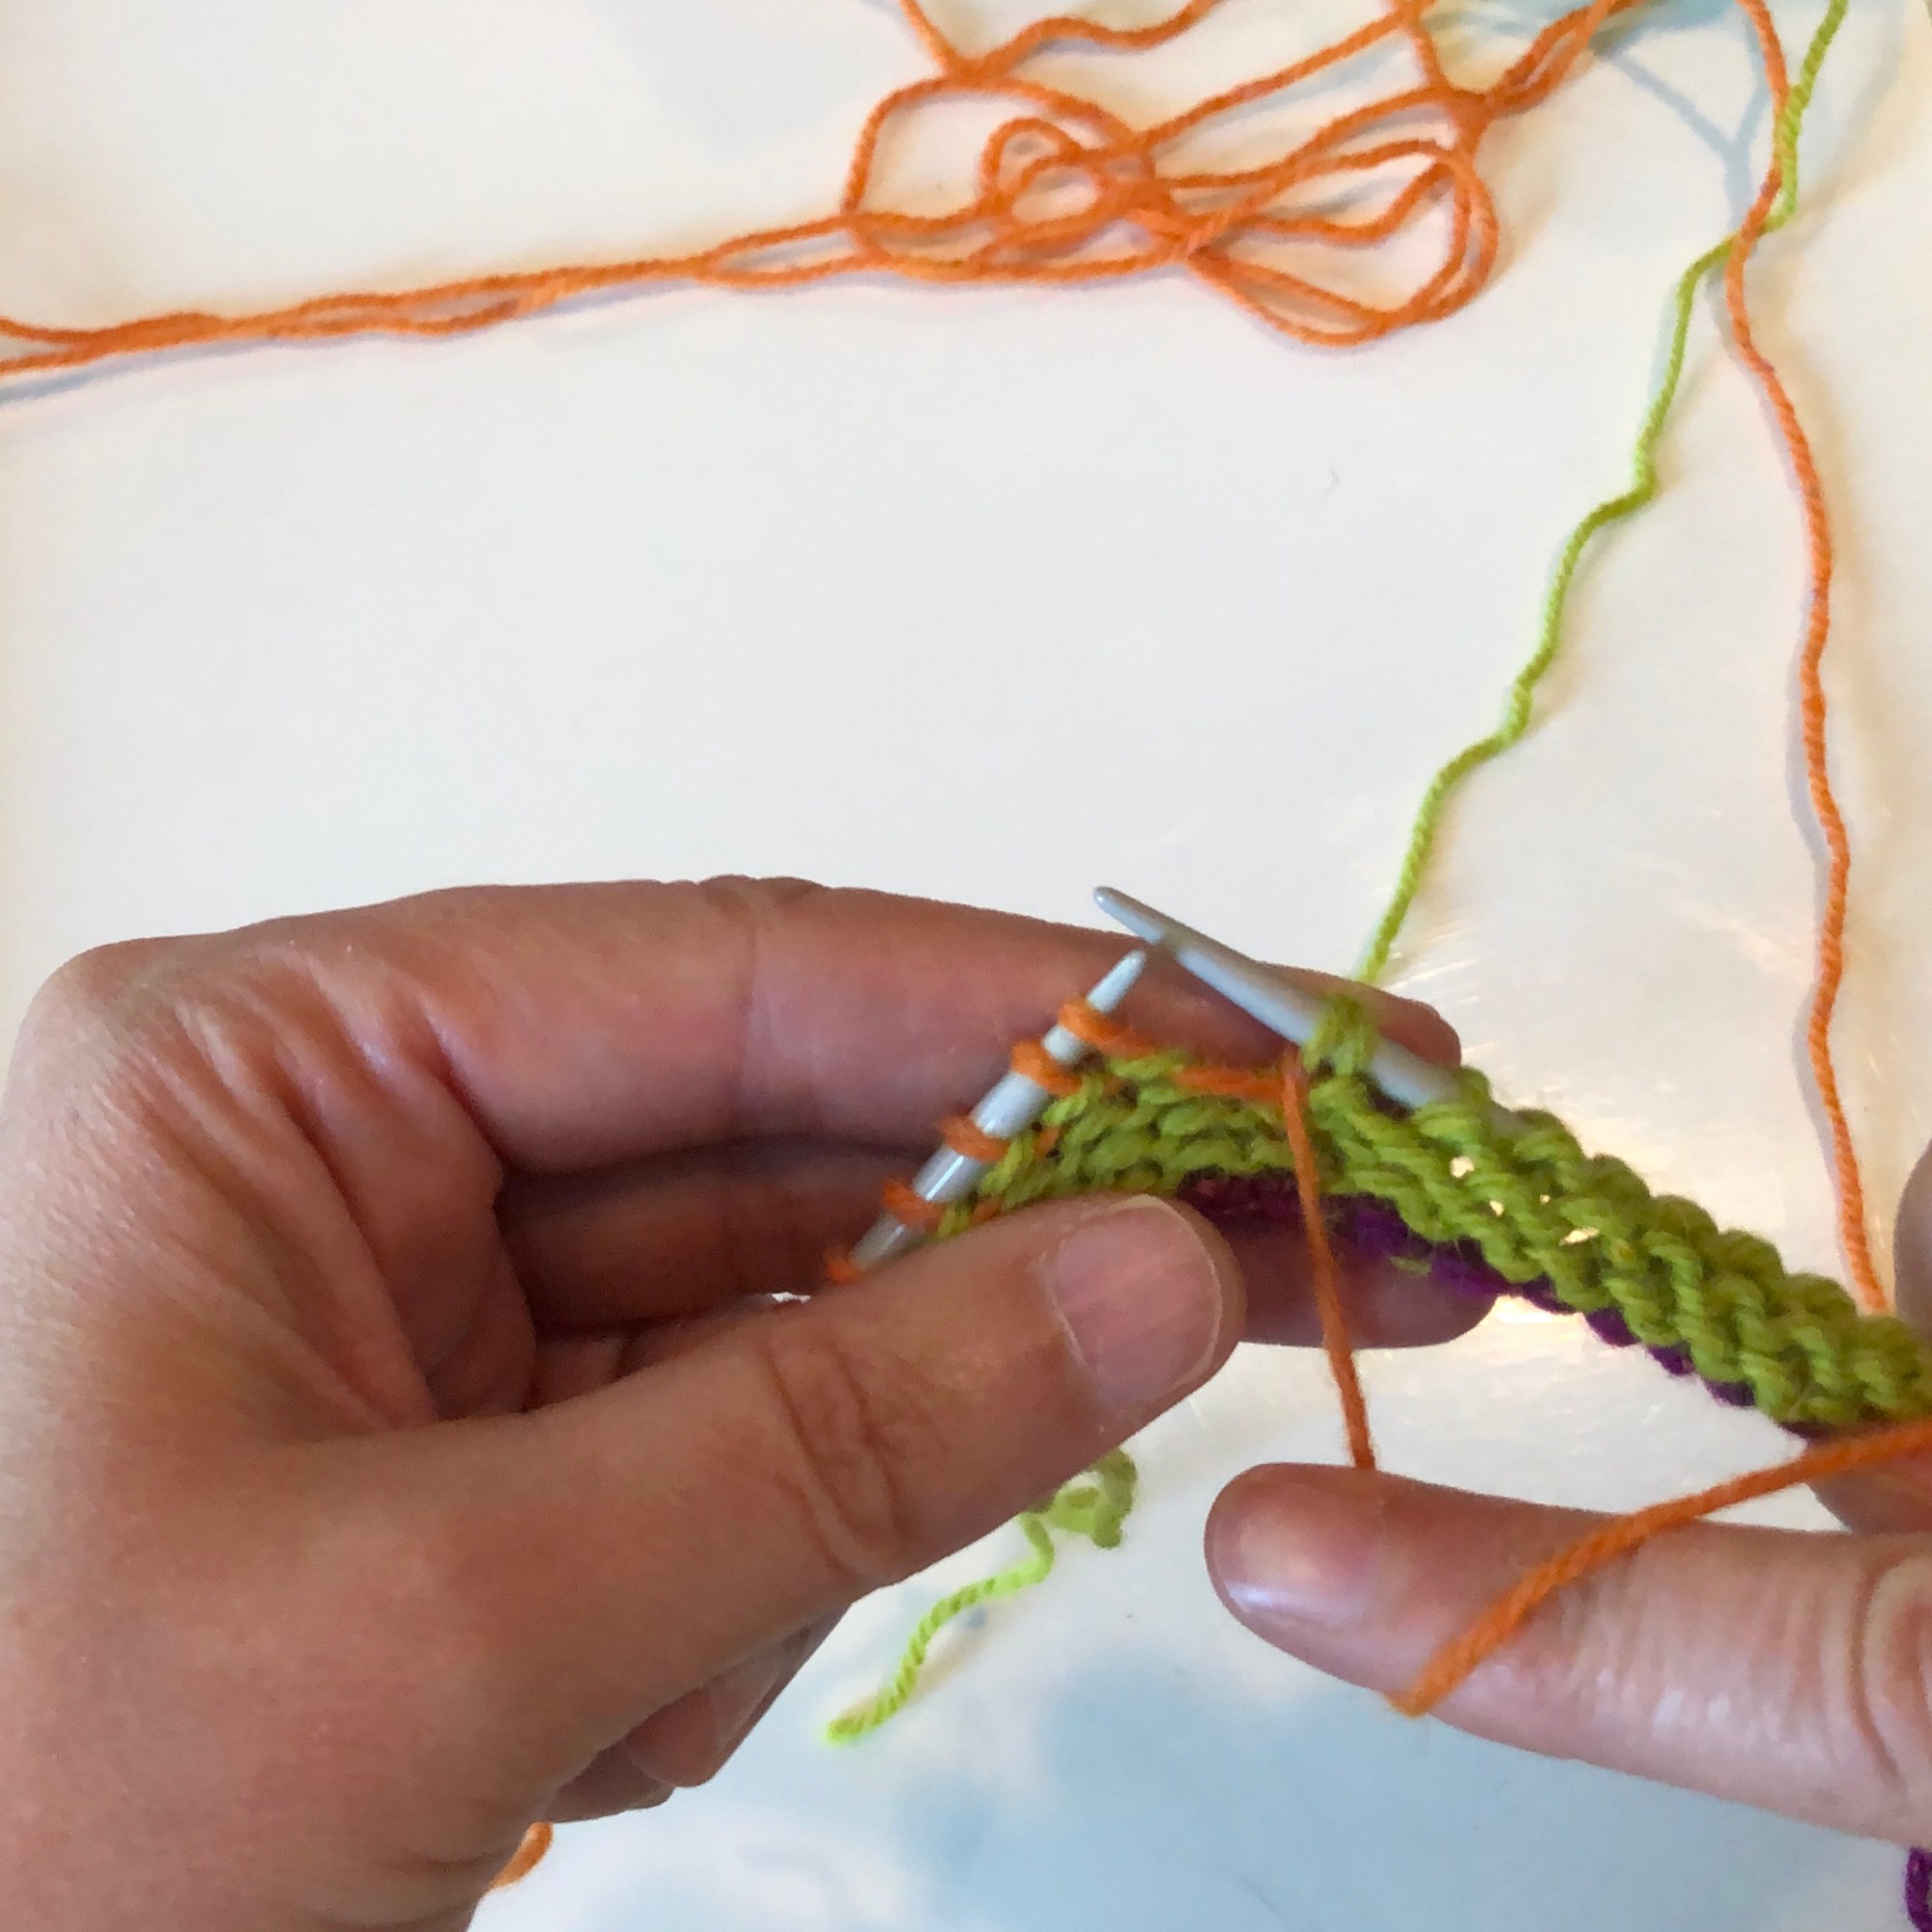
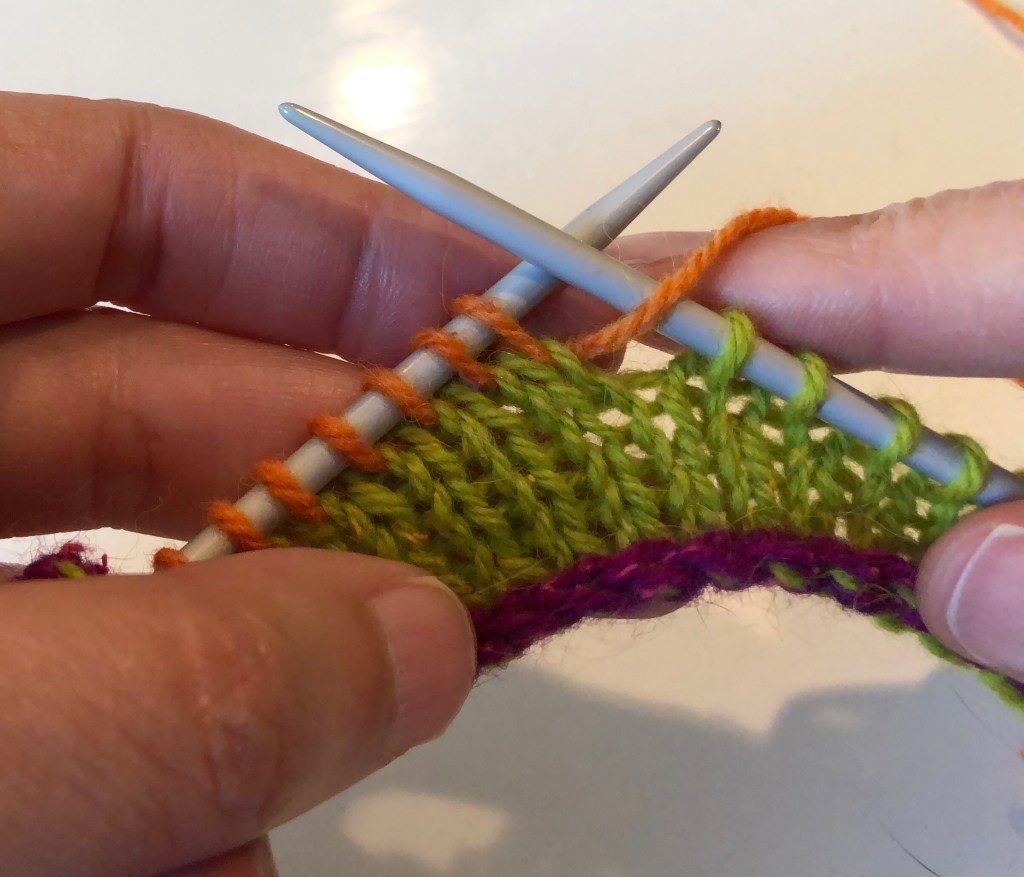
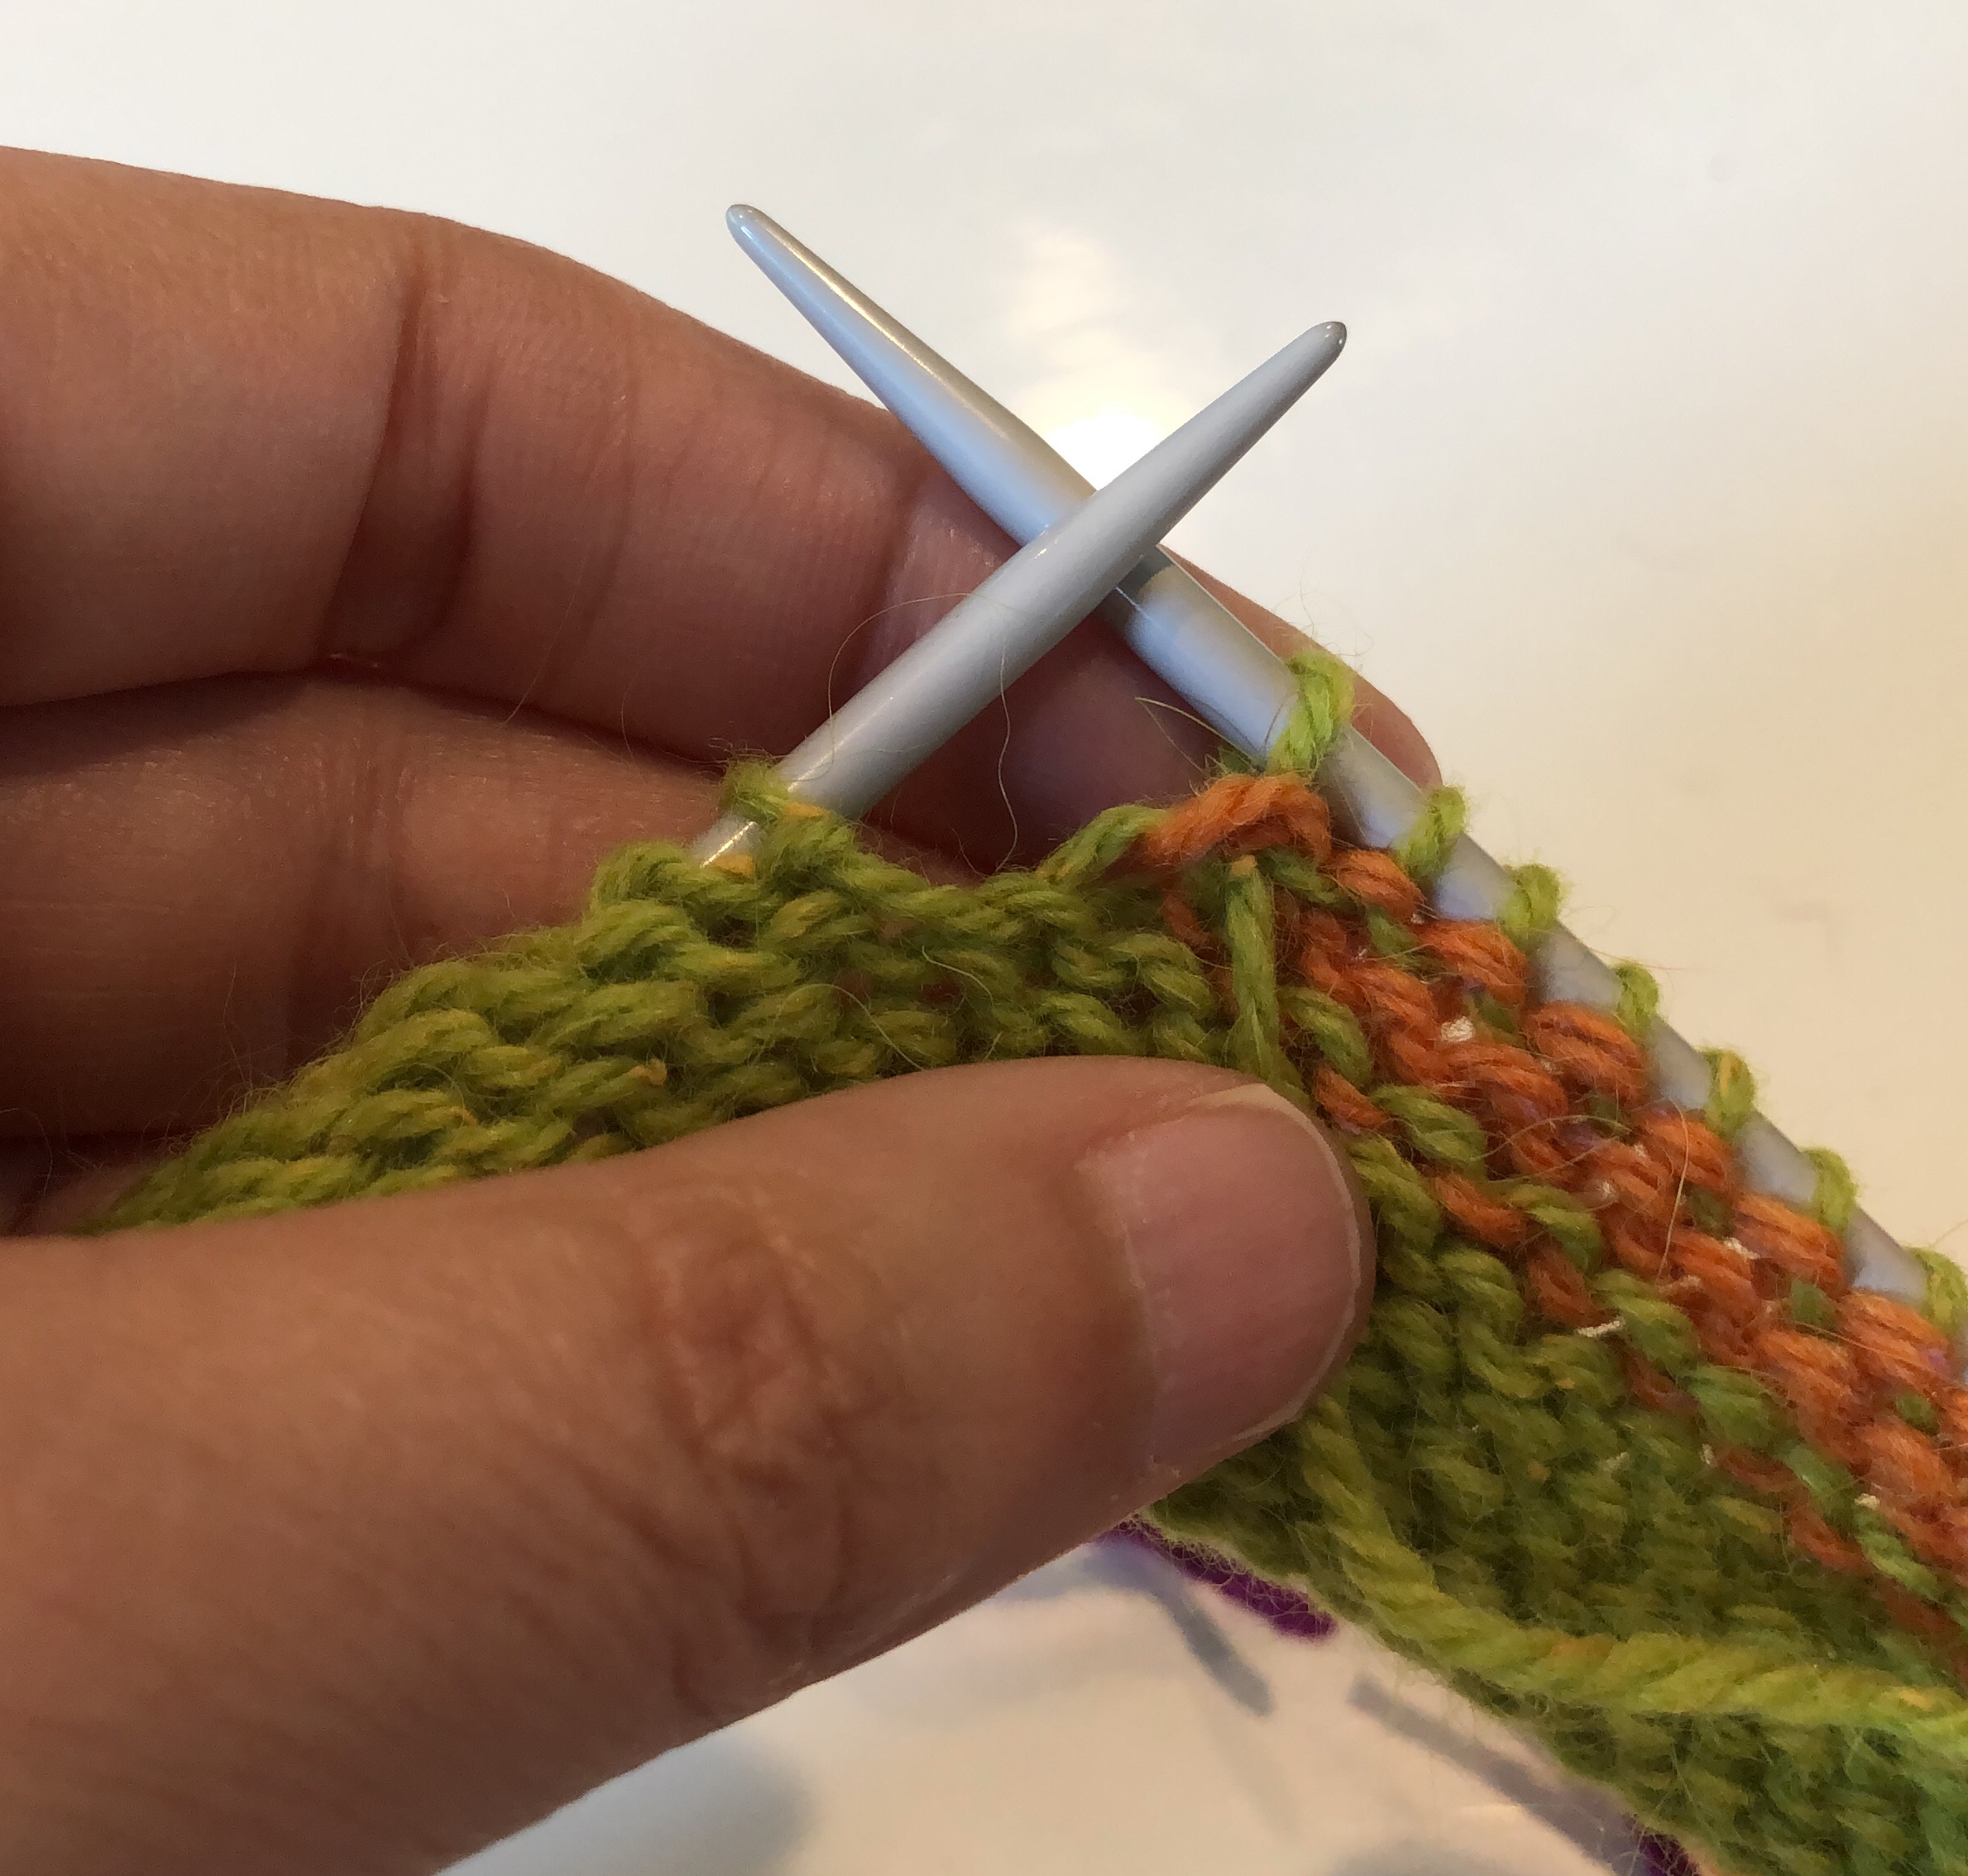
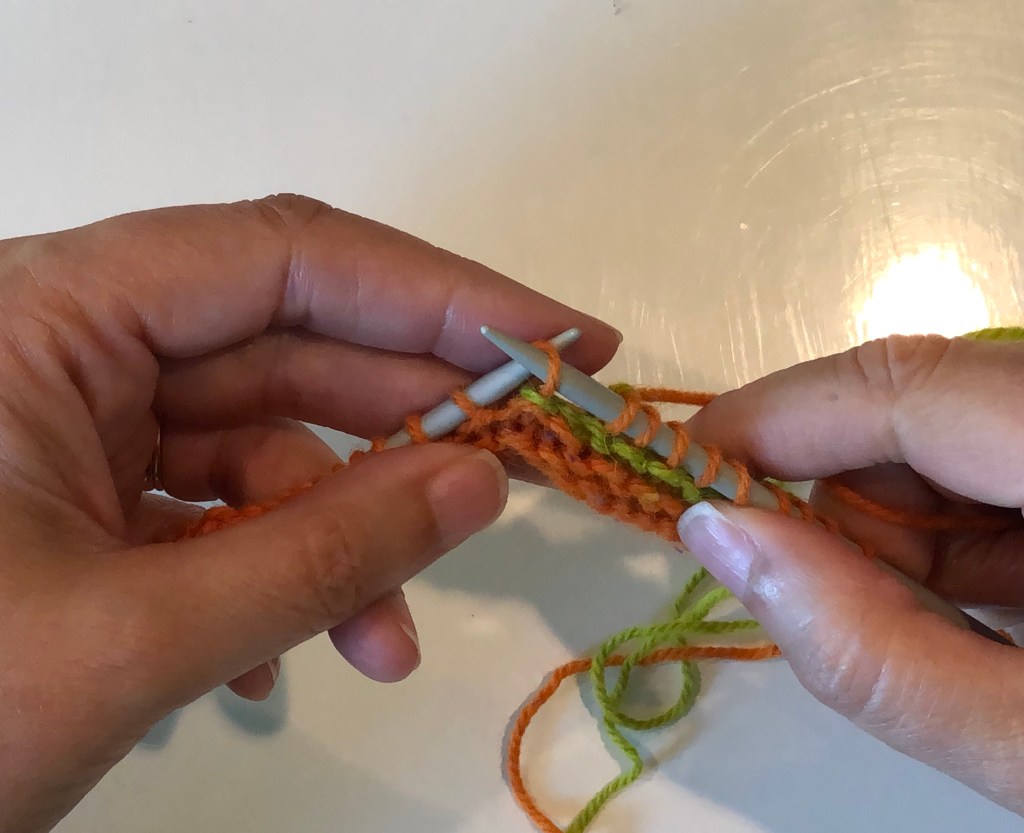
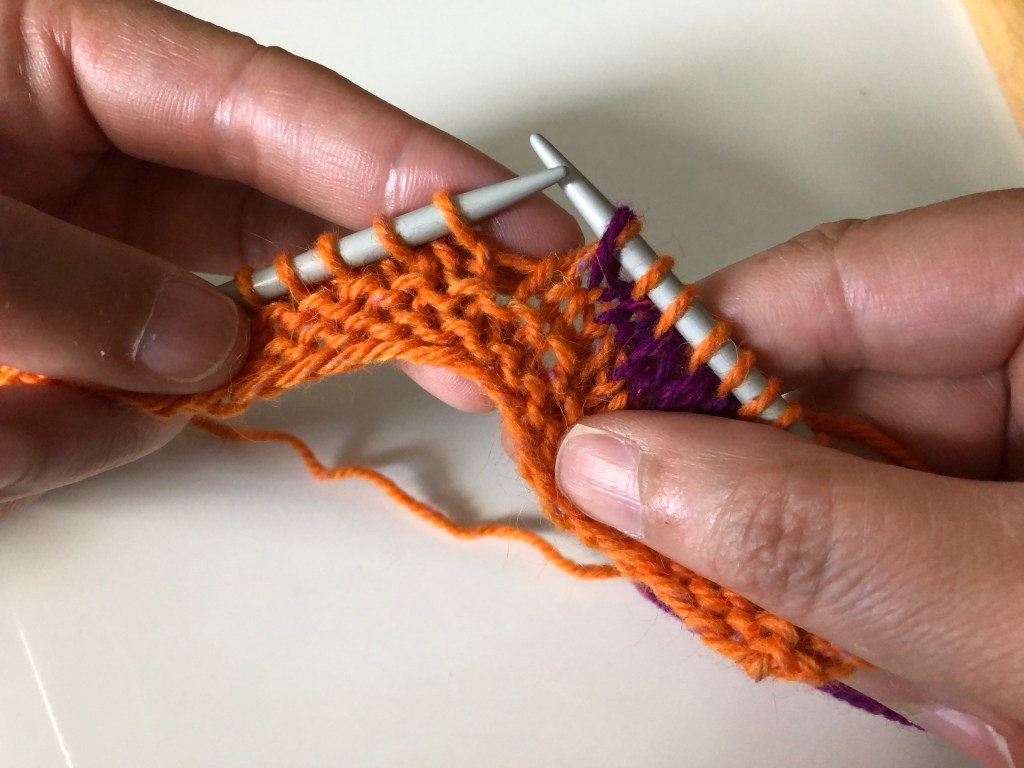
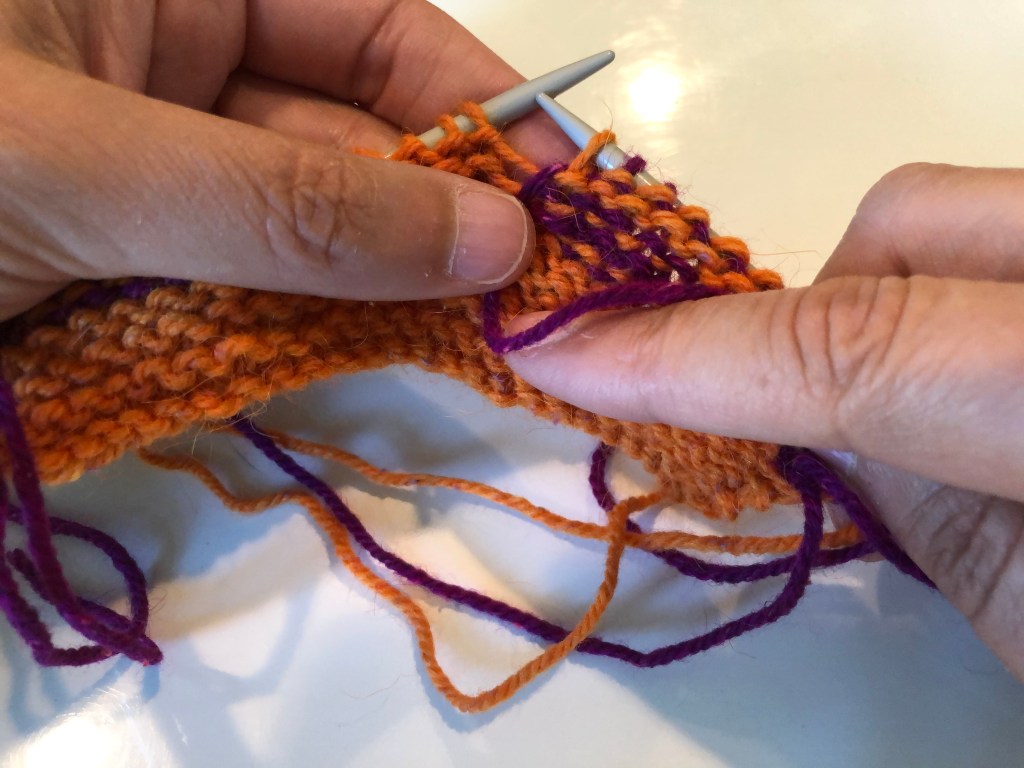
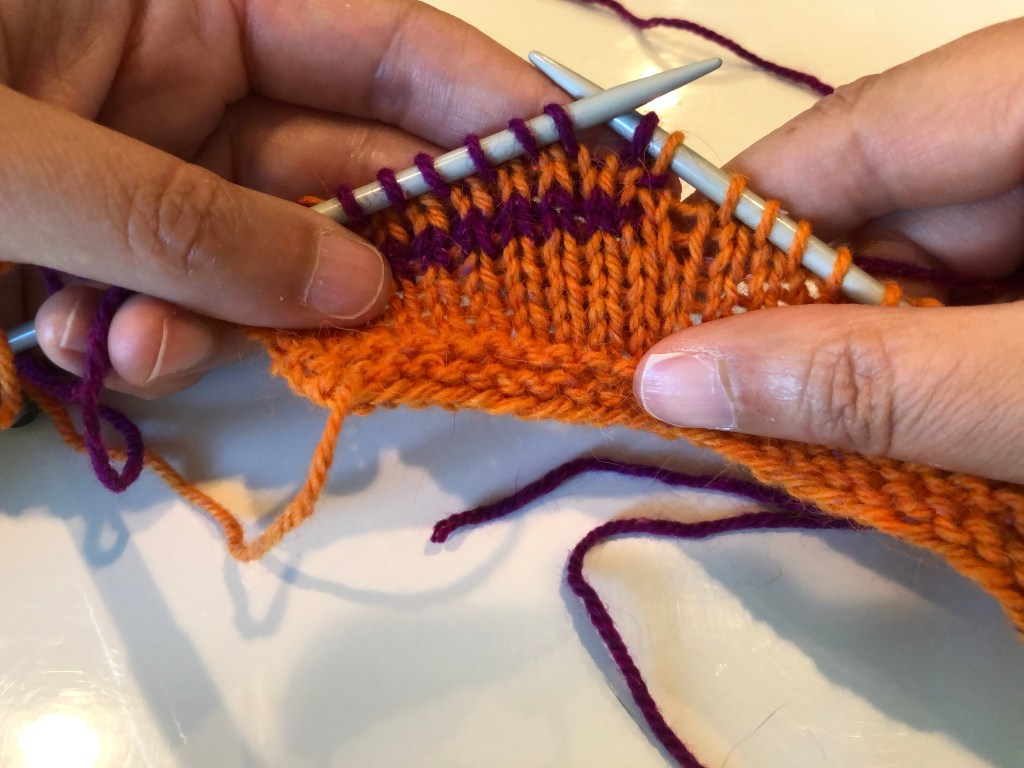
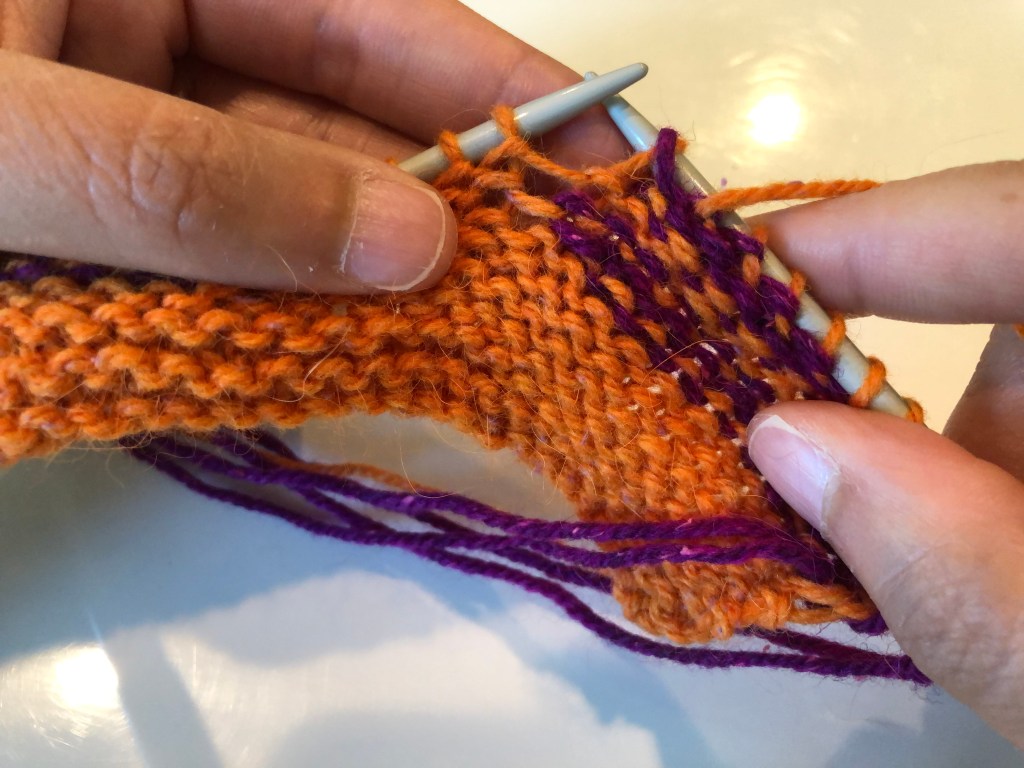
Working the Turn: Wrong Side of Stockinette
Work up to the turn on the wrong side and turn the work so that the right side is facing you. Move the yarn to the front of the work, as shown below.
Transfer the next stitch (purlwise) to the right-hand needle.
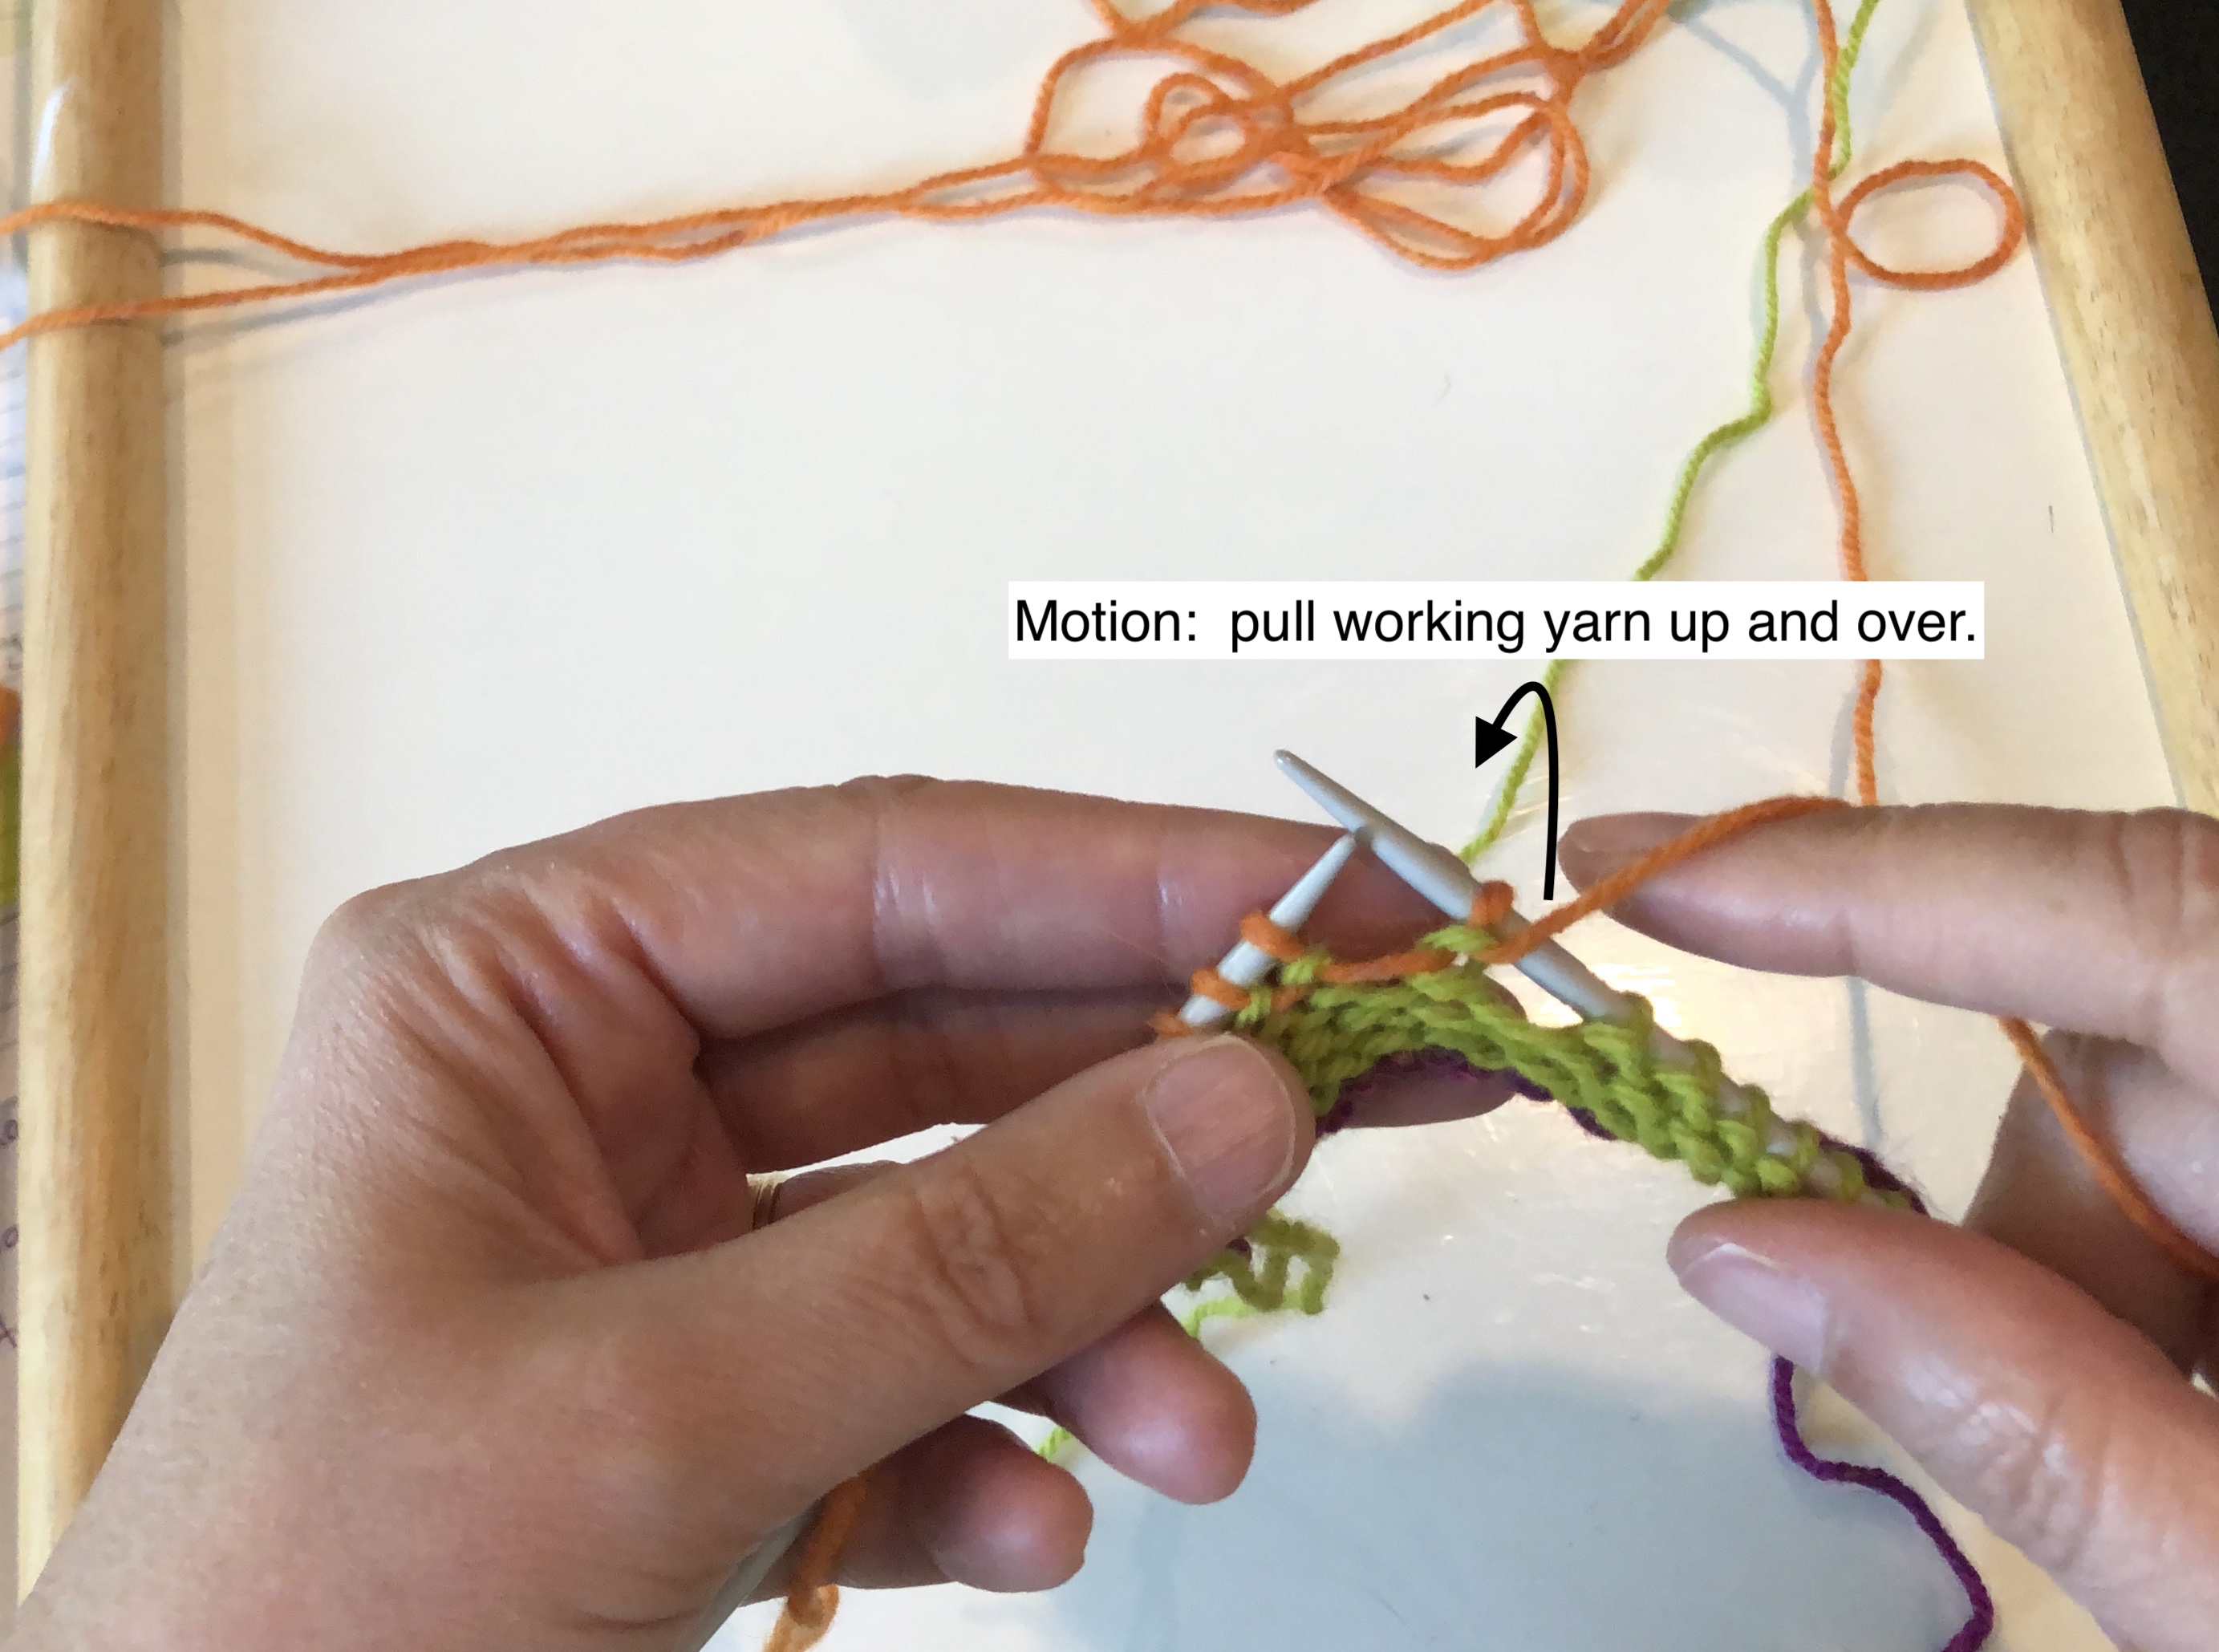
Pull the working yarn up-and-over the right-hand needle so that it is now at the back of the work.
Knit the next stitch as you normally would, and continue knitting stitches until the next turn or the end of the row.
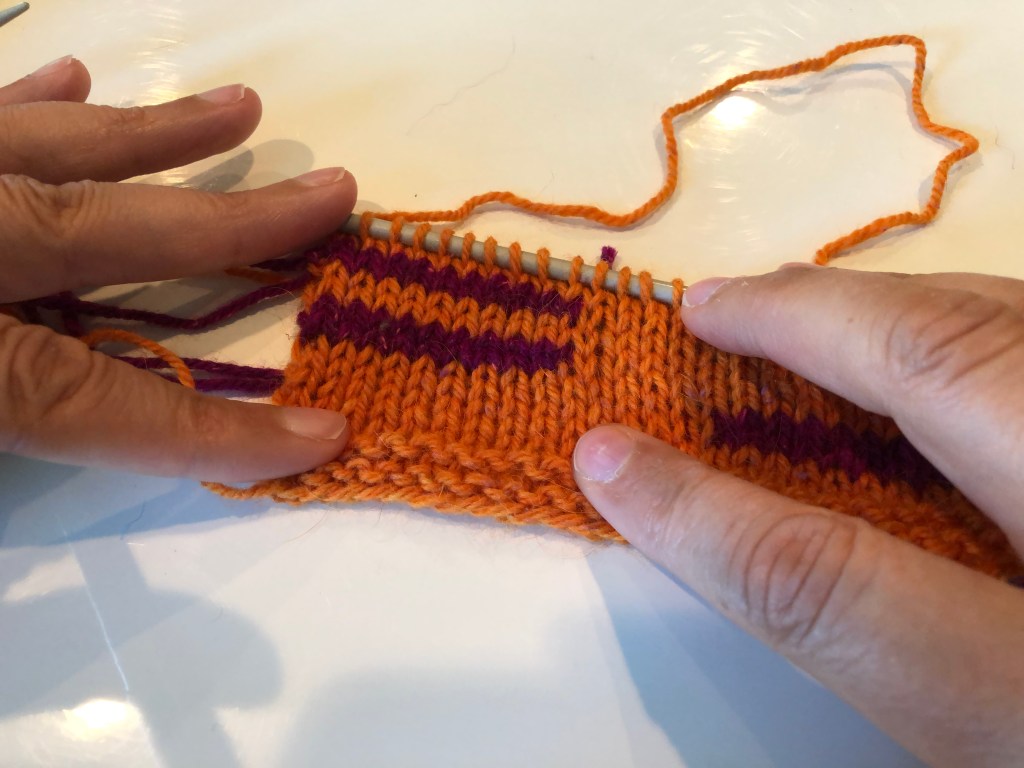
The up-and-over stitch will look like two interconnected, upside-down Vs, this time with a twist.
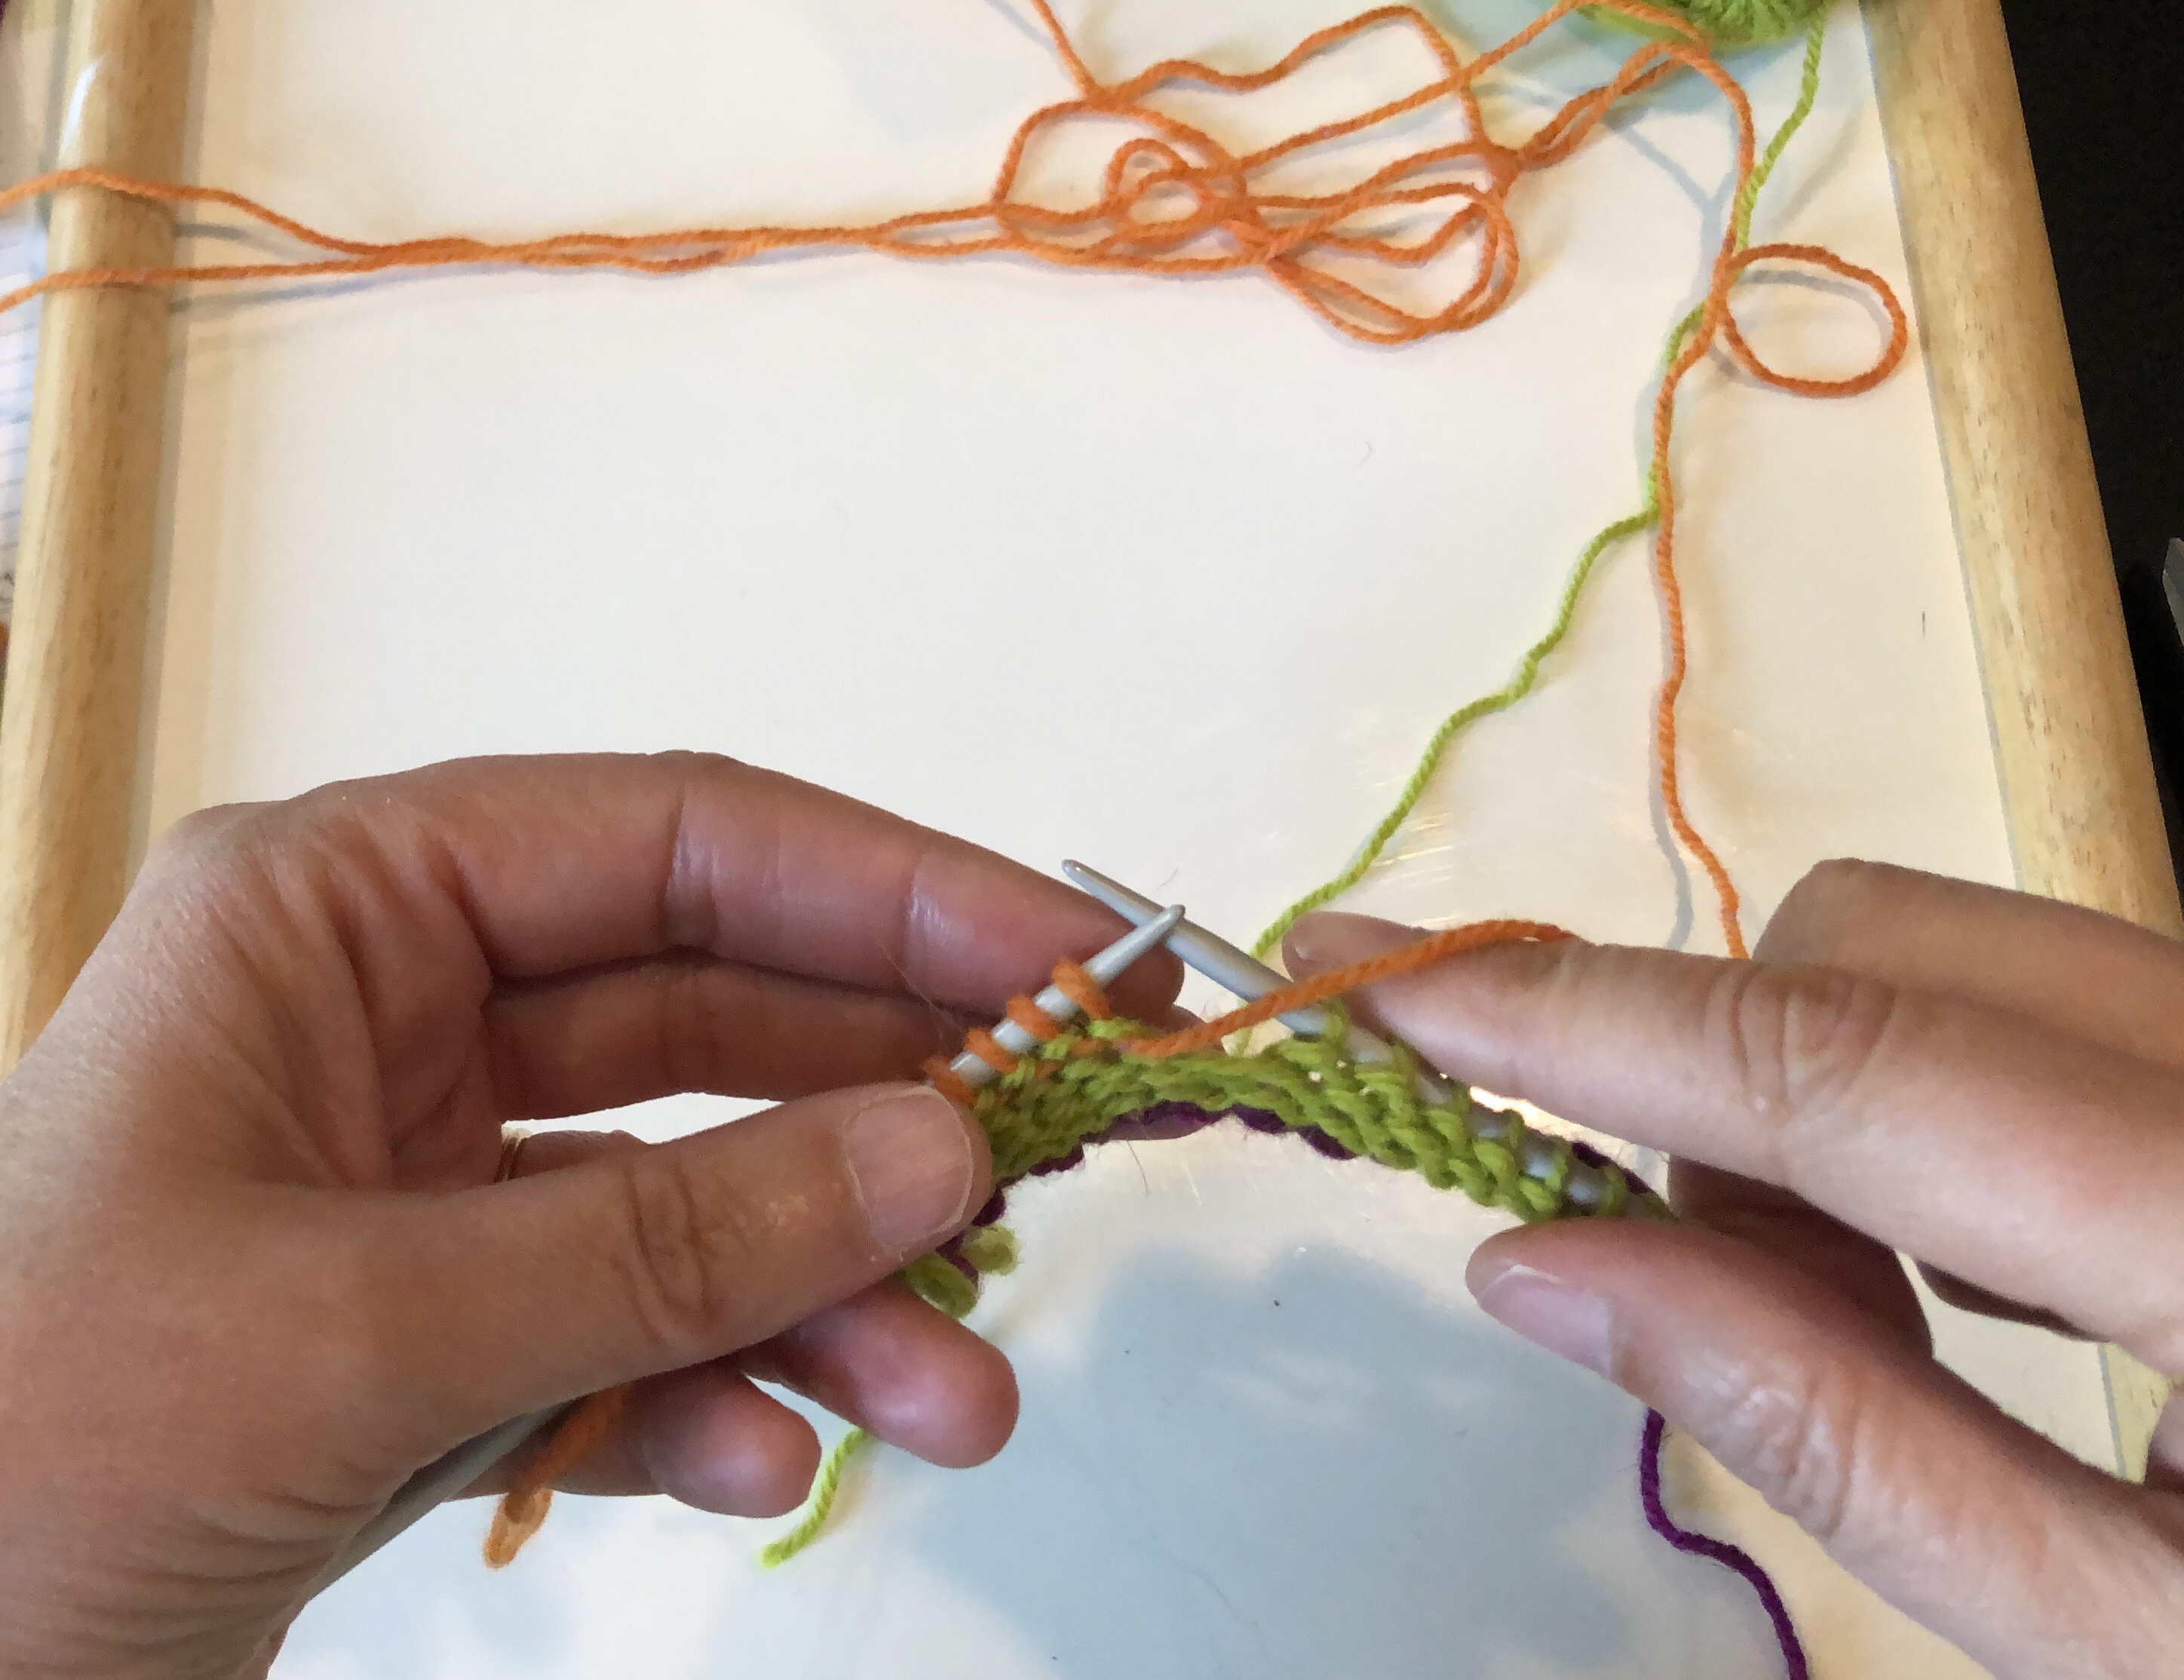
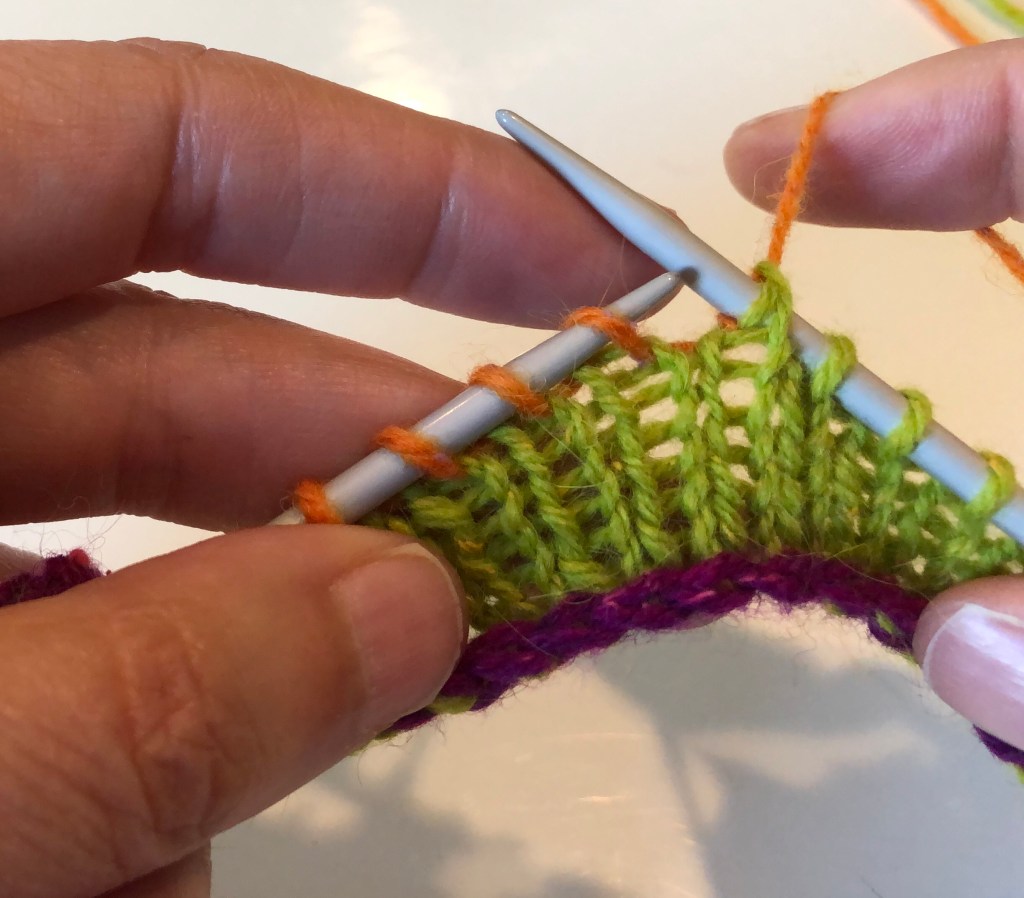
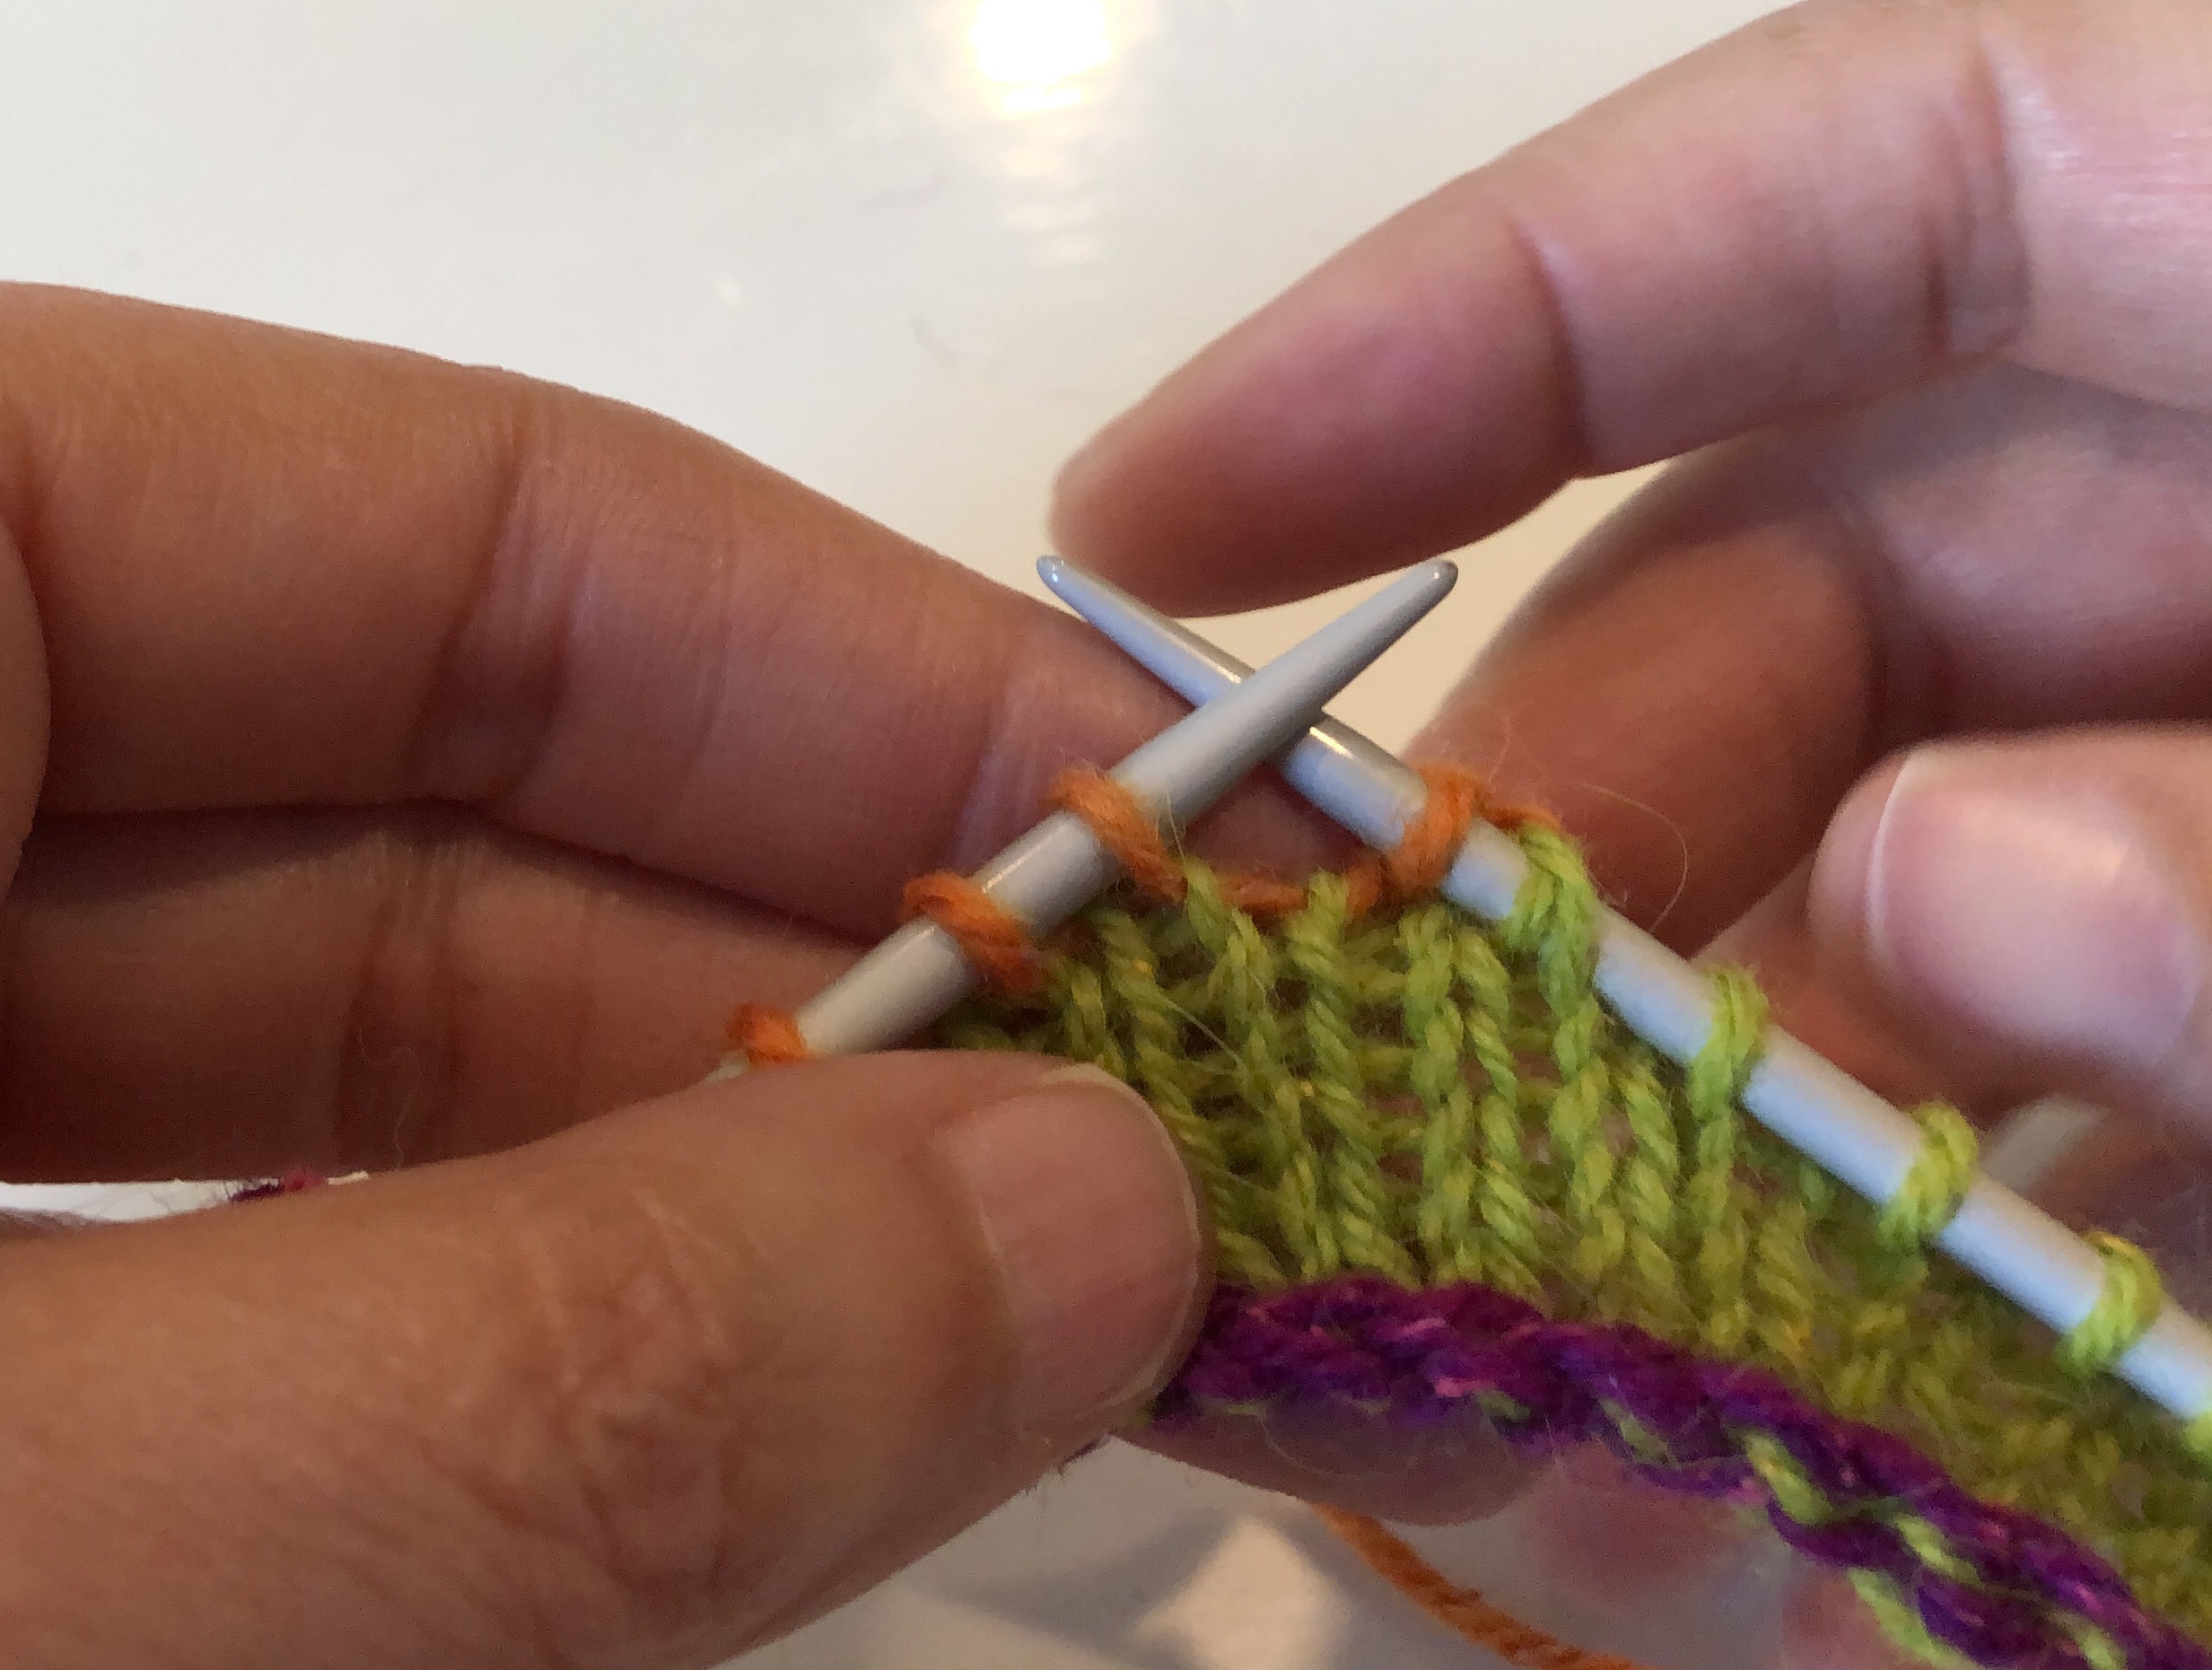
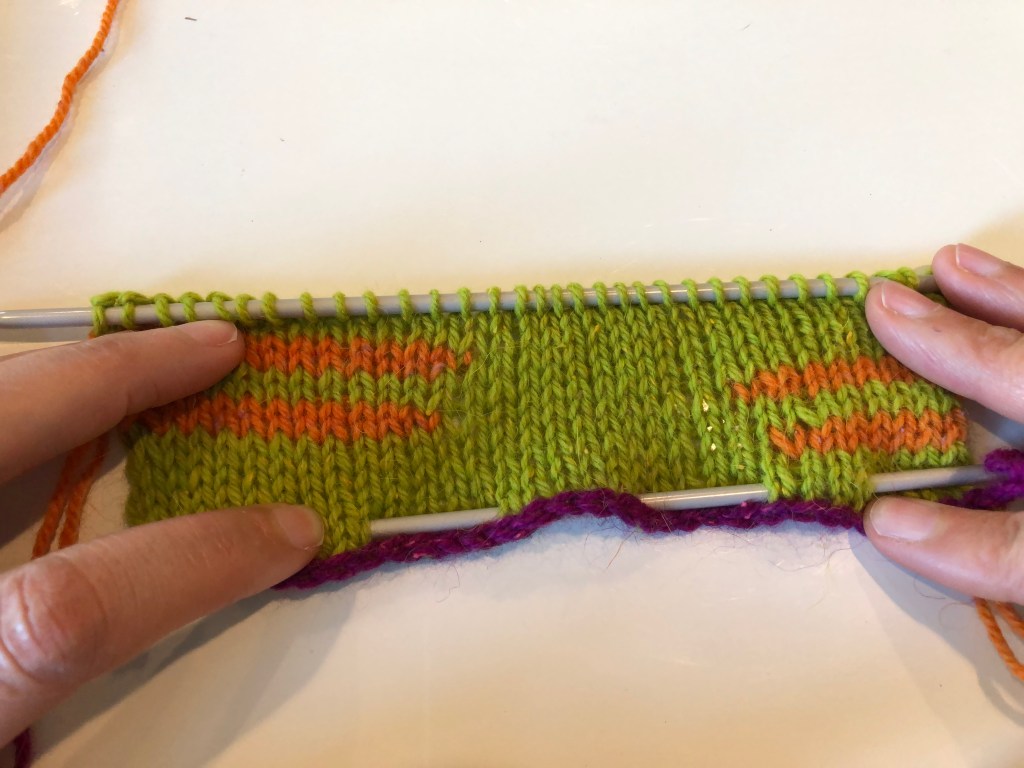
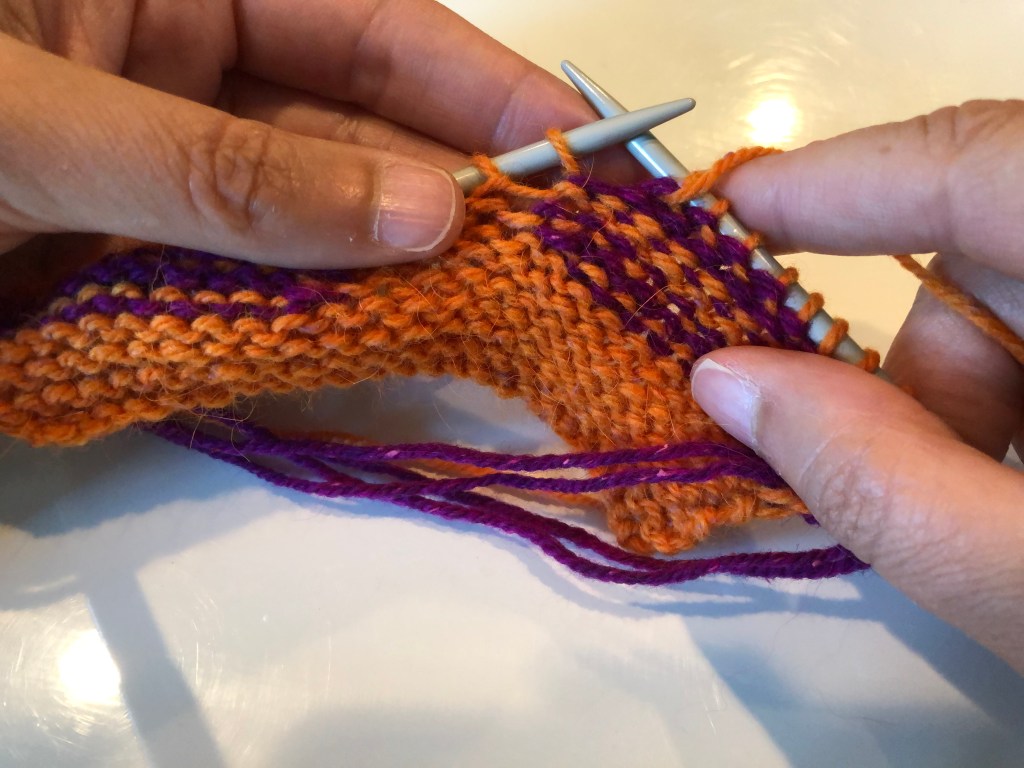
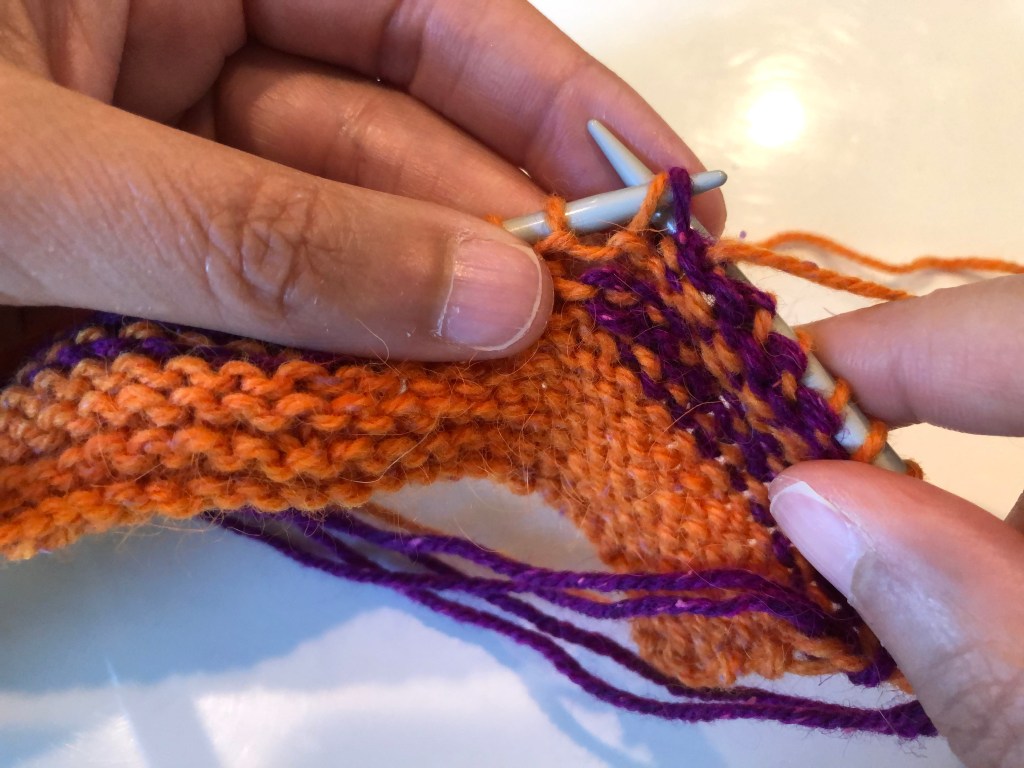
Working through the Up-and-Over Stitch
With wrong side of work facing you, purl up to the up-and-over stitch. Insert the right hand needle between the front and back legs of the interconnected Vs and purl as you normally would.
Purl up to up-and-over stitchInsert the right-hand needle with both legs of the V in front of the inserted needle.
Continue working the row to the next turn or the end of the row.
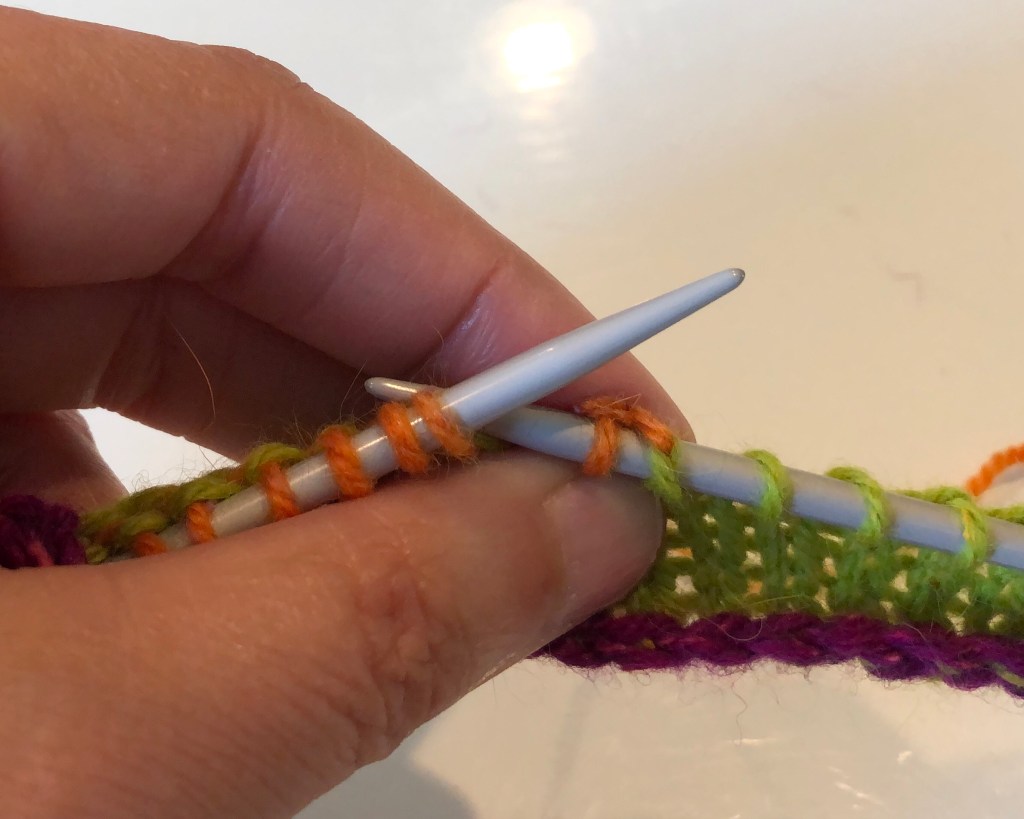
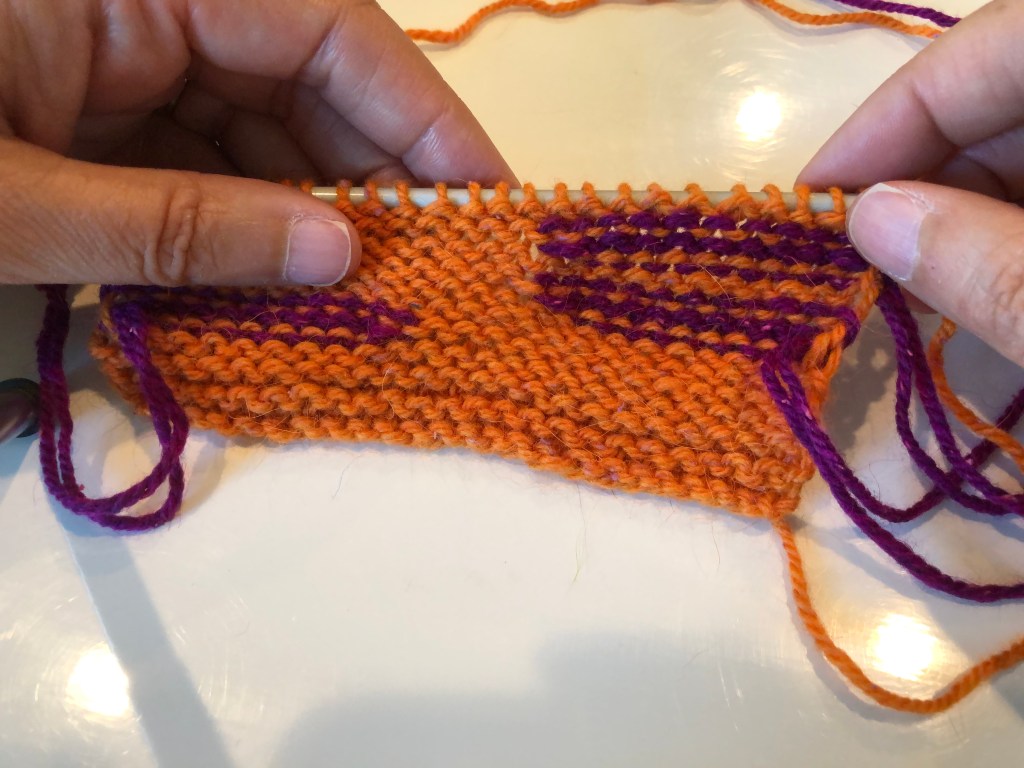
View From Front and Back
Up-and-Over stitch from the right side.
Working through the up-and-over stitch on the wrong side.
Caramel apples are delicious. Chocolate covered caramel apples are divine. The first time I tried to make caramel apples I got frustrated. And burned. Nothing burns like sticky, hot caramel. I now have an aversion to and a healthy fear of working with hot caramel, so I figured out how to make caramel apples without using hot caramel. Here are my cheats and simplifications.
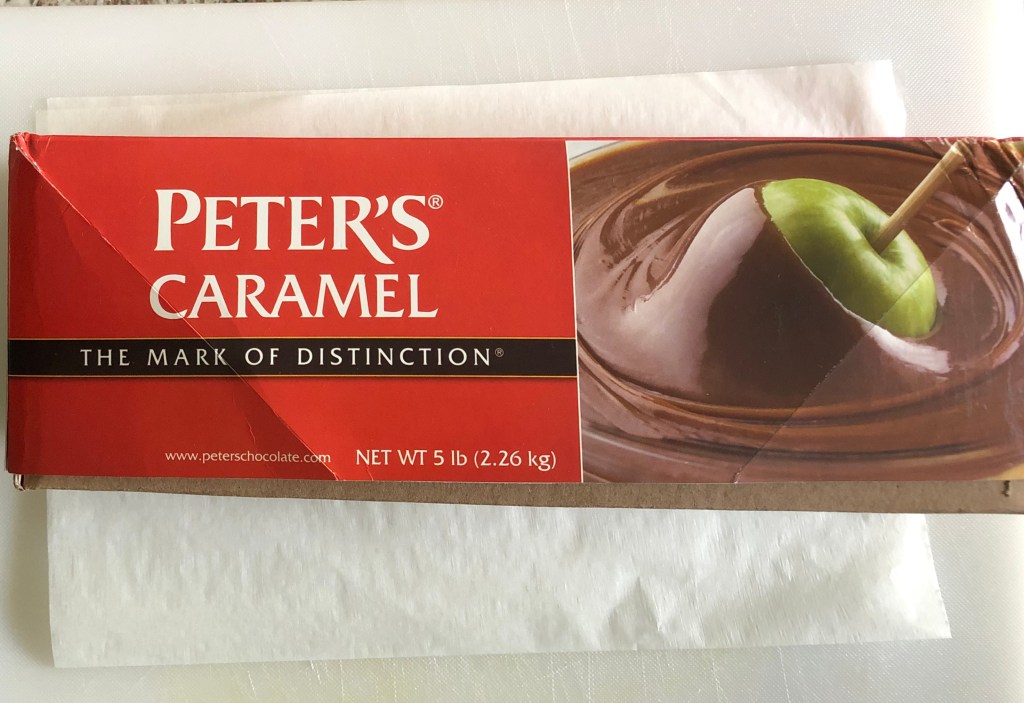
First cheat/simplification: I don’t make my own caramel. There are so many variables when making caramel that don’t include the variables in the ingredients – the exact temperature, the humidity, how quickly the mixture is cooled. The list goes on. So, I found a good source of caramel – Peter’s Caramel – and have used it ever since. It tastes good. It has a consistent quality. I know what I’m getting. Homemade caramel might be more delicious, but this is easier. Plus, I’m coating it with chocolate – high quality chocolate. The taste and texture of the caramel is sandwiched between the taste of the apple and the taste of the chocolate. My palette is not discriminating enough to tell the difference. So for me, it’s just not worth the effort to make my own caramel. My local kitchen store (Garlic Press in Uptown Normal, IL), local cake decorating store (Decorator’s Grocery in Bloomington, IL), and local-ish pastry supply center (Sweet Treat Supply of Gridley, IL) all carry Peter’s Caramel. Both the Garlic Press and the Decorators’ Grocery sell it in smaller quantities in addition to the five-pound loaf.
Yummy. Easy.
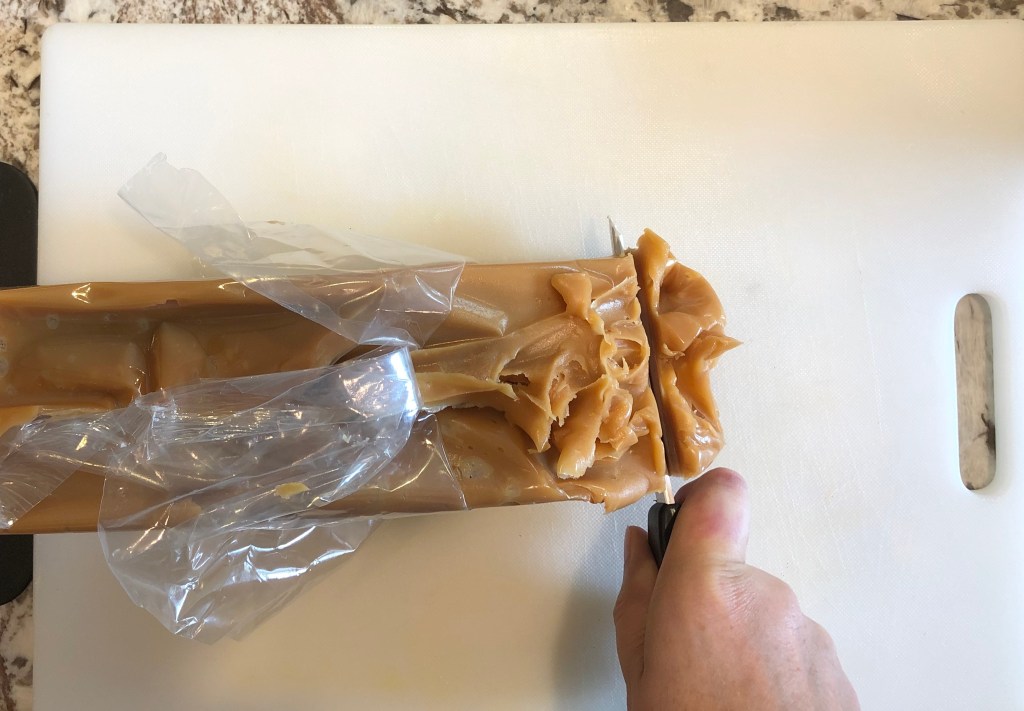
Second cheat/simplification: I don’t heat the caramel or dip the apples, as shown in the picture on the box above. There is a recipe for caramel apples on the box but I don’t use it, because – hot caramel. Ouch. Plus, when you melt the caramel and dip the apples, the hot caramel tends to slide off the apples, and there ends up being a lot of wasted caramel.
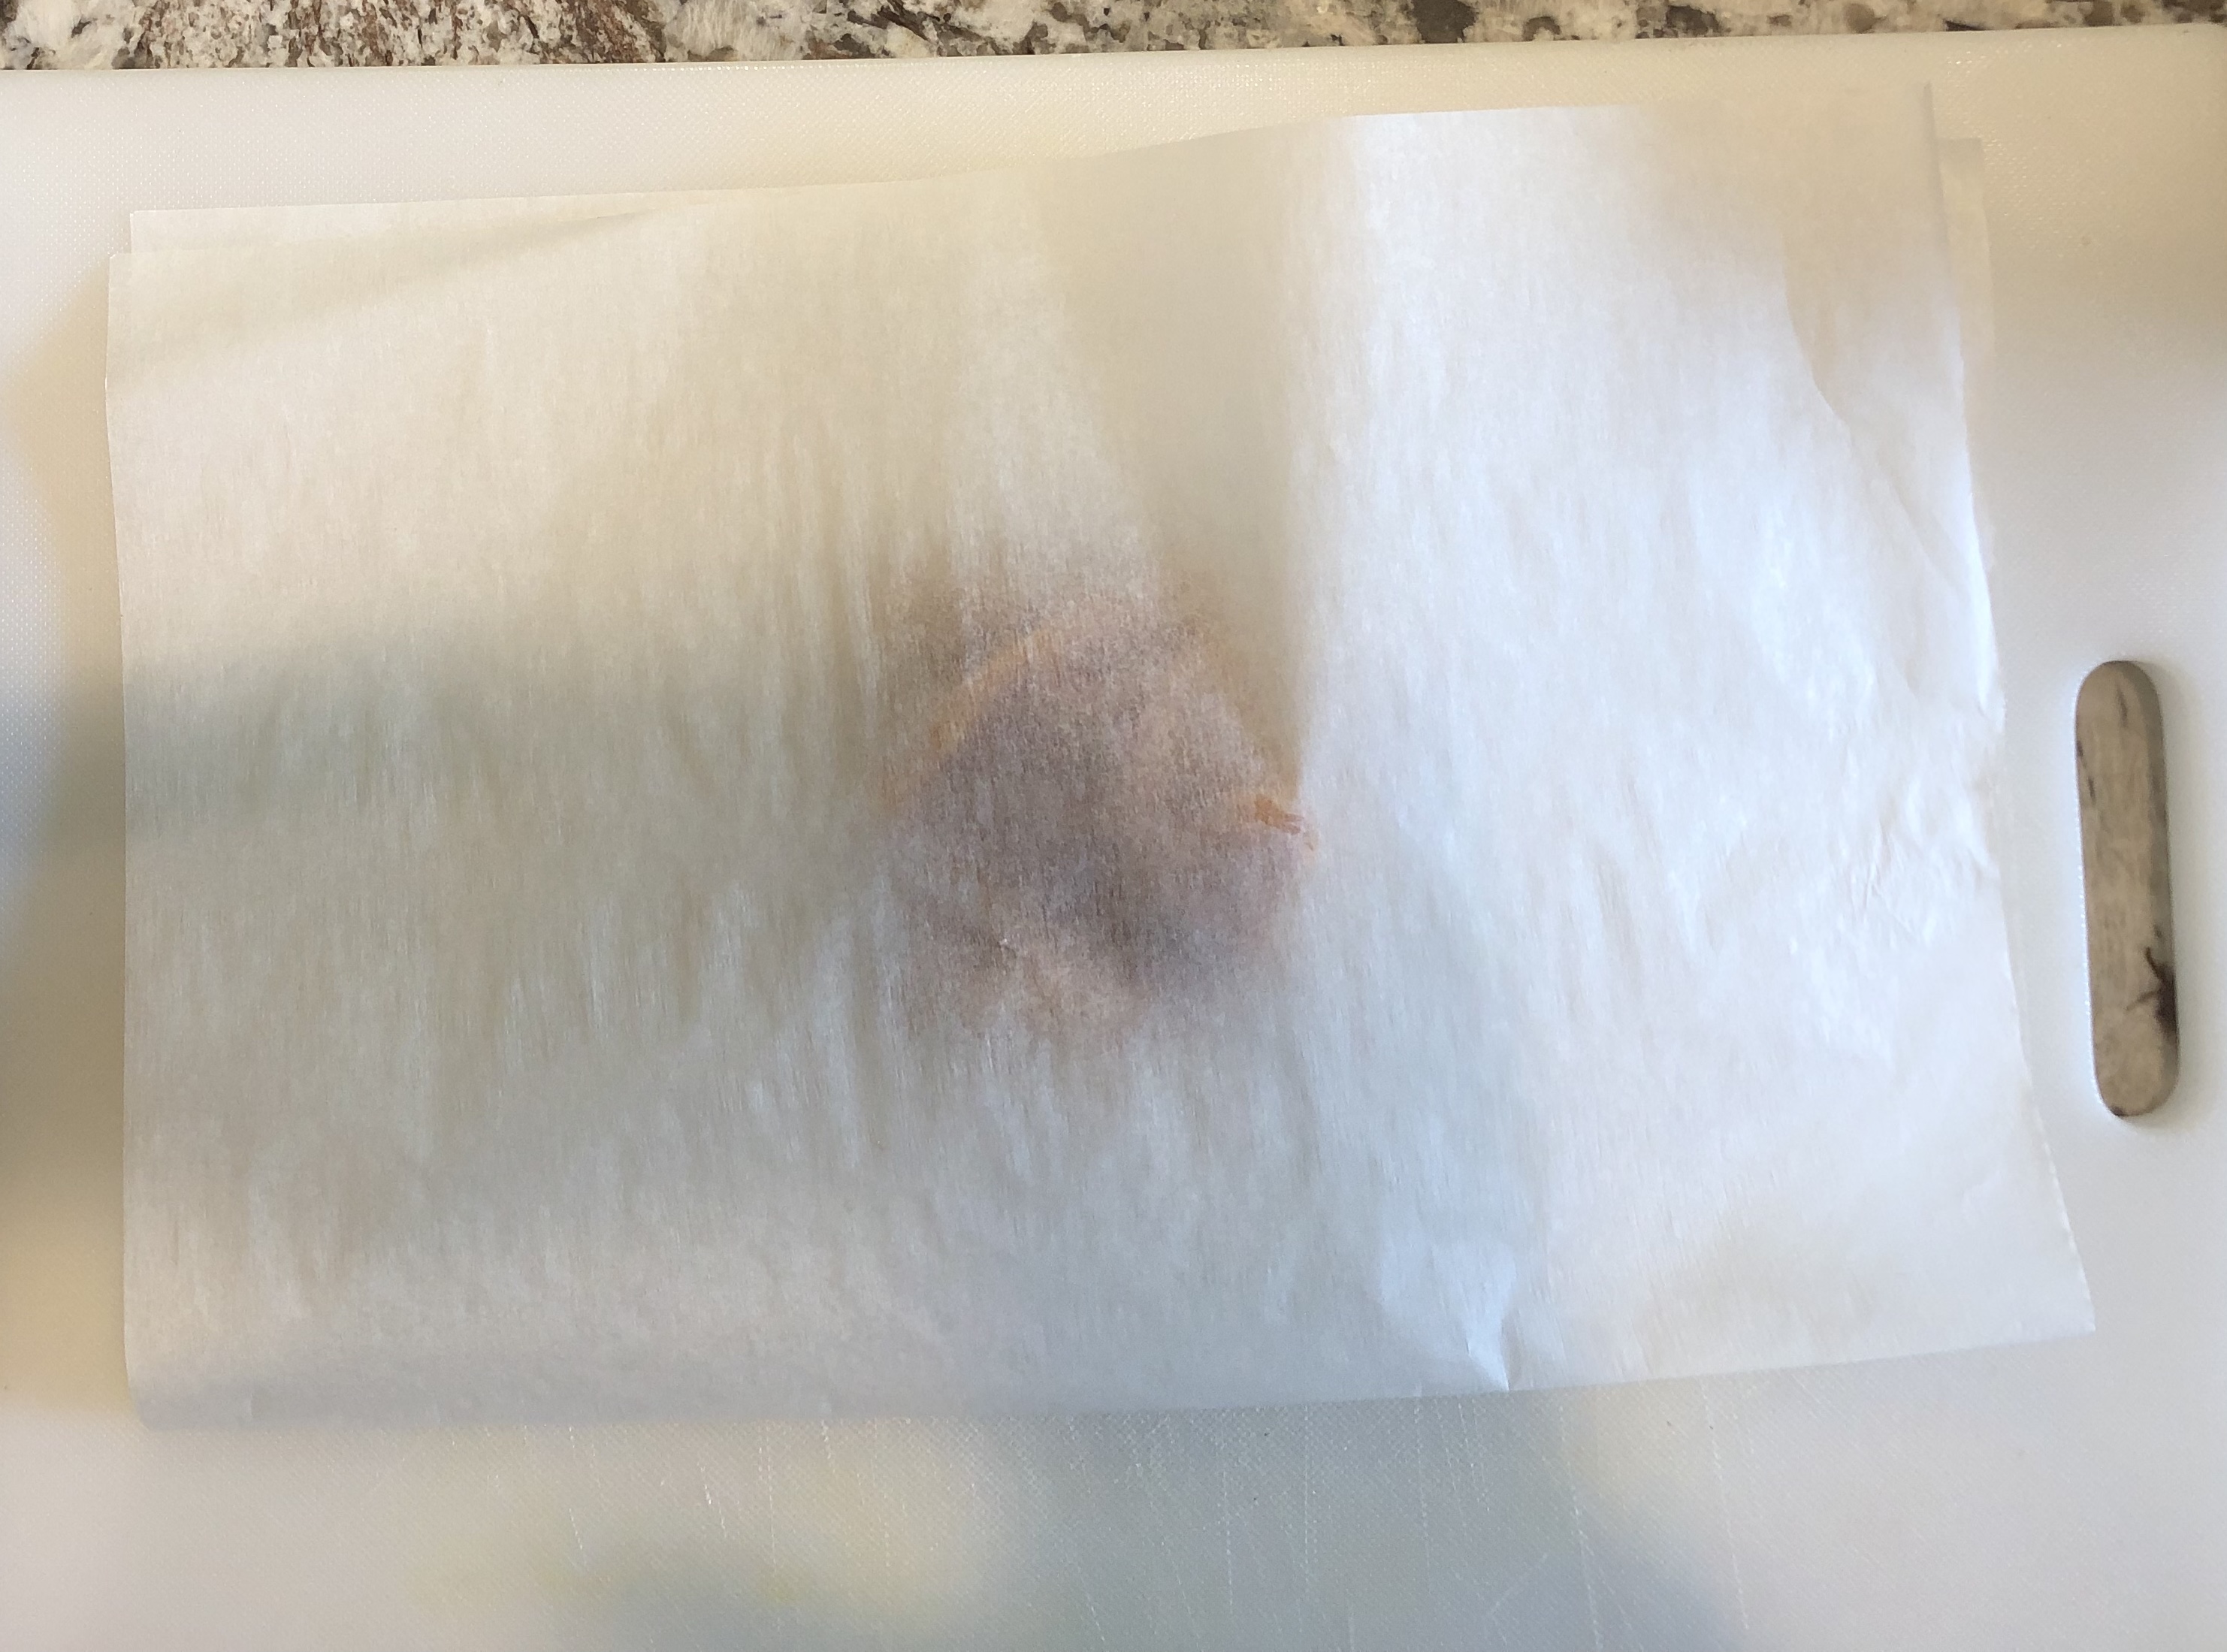
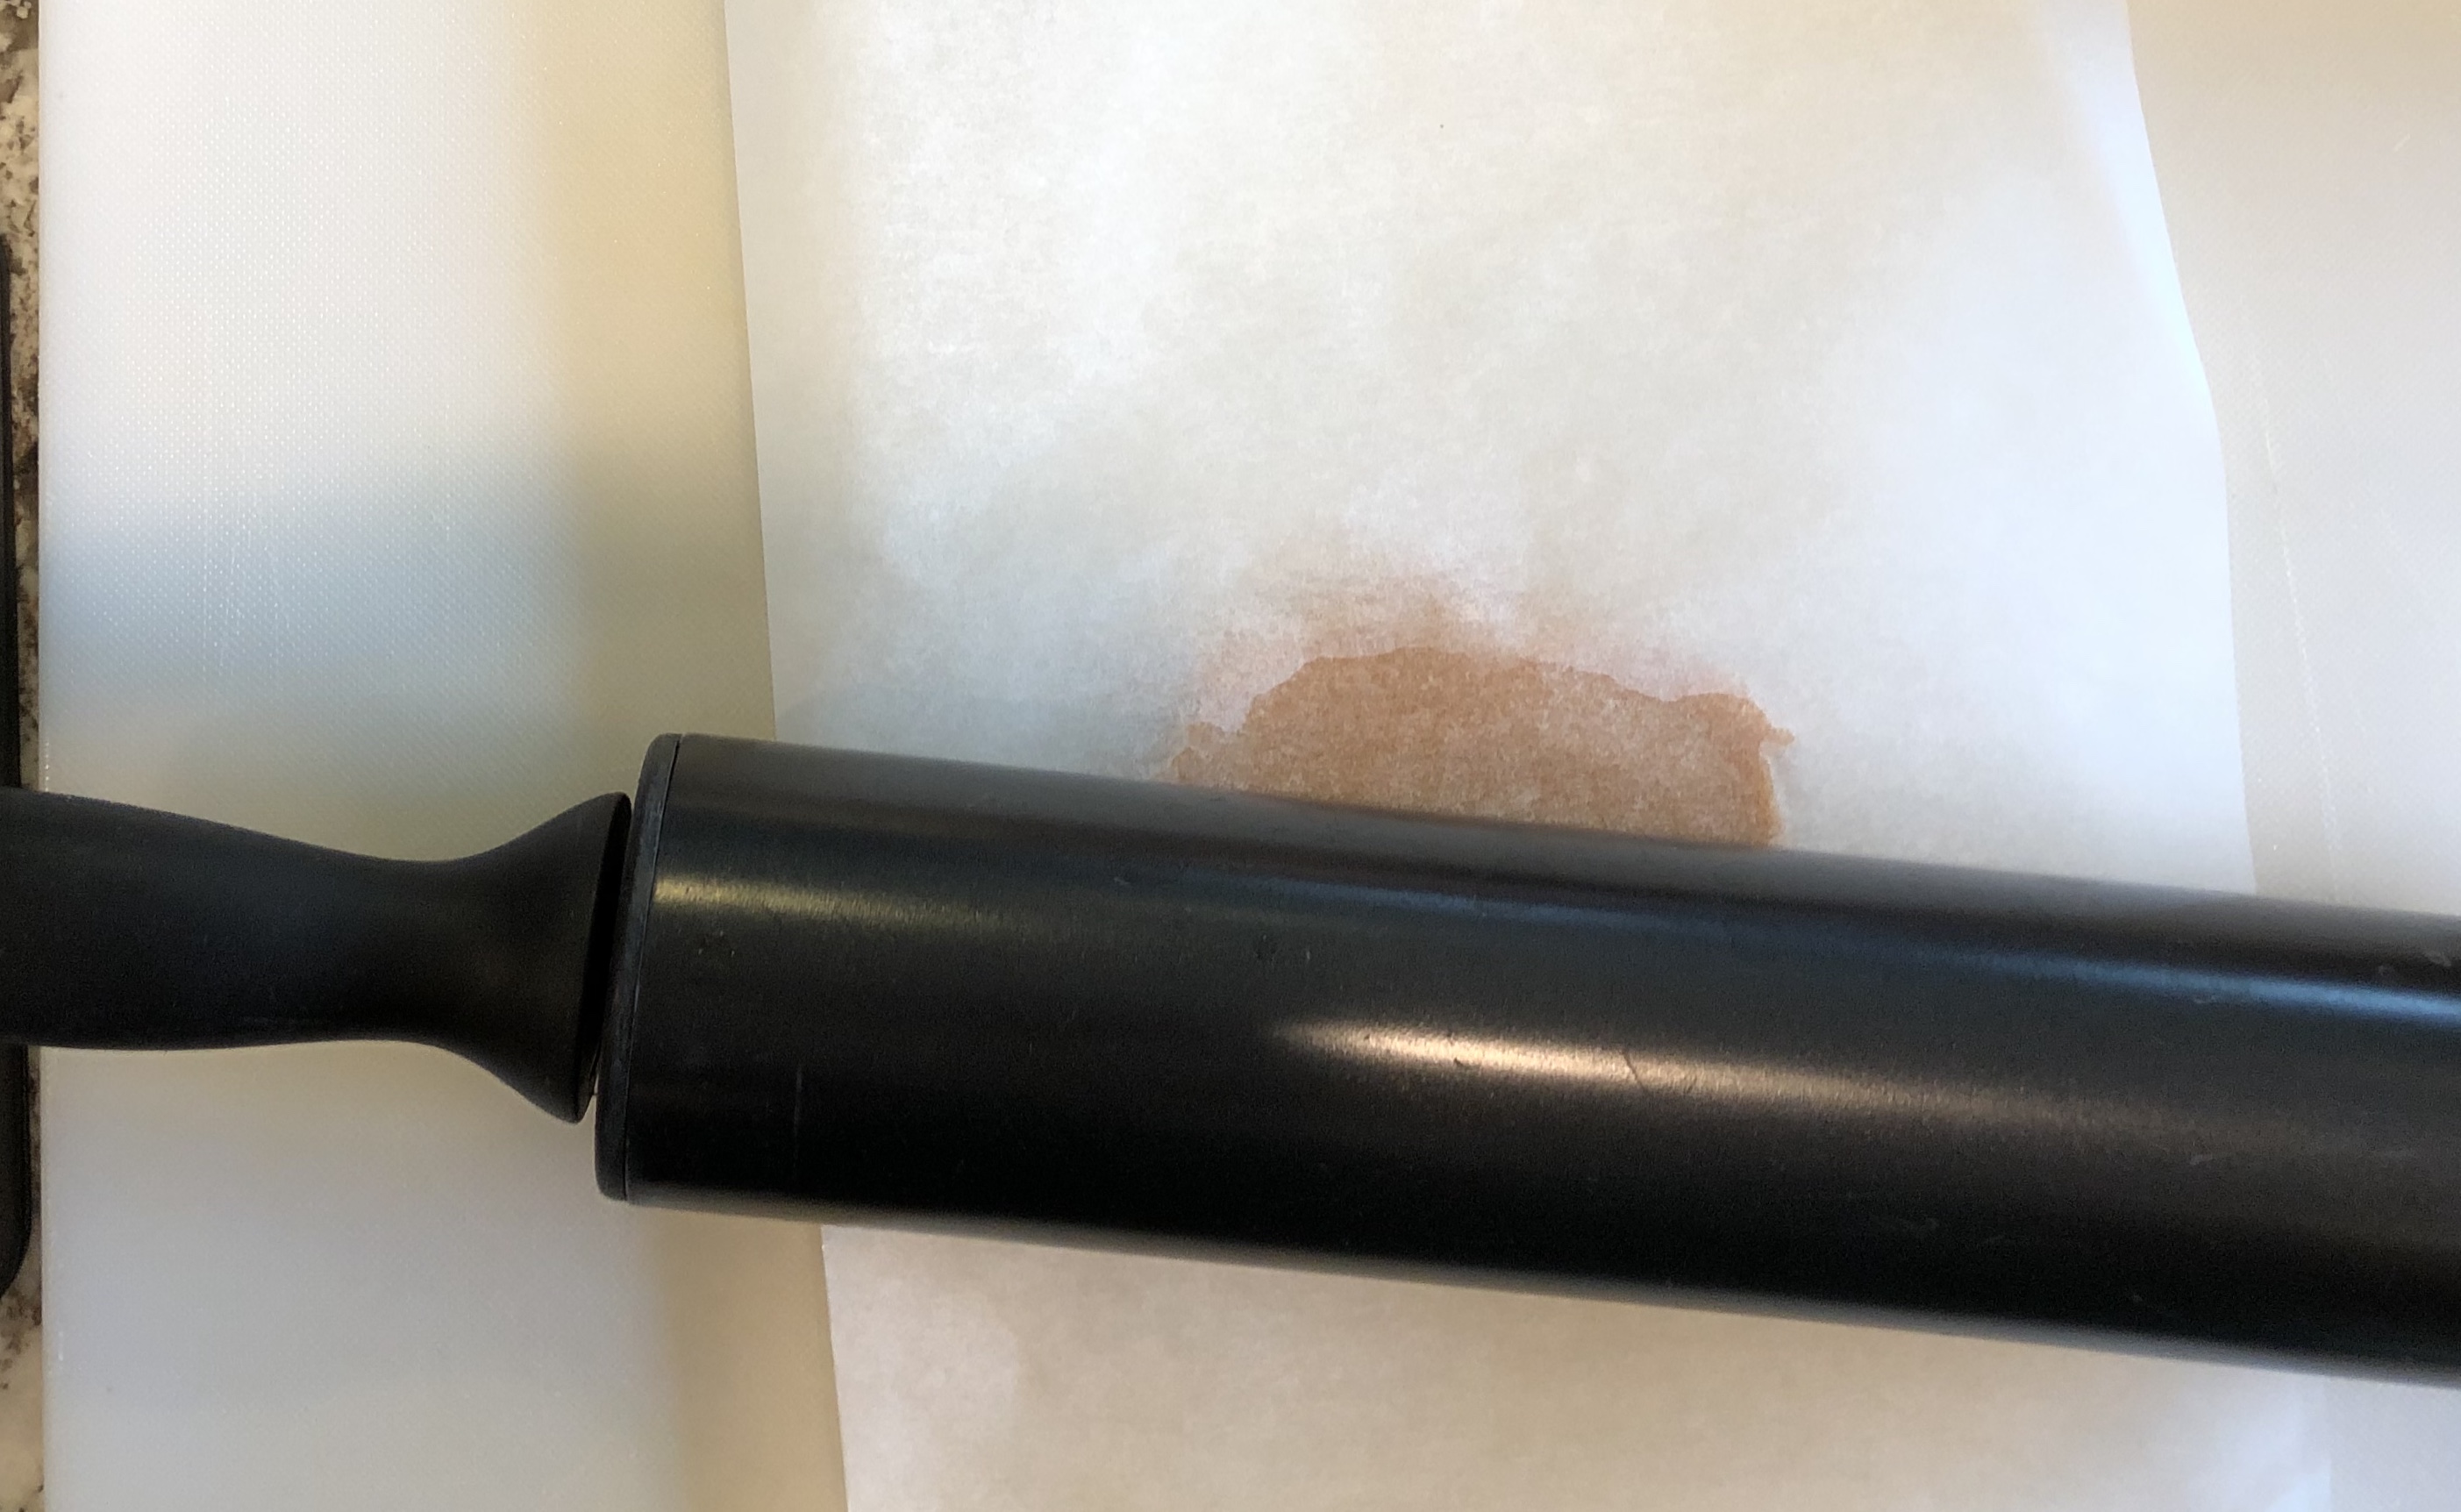
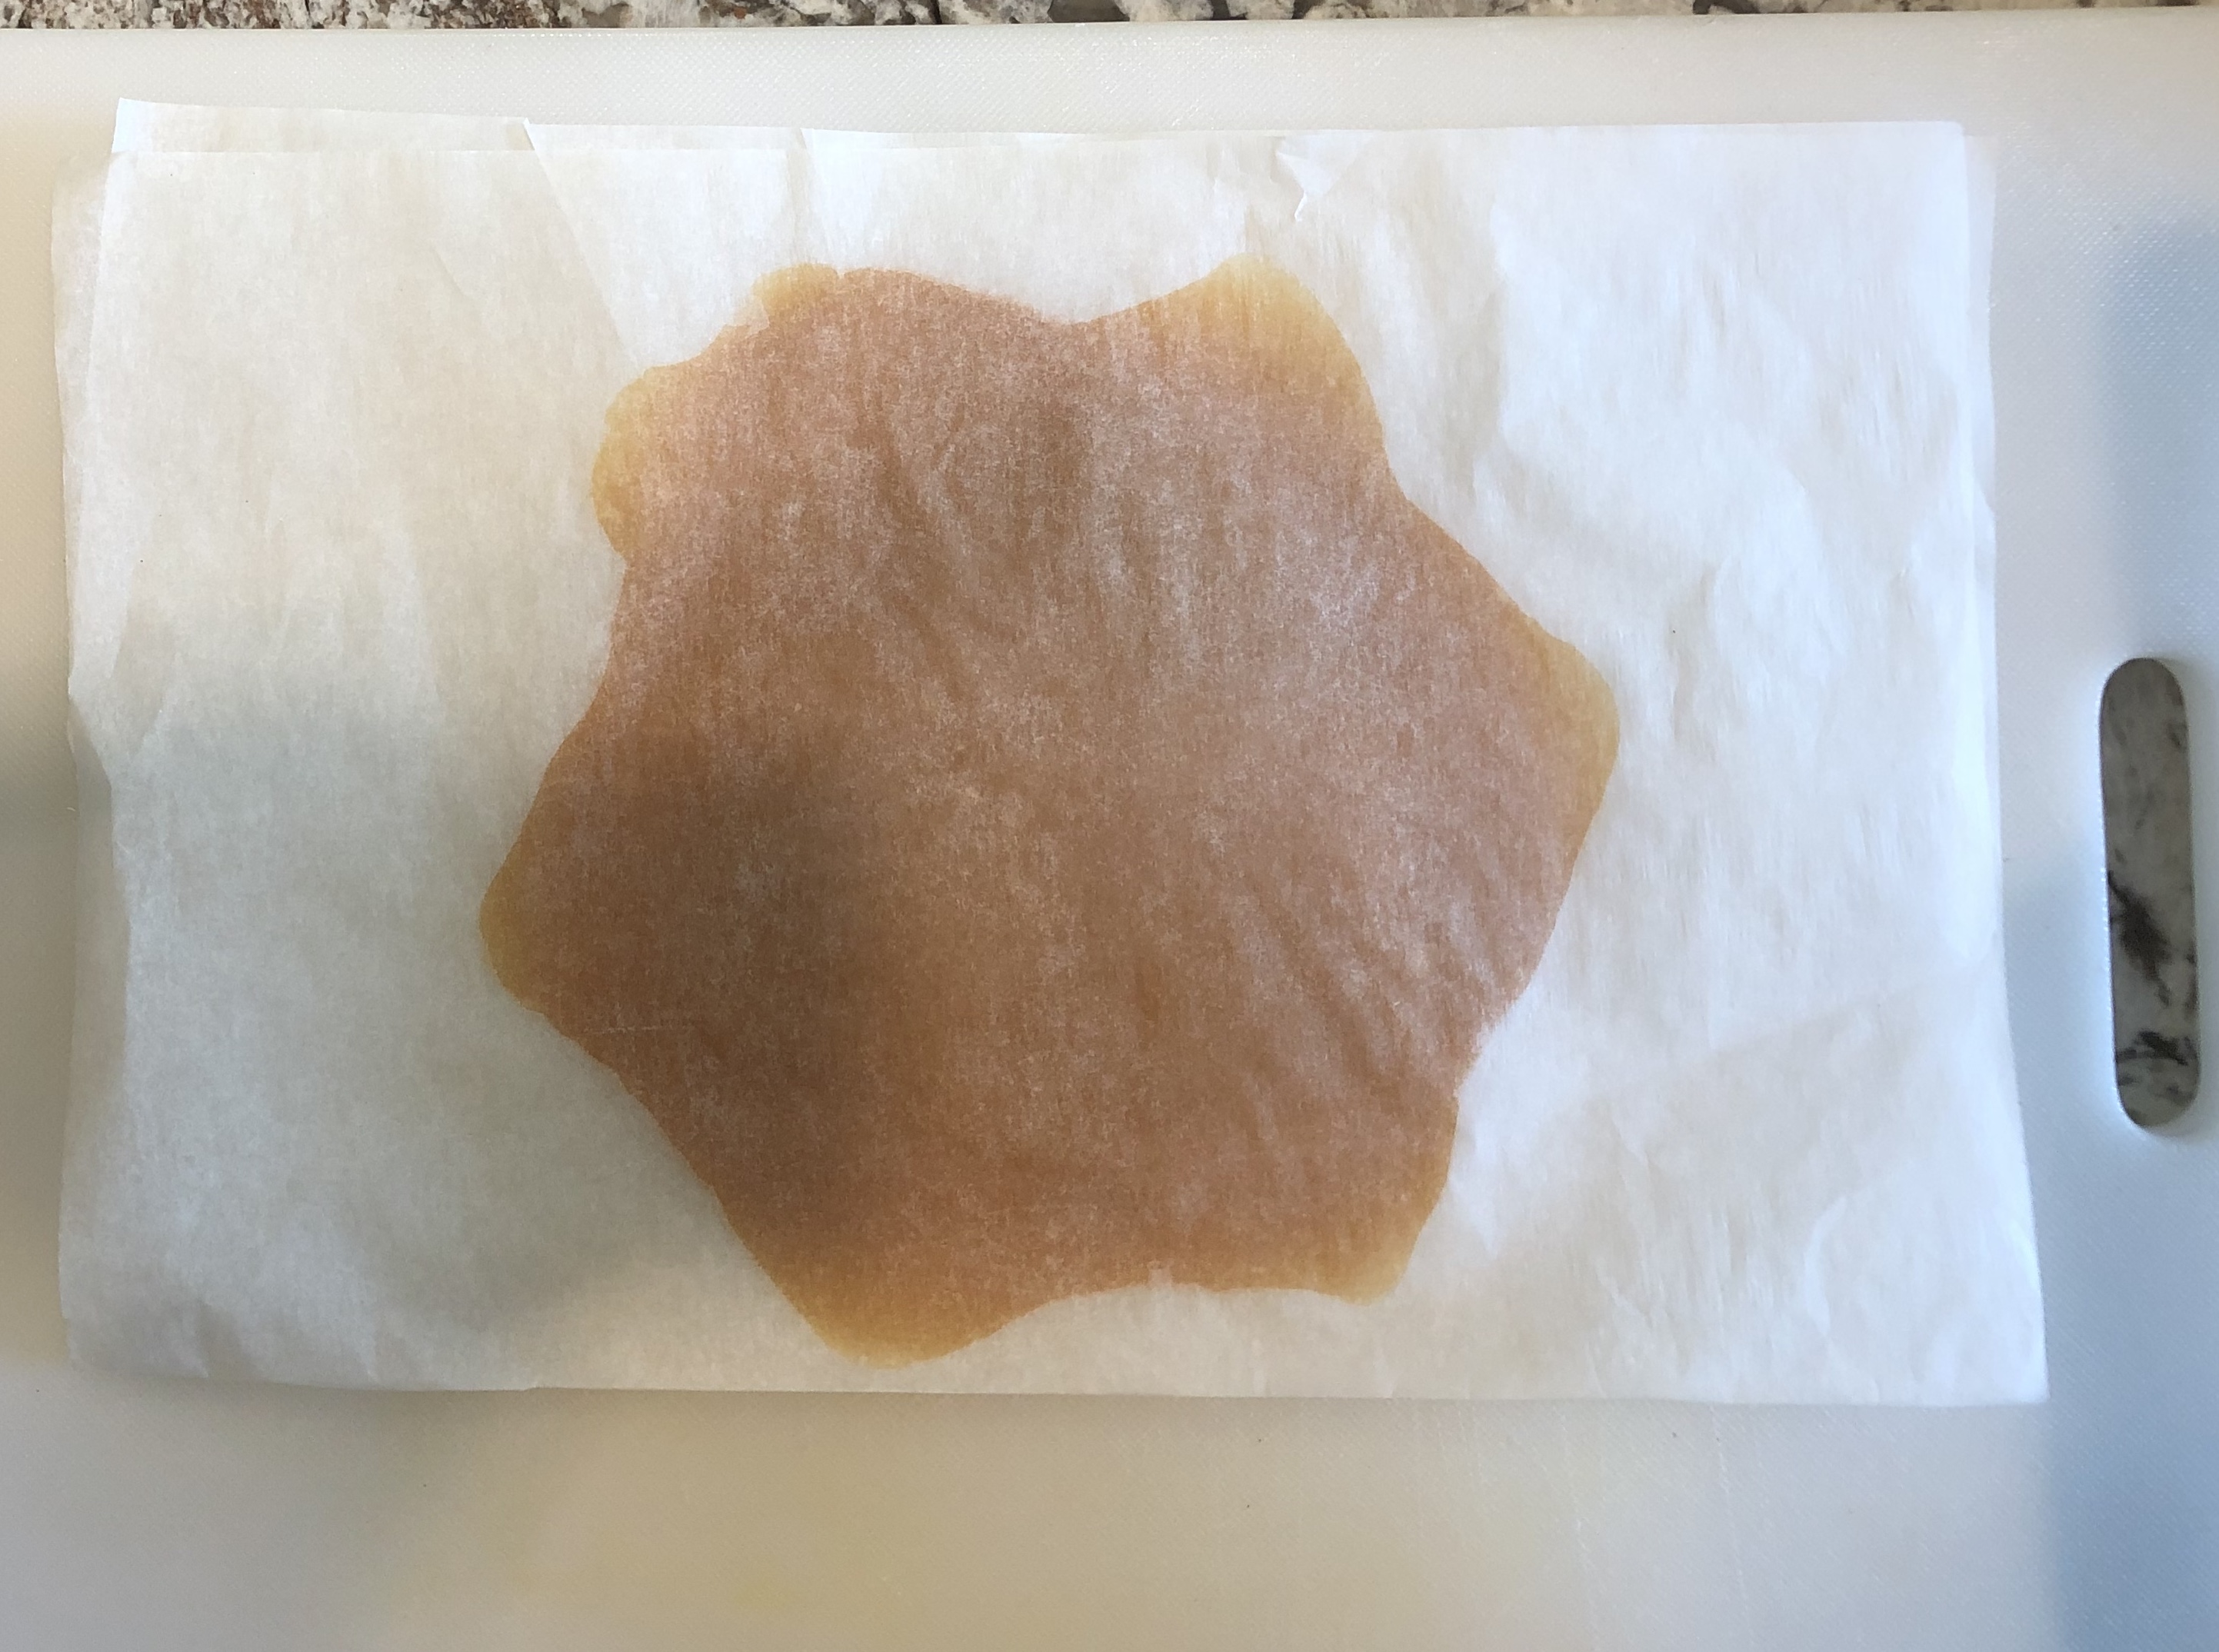
Instead, I portion just enough caramel for one apple (I cut about 1/4 inch of caramel from the loaf – this is between 60-75 g of caramel). I place the caramel between two sheets of parchment paper and microwave for 8 seconds on 50% power – just long enough to make the caramel malleable, but not hot. I roll the caramel into a rough circle about 1/8 inch thick, and place it in the refrigerator for a few minutes to cool.
The cooled caramel releases easily from the parchment paper.
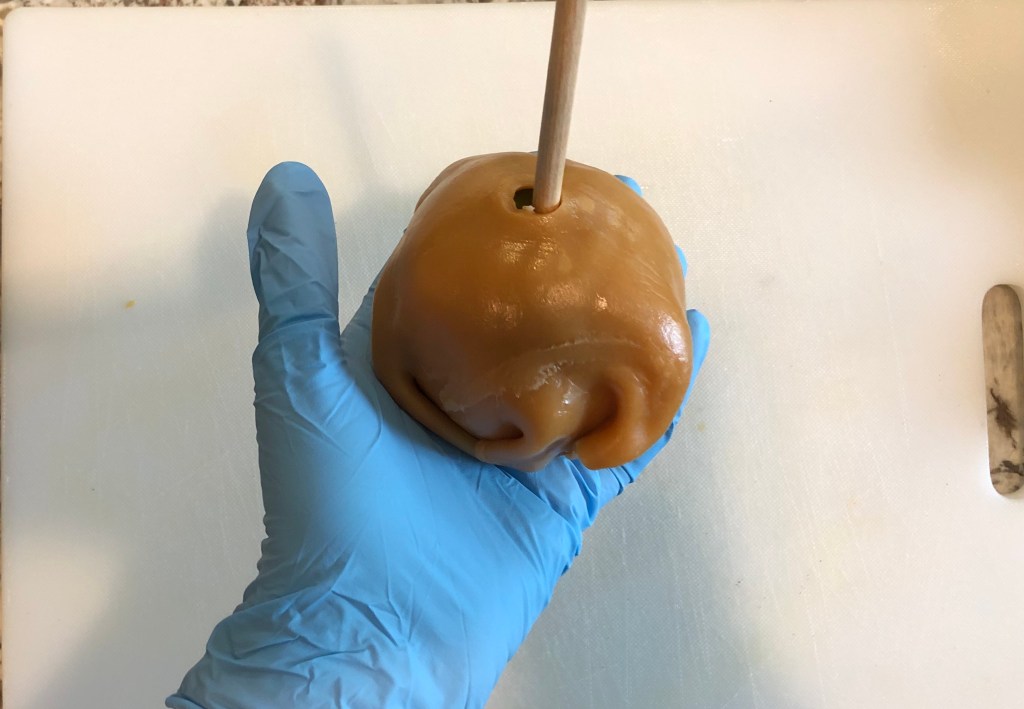
Essentially, I’m making my own caramel wrap and there is very little wasted caramel in the process. Definitely no hot caramel. Each caramel circle is then wrapped around an apple. I place it over the stick, but you could easily wrap the apple and then place the stick into the apple. I use gloved hands to move and smooth the caramel around the apple. I pinch the caramel together at the bottom of the apple.
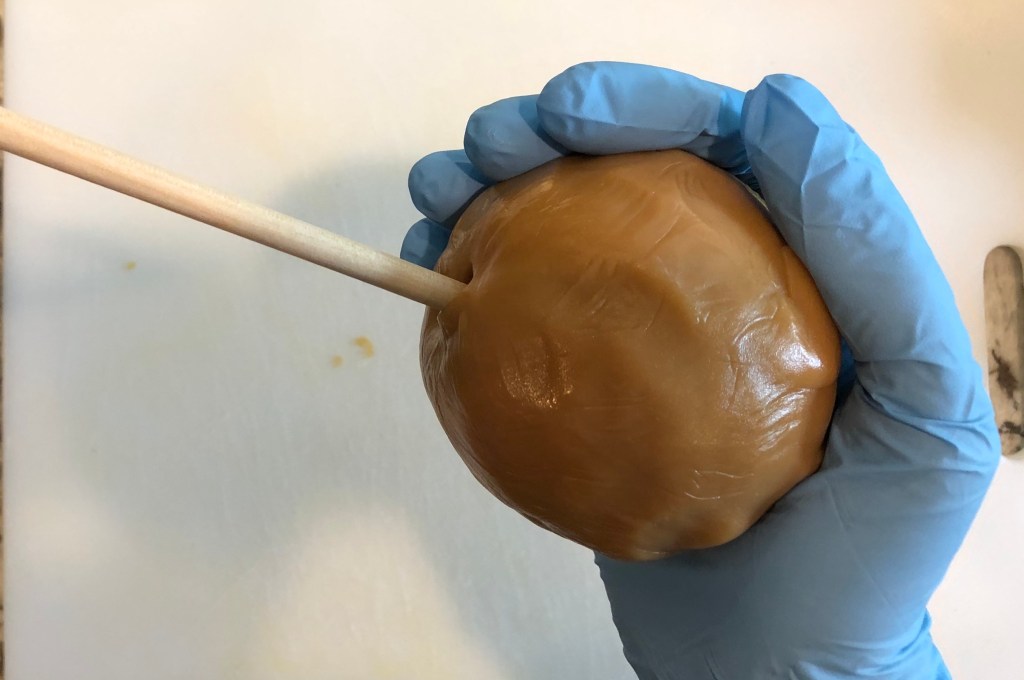
After coating the apple with caramel, I leave them at room temperature. The caramel will smooth out, and the wrinkles on the surface will disappear.
Third simplification: I don’t dip the apples in the chocolate. Dipping anything in the chocolate is always risky as you can loose the temper if the dipped item is 1) a different temperature – for example, if it just came out of the refrigerator or freezer, or 2) if it is wet with water – like freshly washed strawberries. Either of these two things will cause both chocolate AND confectioners coating to seize up, but chocolate is especially sensitive. So I avoid dipping altogether.
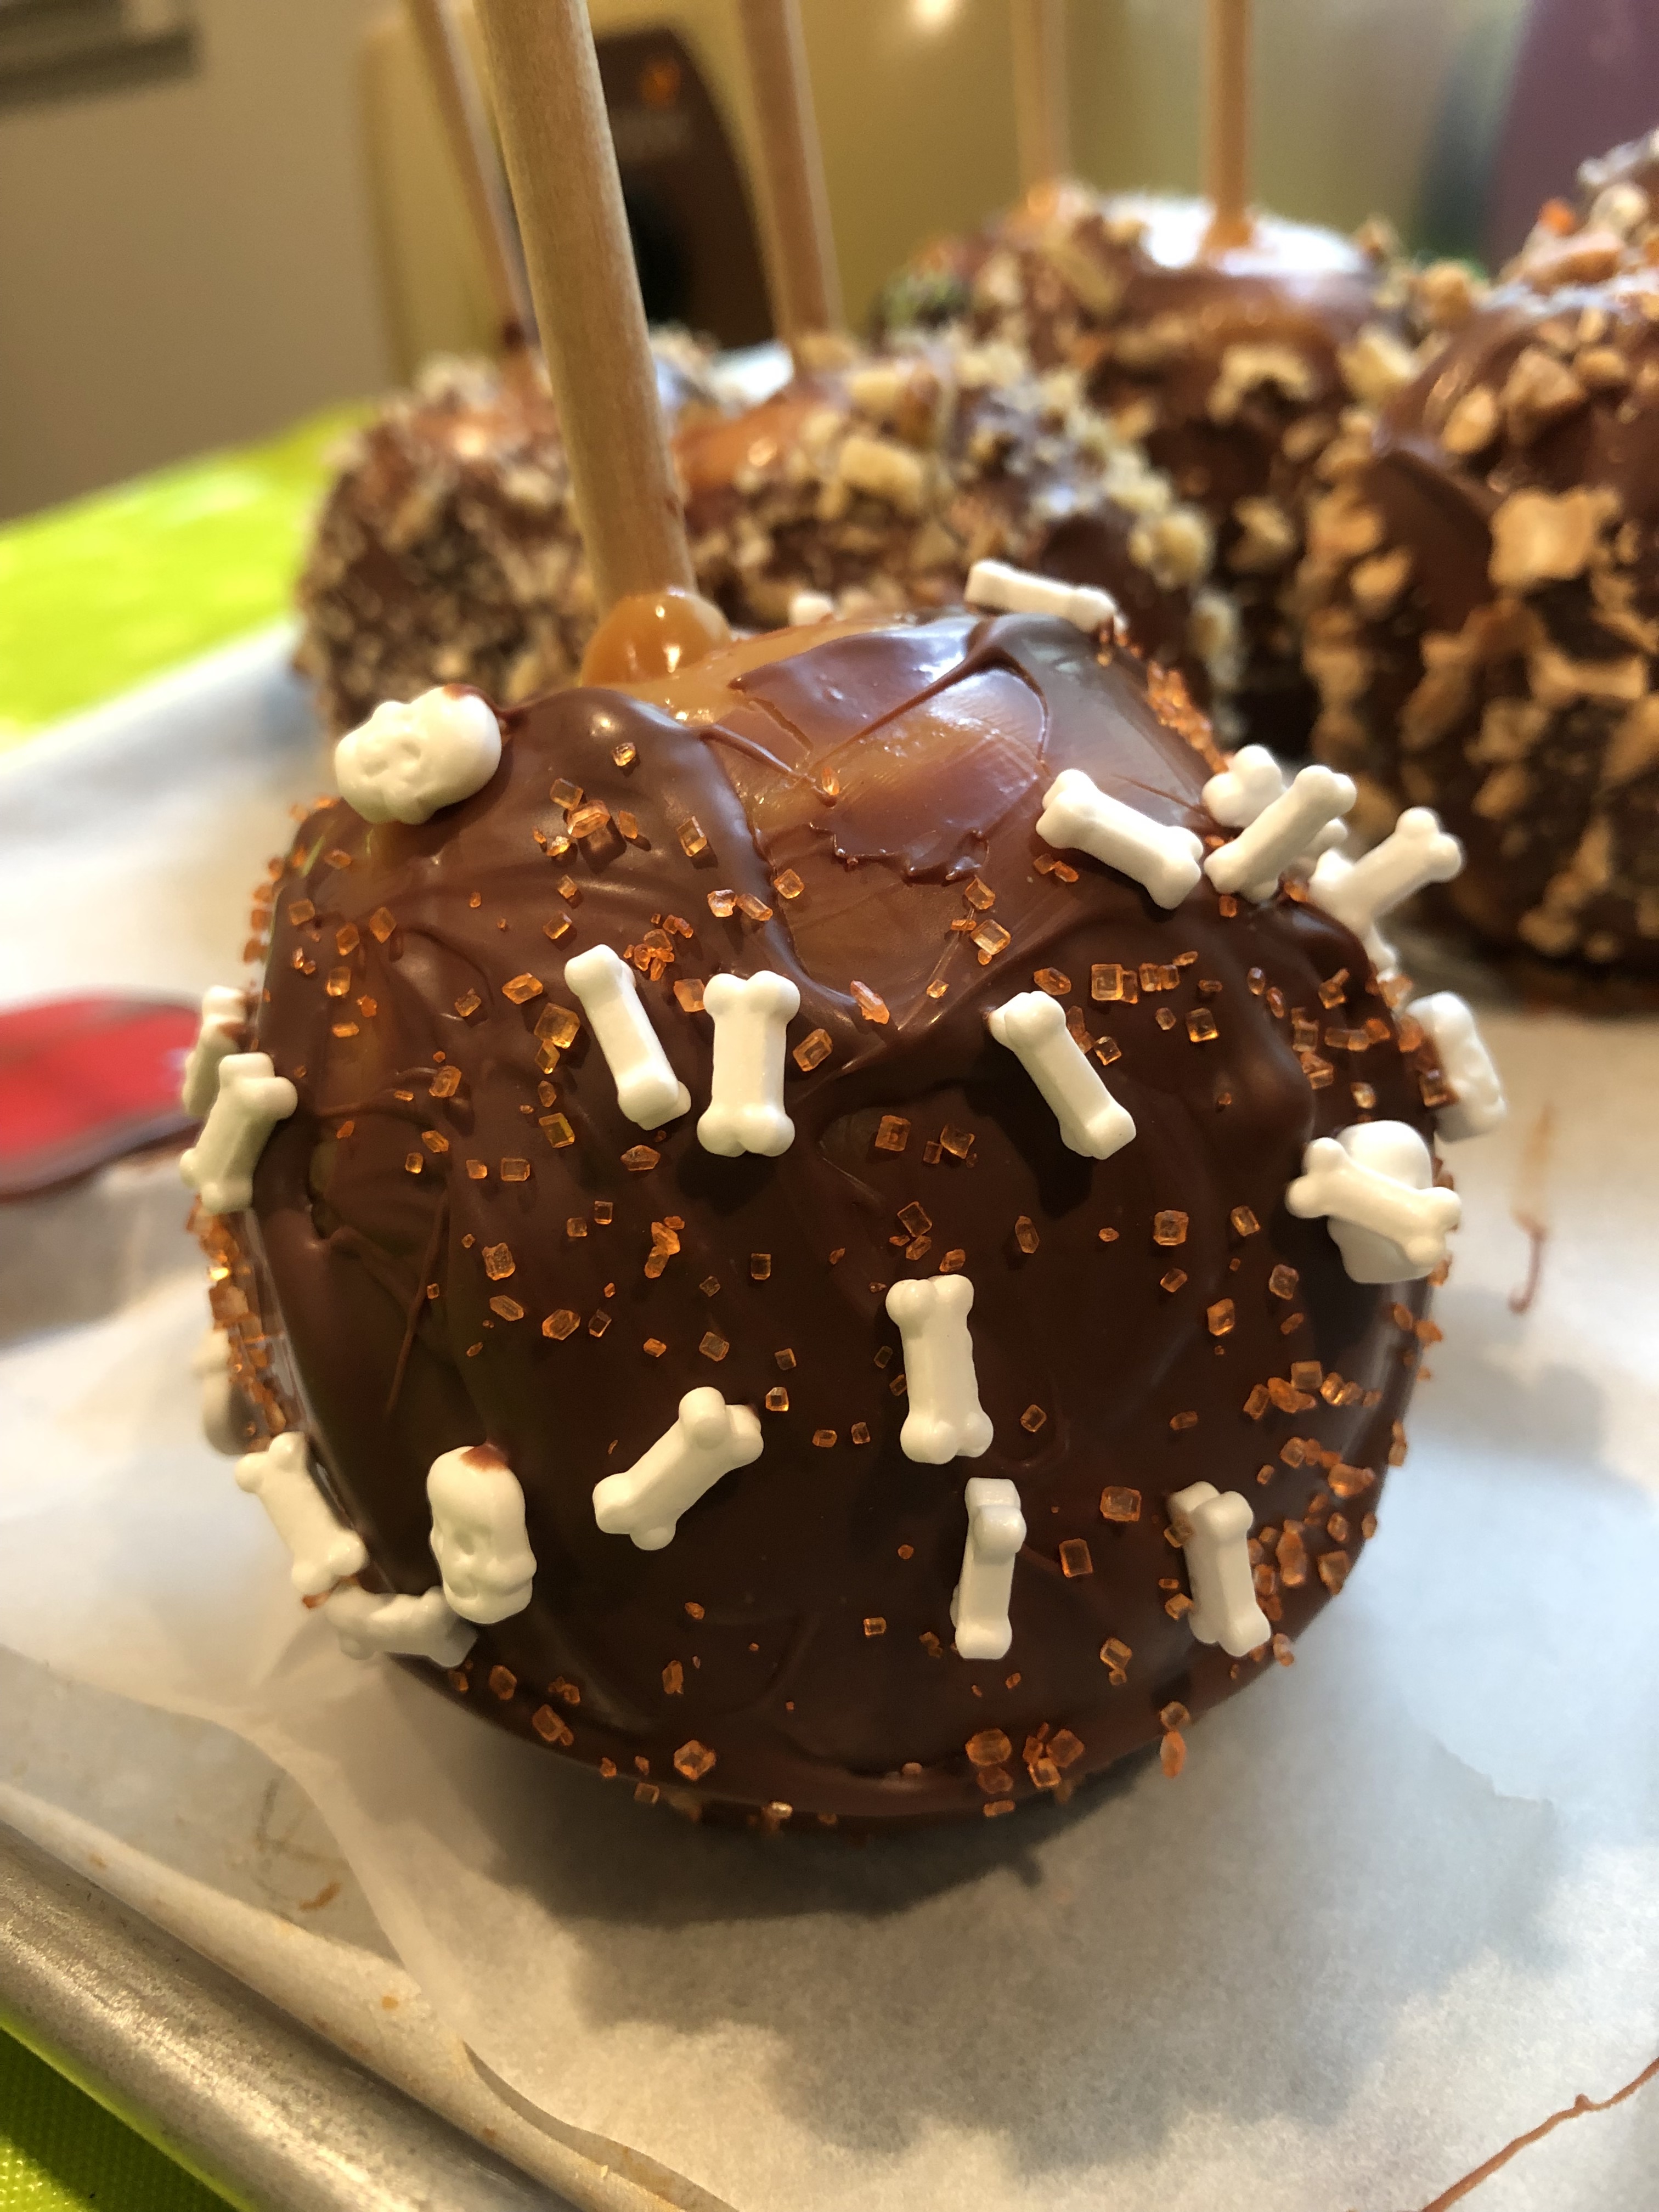
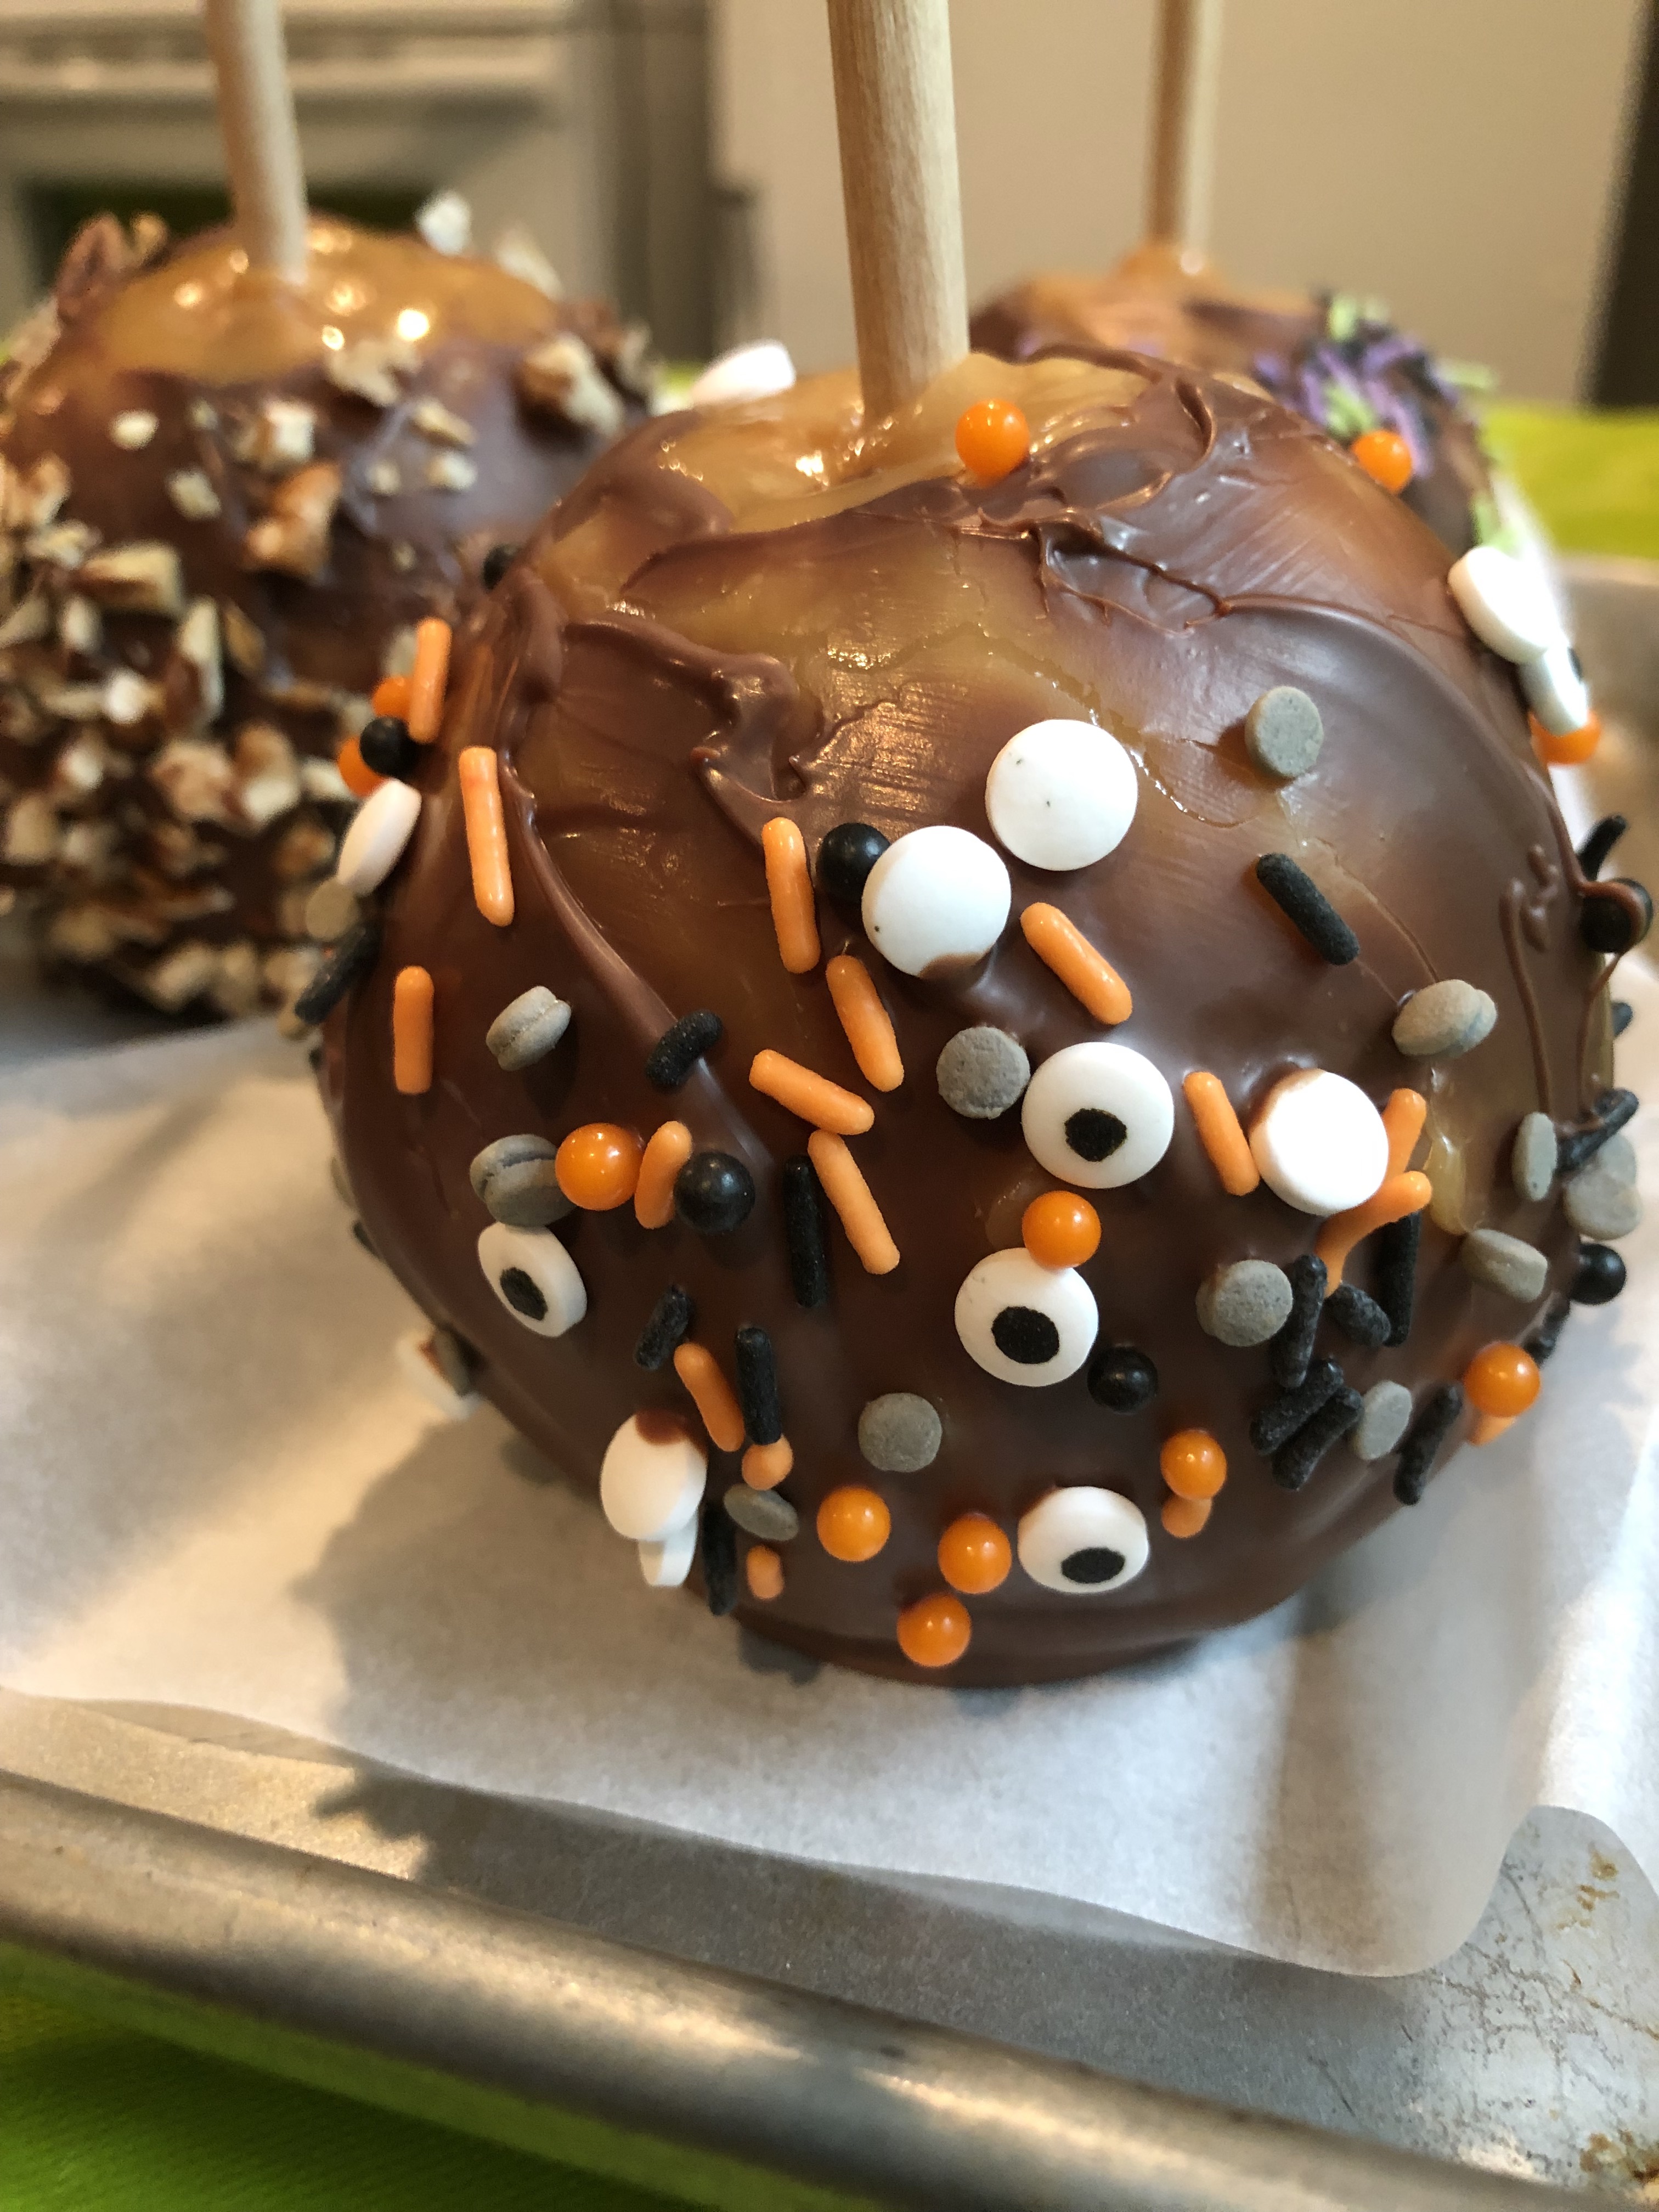
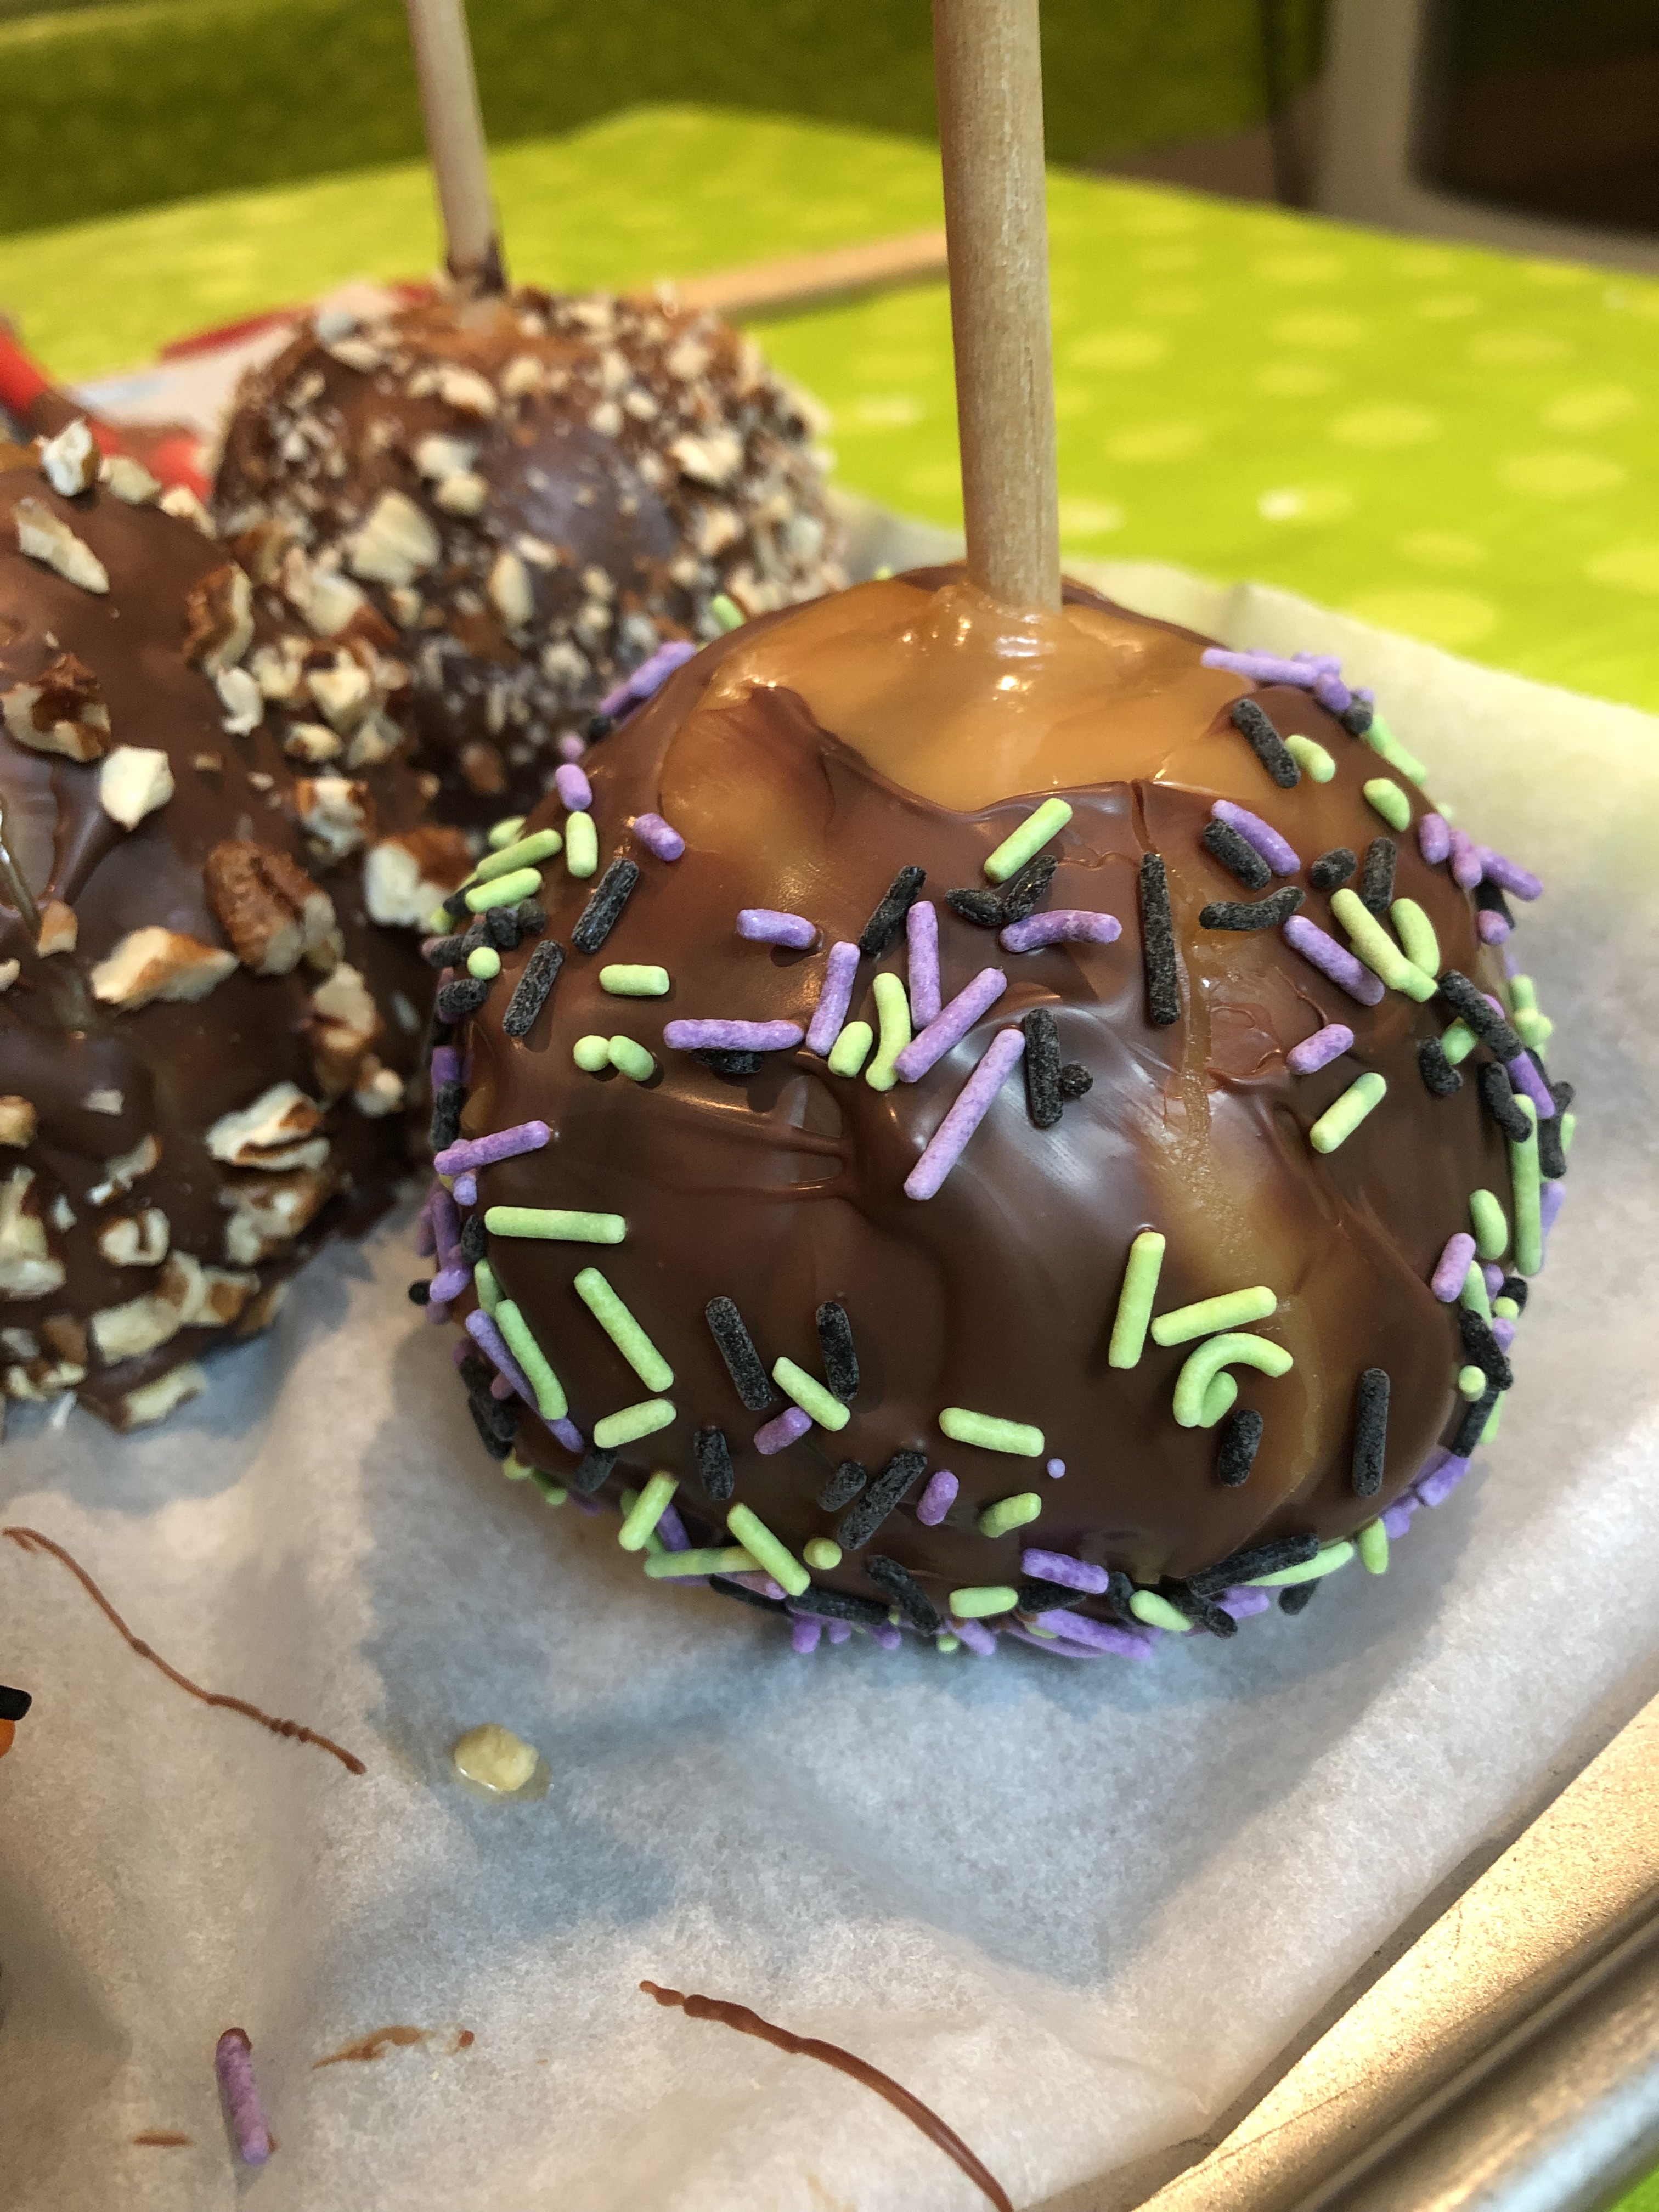
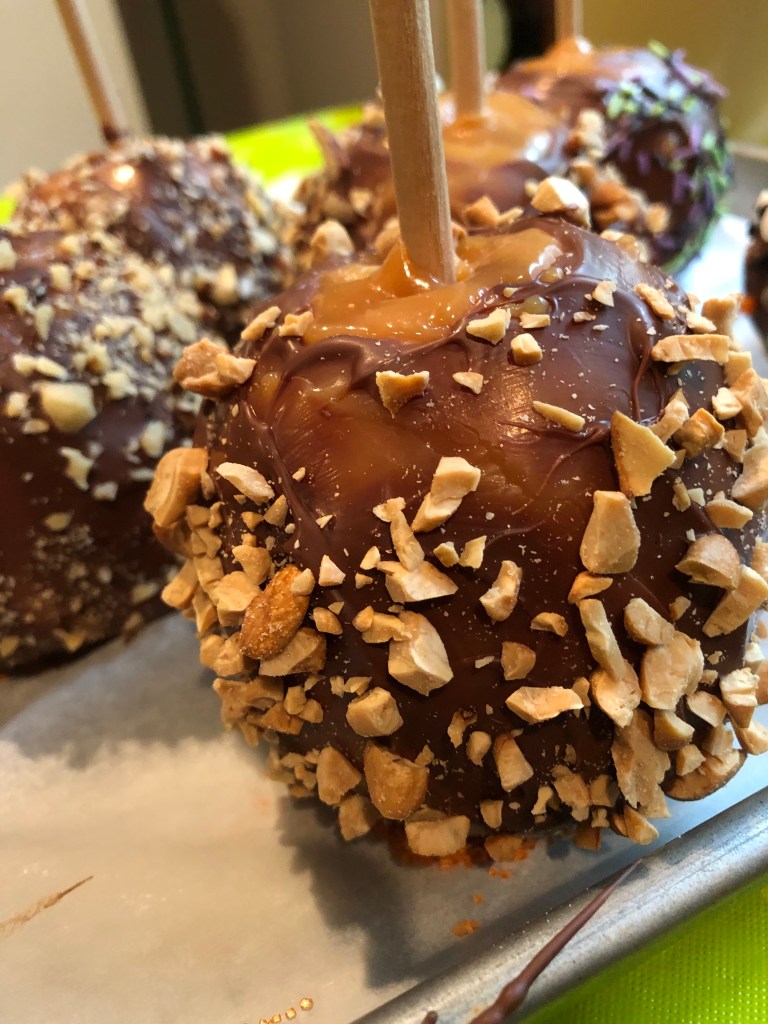
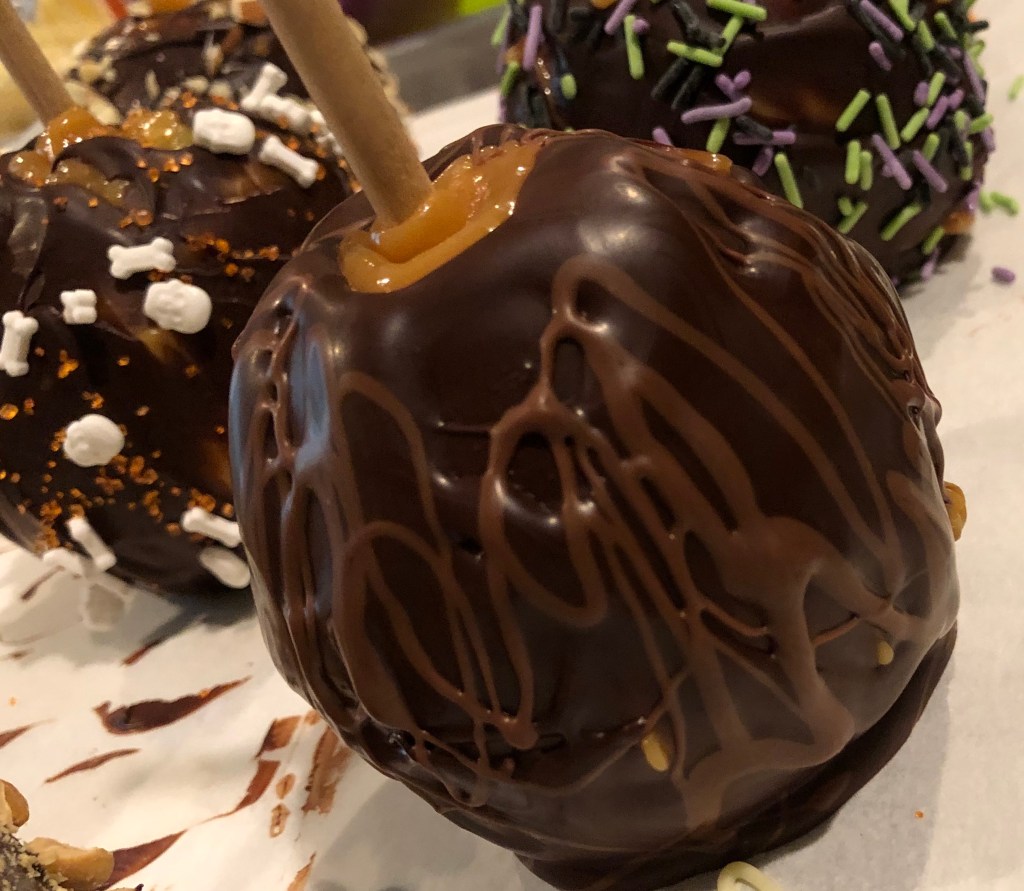
Instead, I carefully apply the chocolate to the apple using a spatula. Sometimes the bottom of the apple will have drops of apple juice on it, especially if the stick is poking all the way through the apple. After carefully inspecting the apple and removing any obvious liquid, I apply the chocolate to the apple. I typically hold the apple over the melted chocolate so any drips go right back into the melted chocolate and very little, if any, chocolate is wasted. If you dip the apple in the chocolate, it takes a long time and a lot of shaking for the excess chocolate to drip off. If you don’t wait long enough, the excess chocolate on the apple will slowly move down the apple and eventually form a large “foot” at the base of the apple. Unsightly, but still delicious.
By placing the chocolate on with a spatula, I can control the amount of chocolate that is applied. The chocolate also begins to set up and holds sprinkles, nuts, and other garnishes better. With more chocolate, the nuts and sprinkles tend to slide off the apple and onto the baking sheet.
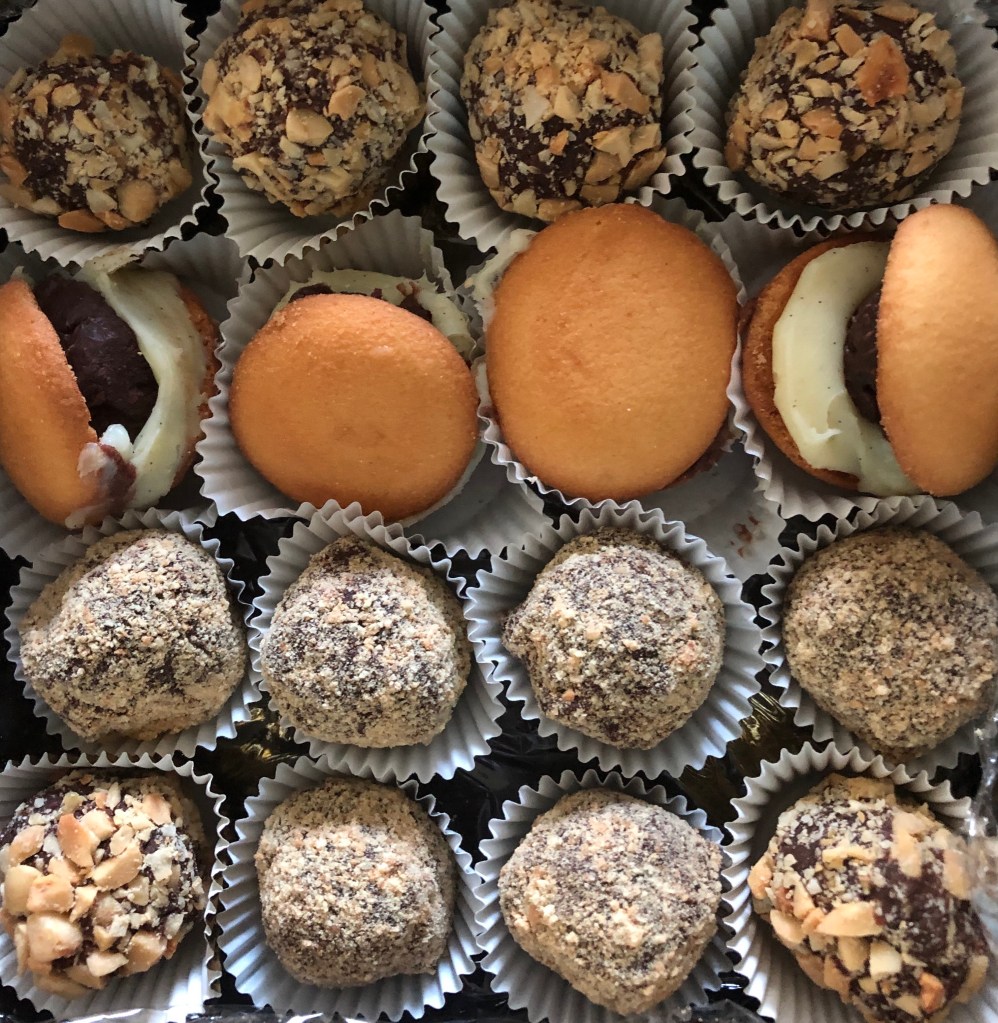
Milk chocolate with cashewsBittersweet chocolate with milk chocolate swirls
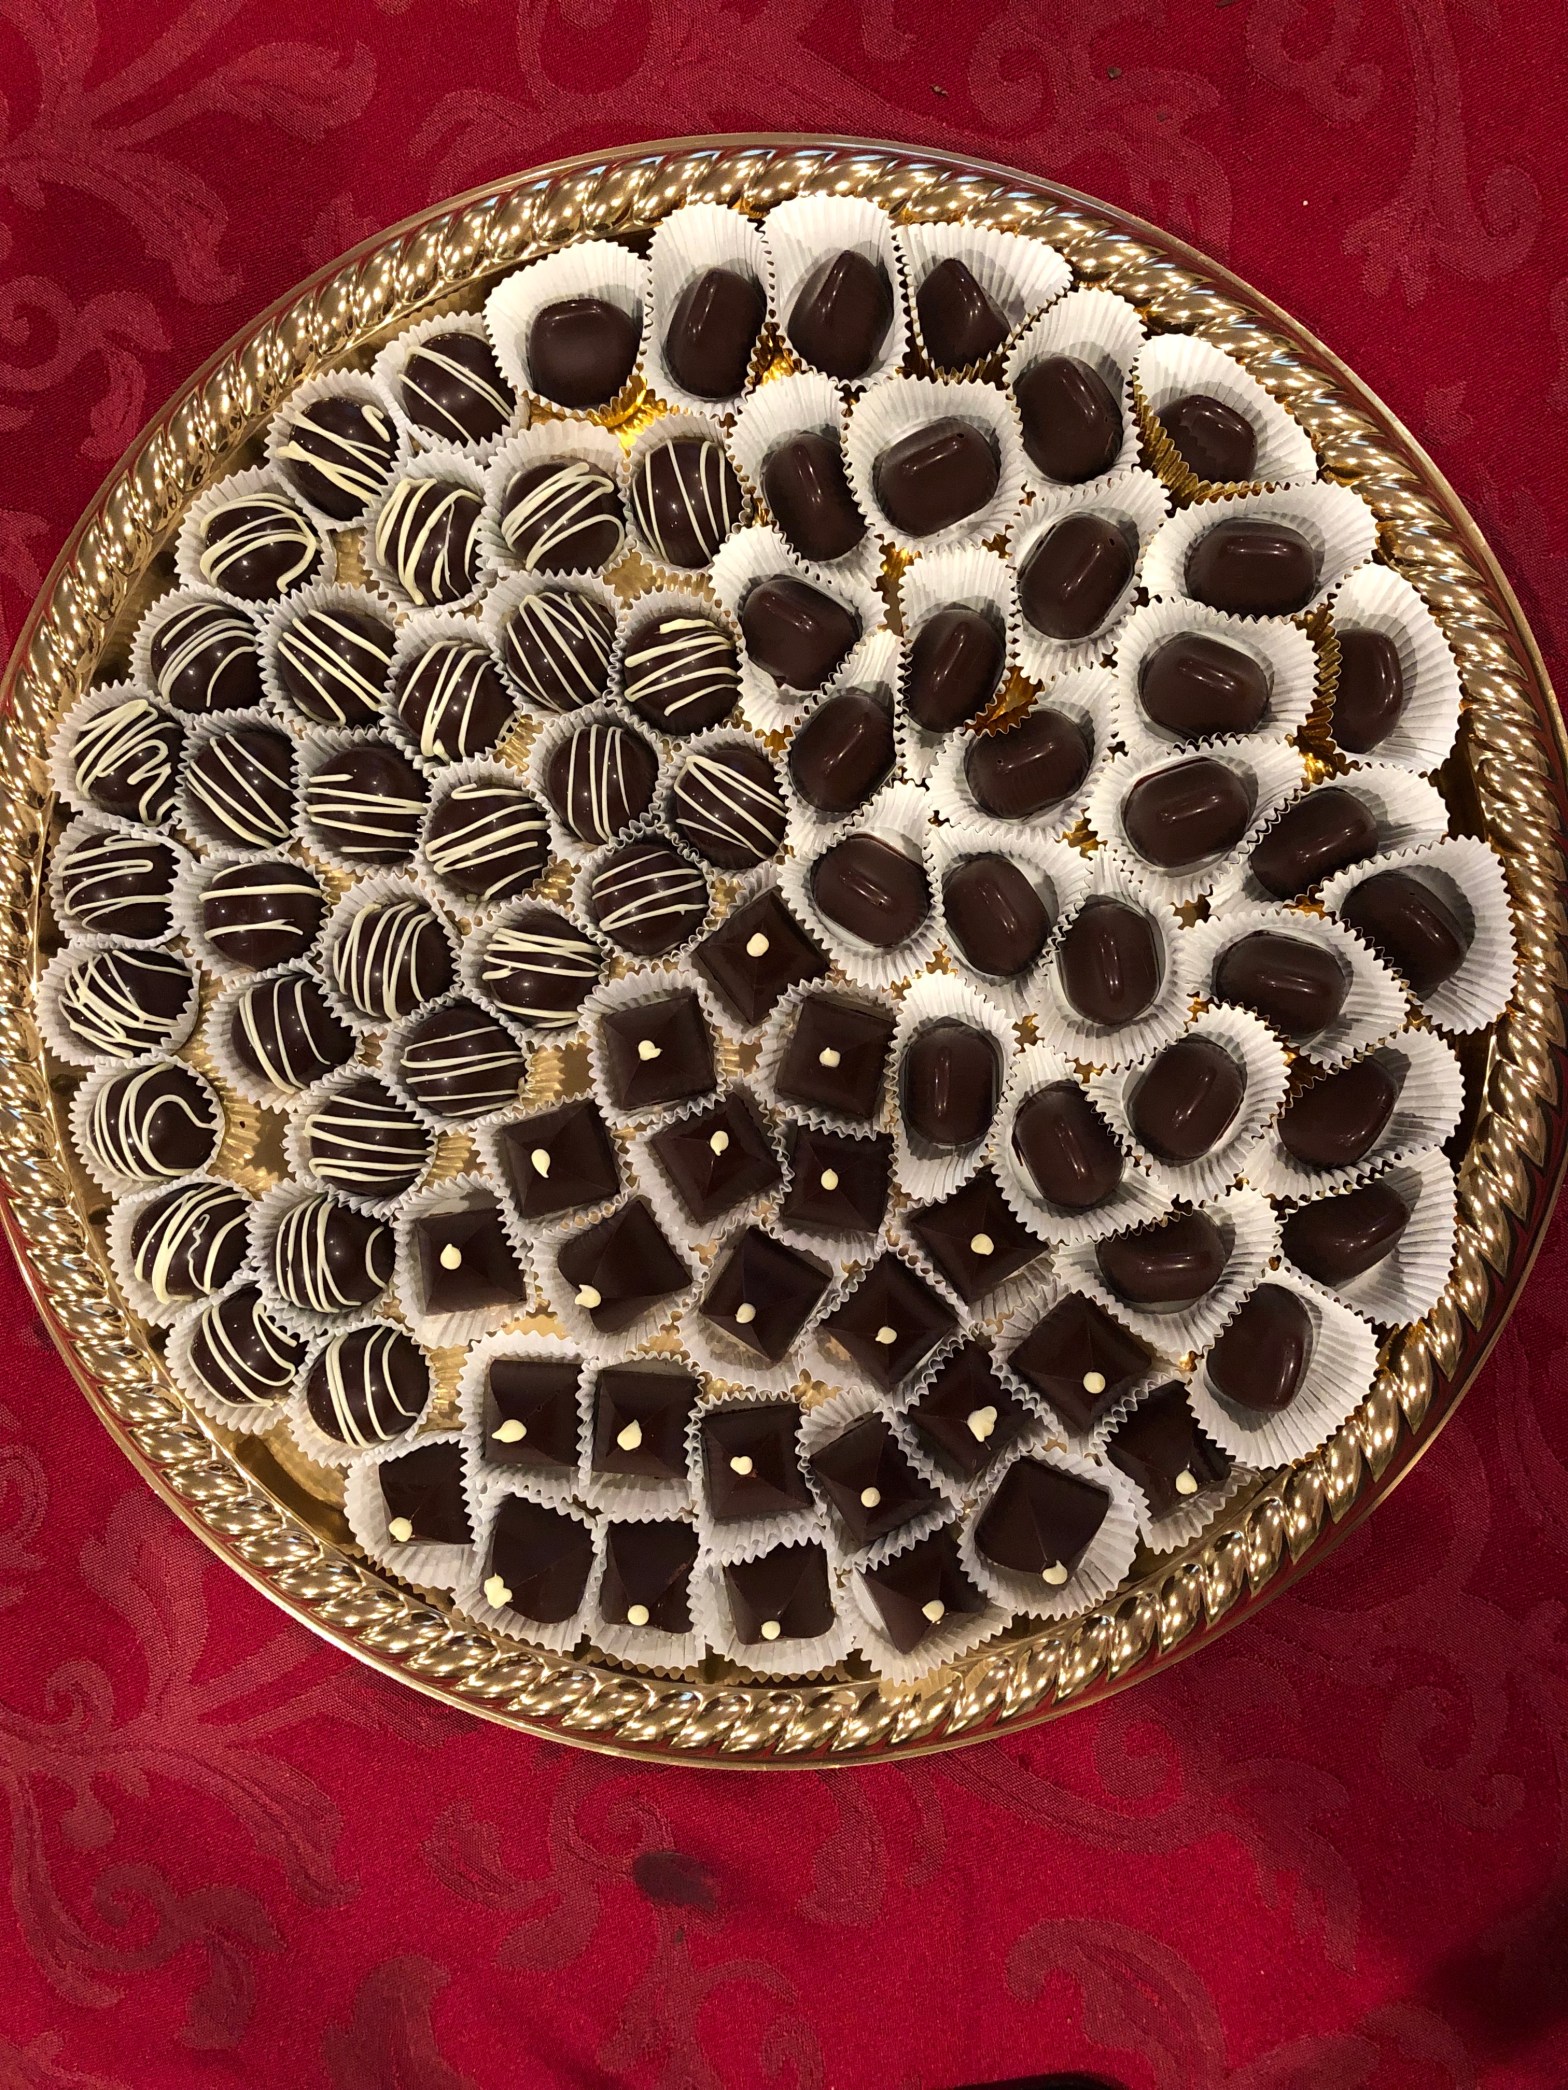
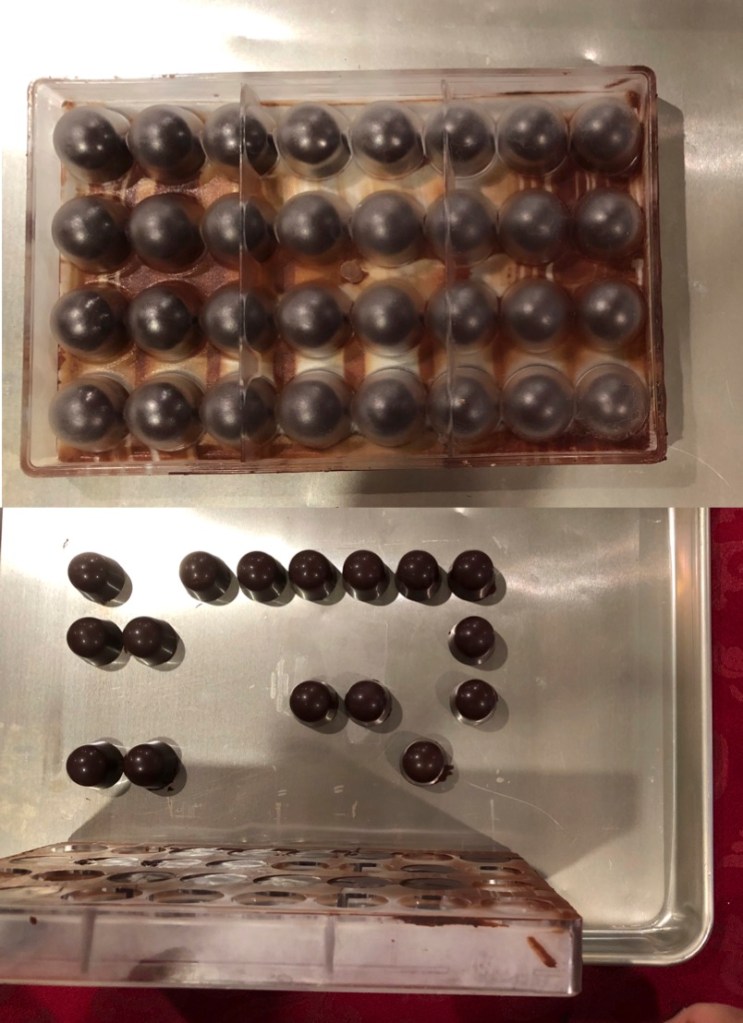
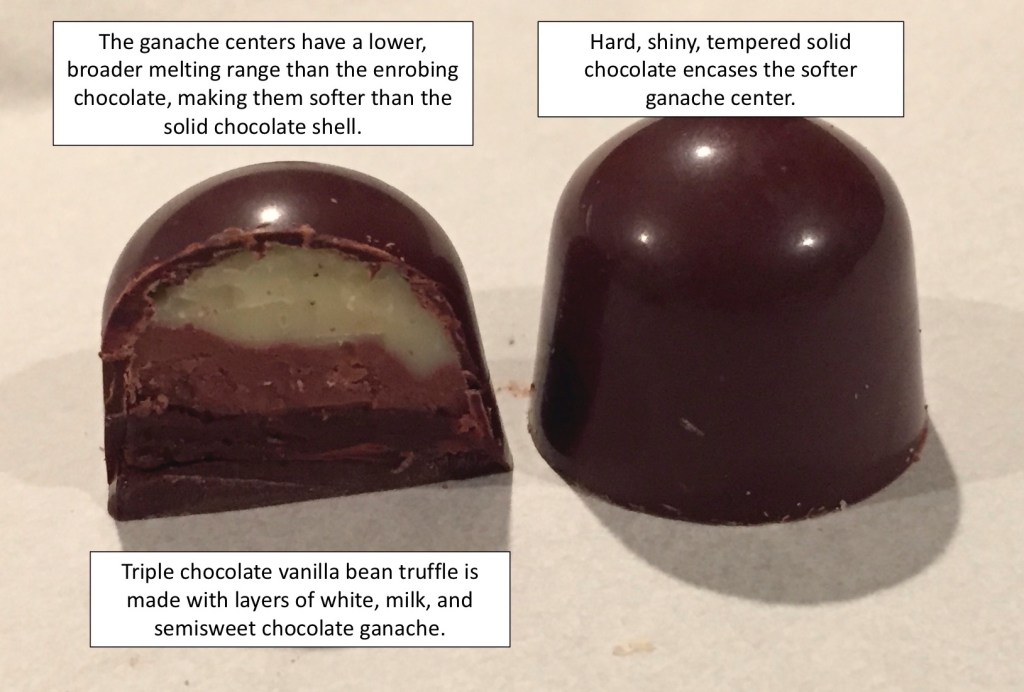
Most of the truffles I make are enrobed in solid chocolate. Enrobing the ganache helps to keep the ganache fresh (because it is sealed within the solid chocolate and not exposed to the air), and allows me to distinguish the different flavors, as they are all either in different shaped molds or the molds are decorated differently. I use a hollow molding technique rather than dipping the truffle centers because I have found this to be a much more reliable than dipping methods – no chocolate seizing up, or random lost truffle centers in the swirling chocolate.
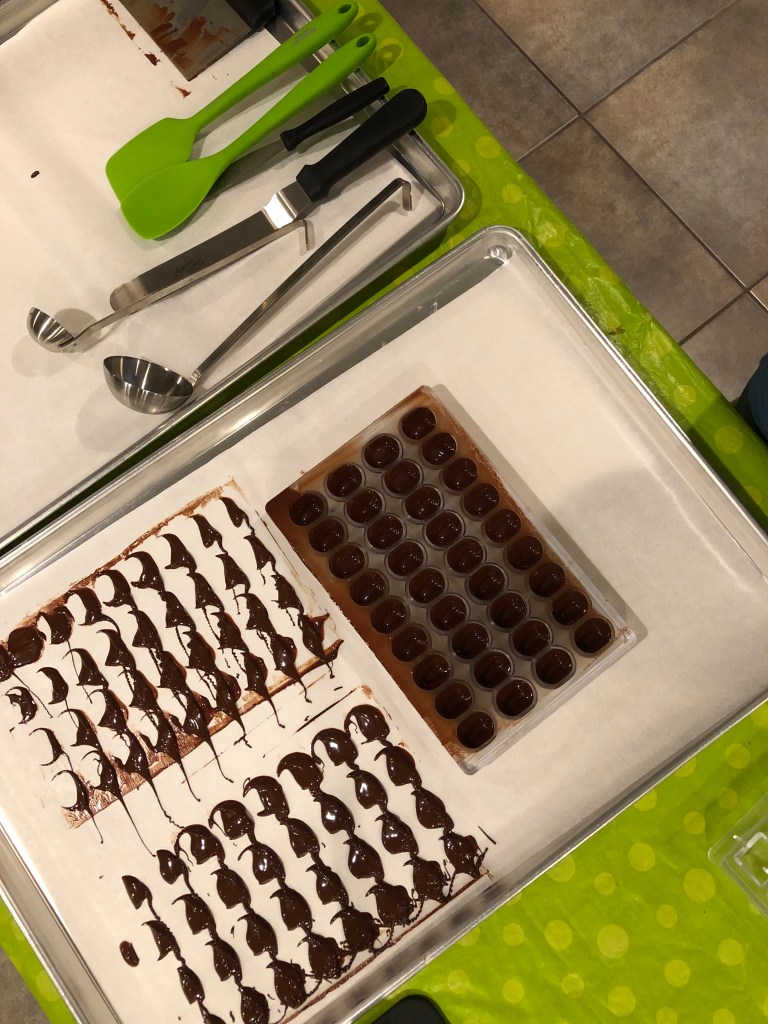
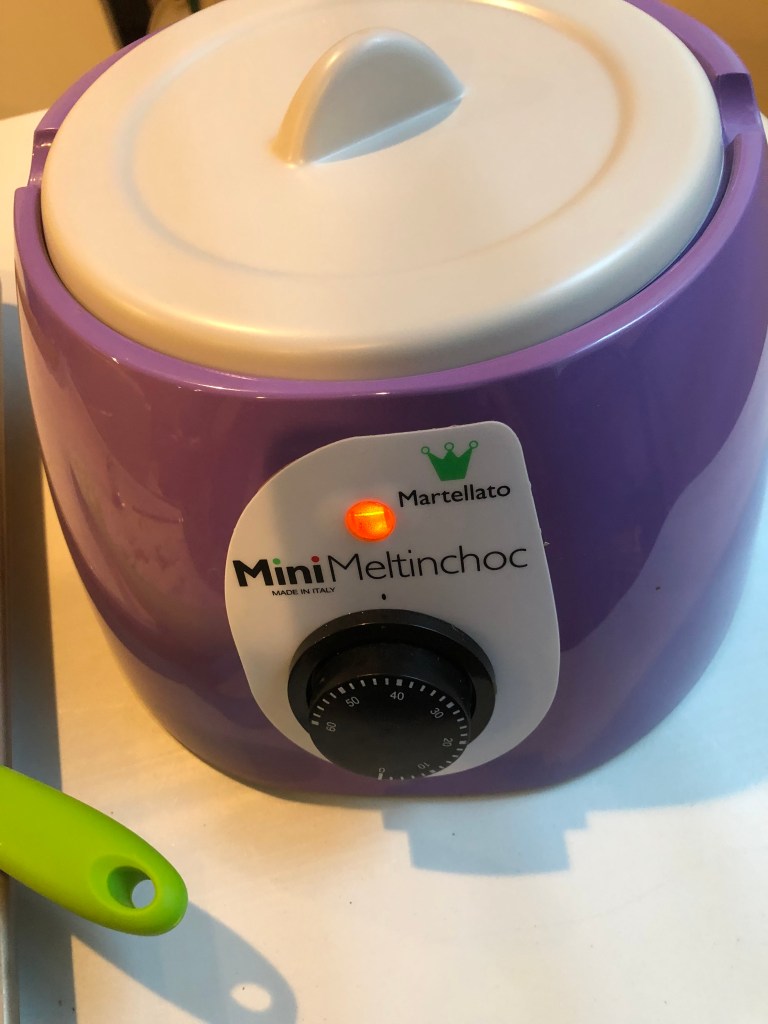
I use a table-top chocolate tempering machine to temper my chocolate. It is a simple machine: there is a thermometer to maintain the temperature of the melted chocolate, there are 2 100 watt incandescent light bulbs to heat the chocolate, and a fan to cool the chocolate. The bowl spins to keep the chocolate mixing. I purchased this tempering machine used.
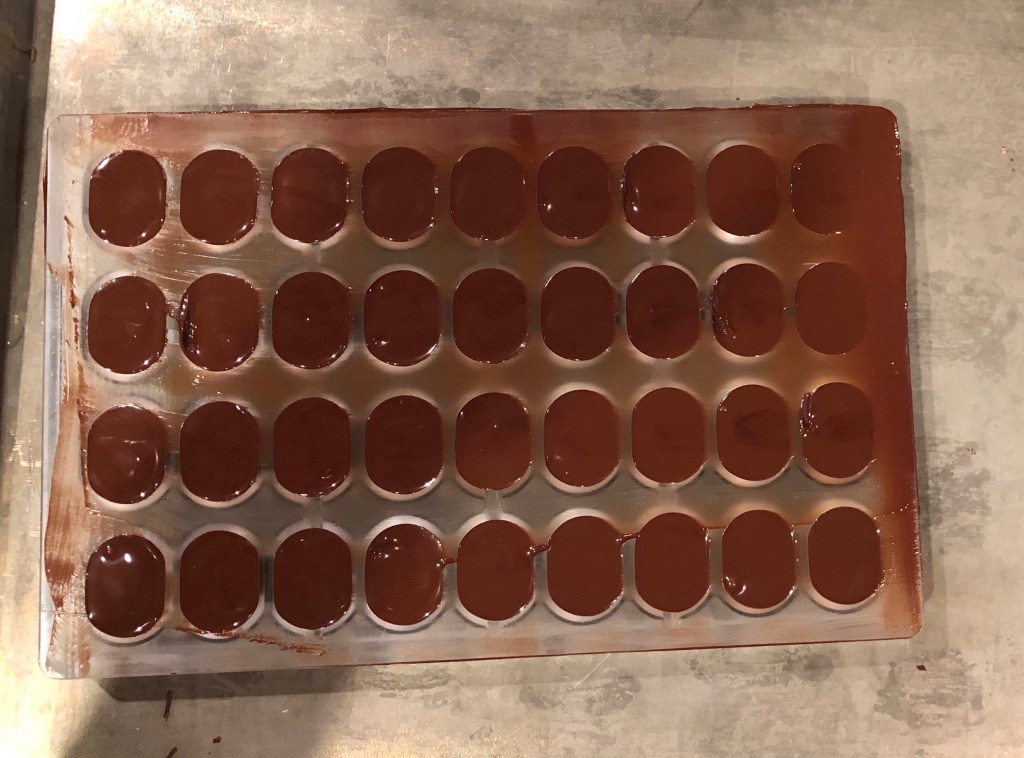
Once the chocolate is melted and tempered, I fill the molds completely, then drain most of the chocolate back into the machine. I invert the molds to remove the remaining excess chocolate. This chocolate will eventually go back into the machine and be re-tempered. The filled mold goes into the refrigerator for a quick cool down before filling with the ganache.
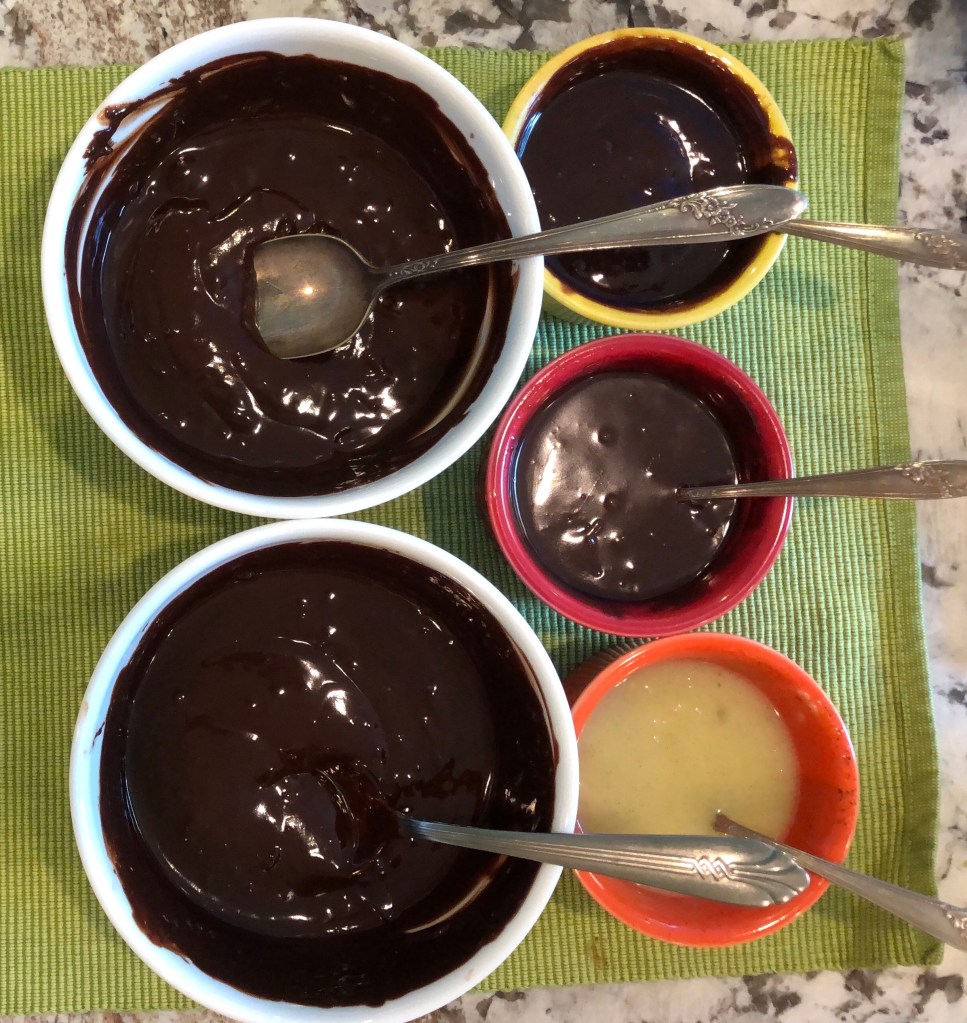
For the triple chocolate vanilla bean, a small amount of the white chocolate ganache is added to each, followed by a small amount of the milk chocolate ganache, followed by a small amount of the semi-sweet ganache.
Filling the triple chocolate vanilla bean truffles.
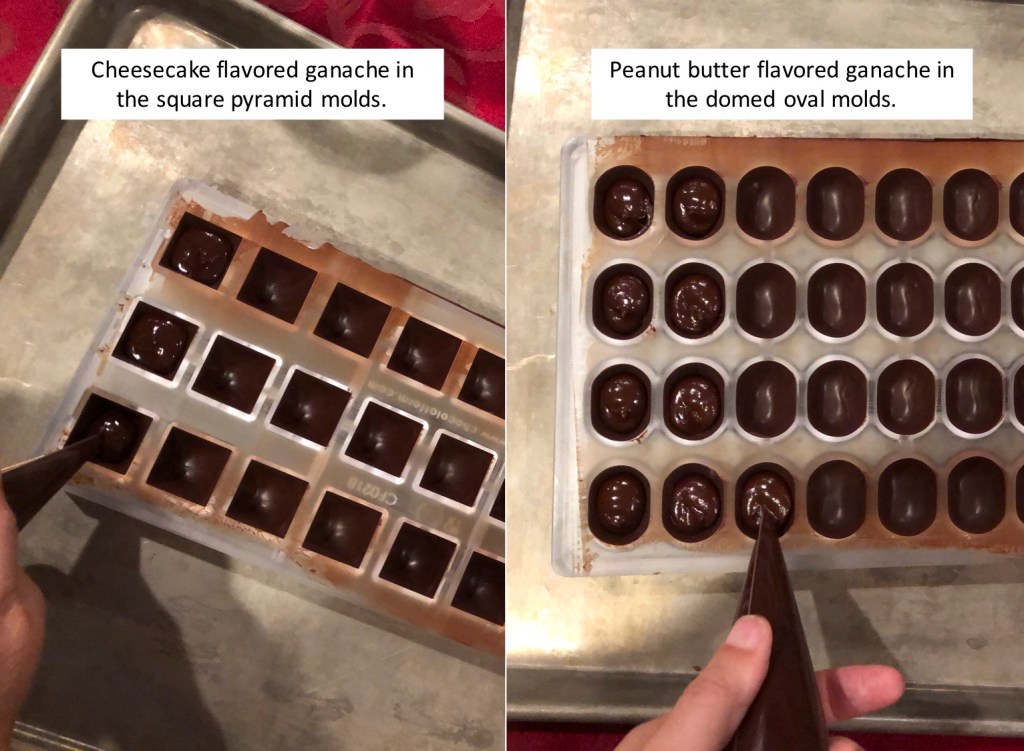
The remaining two molds are filled 2/3 full with the peanut butter and cheesecake flavored ganaches which are then cooled for a few more minutes.
Each mold is topped off with more melted chocolate and cooled completely. This becomes the bottom of the truffle.
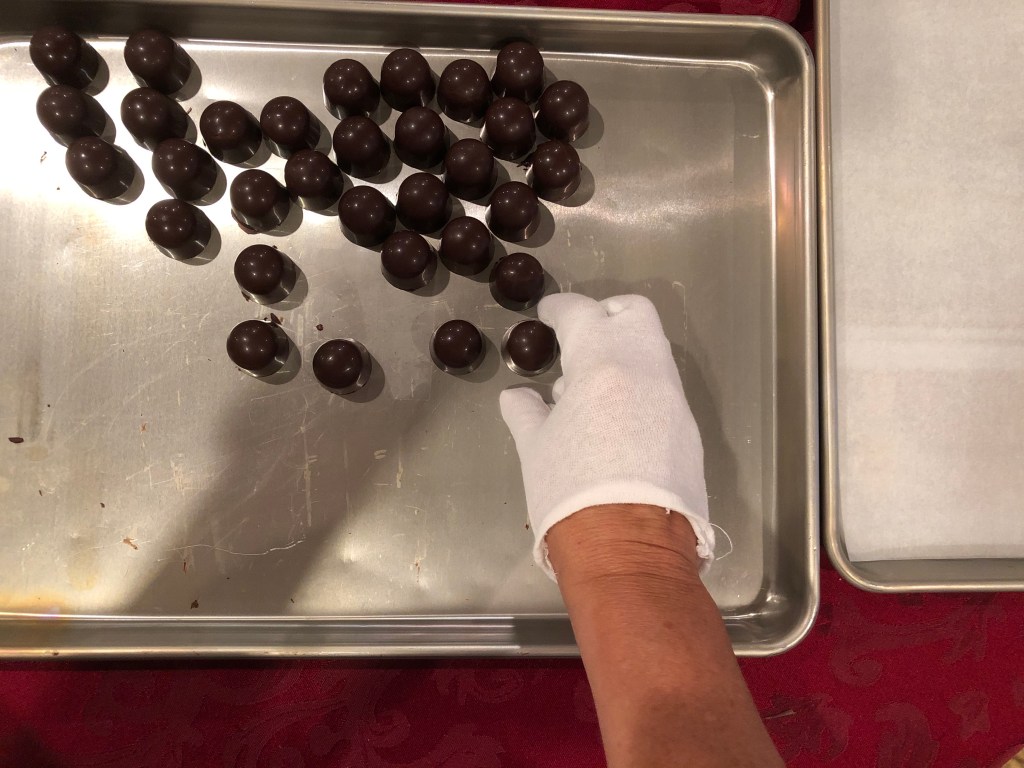
To release the truffles from their molds, the tray in inverted onto a cookie sheet. Most of the truffles will come out will a few sharp smacks. Look at those beautiful shiny surfaces!
I use cotton confectionery gloves to move the chocolates so no fingerprints are left behind.
I didn’t decorate the peanut butter chocolate truffles, so they are finished once they are popped out of the molding tray.
I have a second small table-top tempering machine (no stirring apparatus) for melting and tempering small amounts of the chocolate used for decorating.
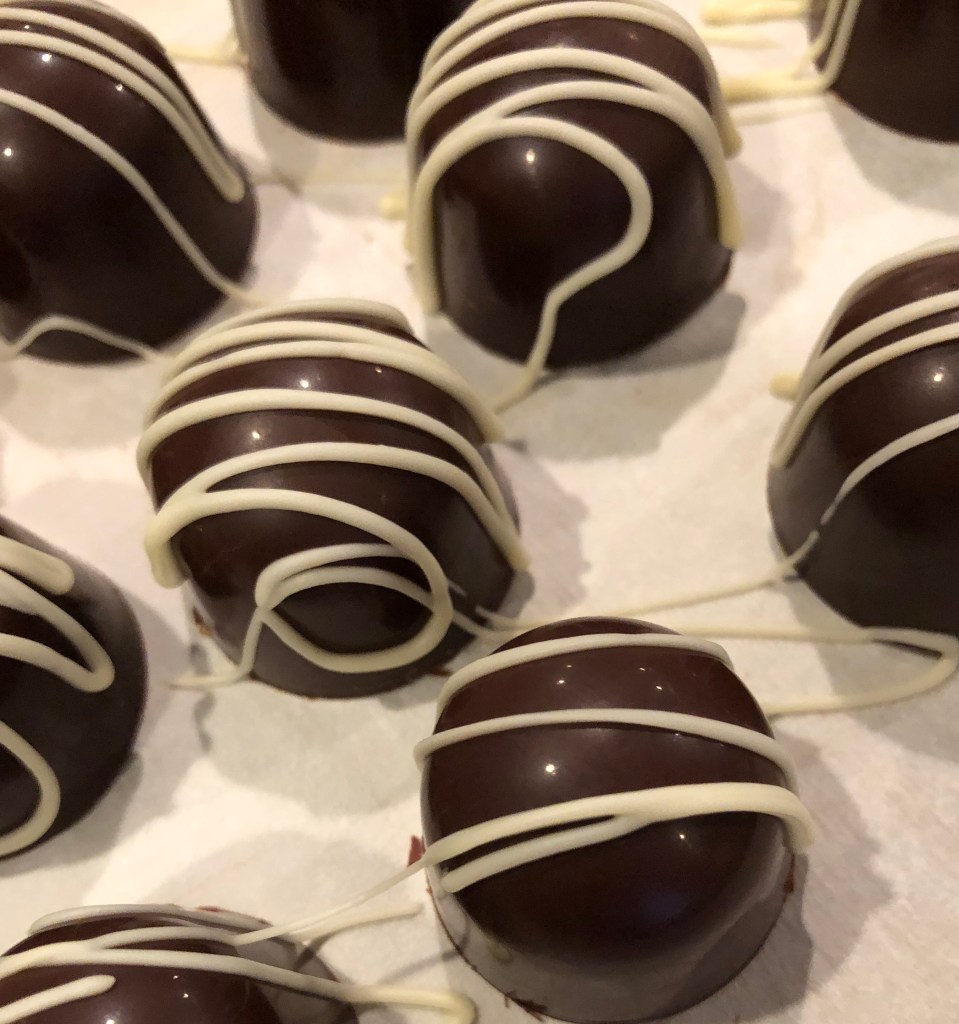
Both the triple chocolate vanilla bean and the cheesecake truffles will have a white chocolate decoration. I like to keep these as simple as possible: lines and dots work well for me.
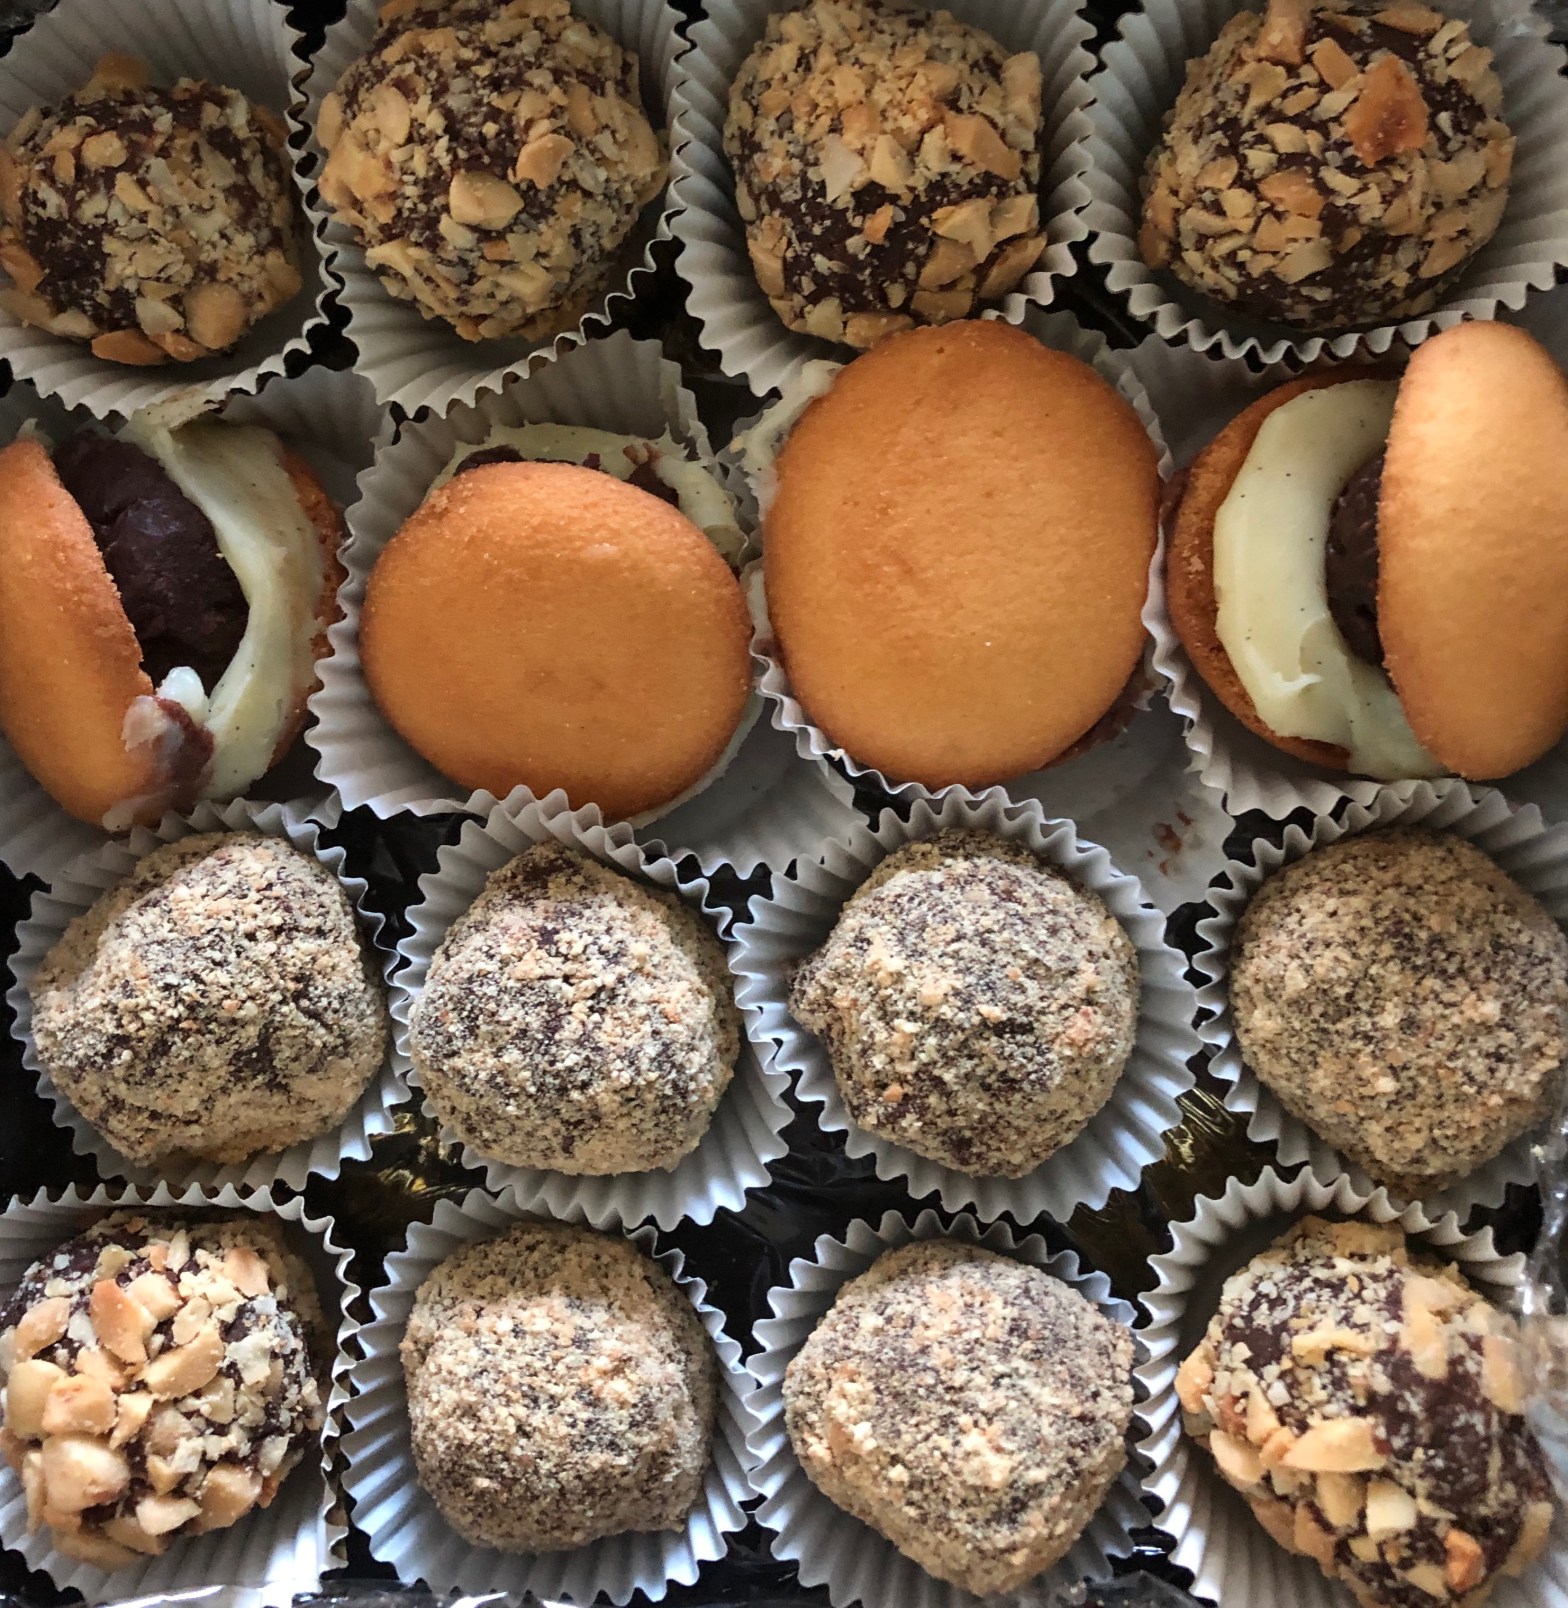
Triple chocolate vanilla bean with white stripes, peanut butter in the undecorated oval dome, and cheesecake in the square pyramid with white dot.
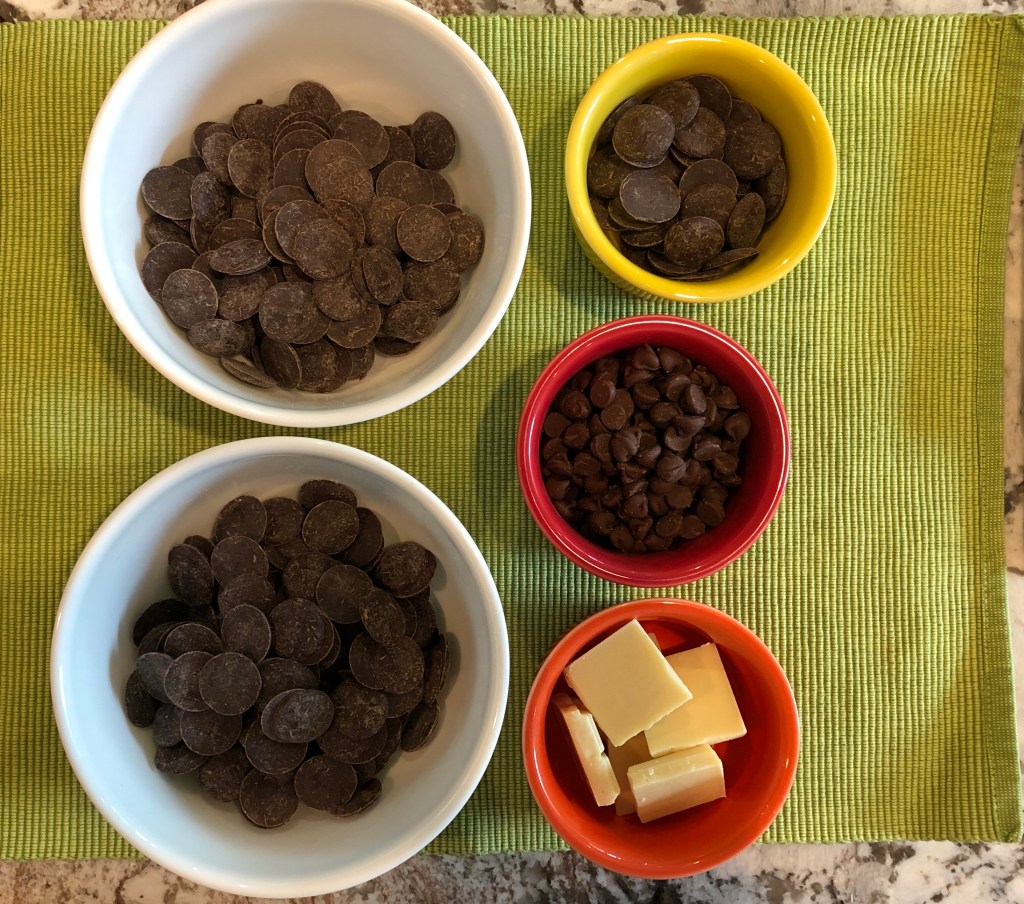
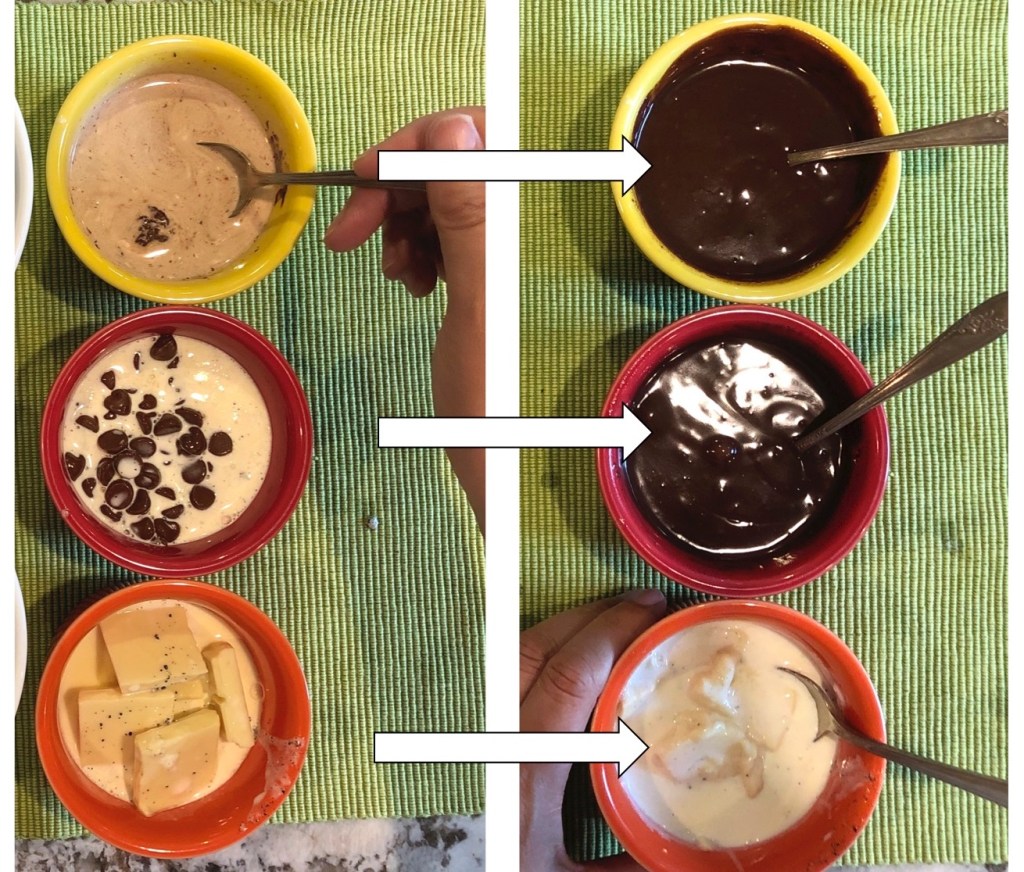
The soft ganache centers are simply mixtures of cream, butter, fine chocolate, and a flavoring. I’m making three flavors: triple chocolate vanilla bean, peanut butter, and cheesecake. These three flavors each use a different method of adding the flavoring. The vanilla flavor uses an opened vanilla bean heated in the cream and butter mixture (in lab, we would call this a flavor extraction). The peanut butter flavor simply uses peanut butter, and the cheesecake flavor uses a simple flavored syrup. You can also use flavoring extracts or oils with some slight modifications to the basic recipe.
The peanut butter and cheesecake ganaches are prepared in a semi-sweet chocolate. The triple chocolate vanilla bean contains three types of ganache: white chocolate, milk chocolate, and semi-sweet chocolate.
I use Guittard chocolate in various forms: the semi-sweet is in wafers, the milk is in chips, and the white is in bar form. When choosing a chocolate, just make sure it has cocoa butter as an ingredient rather than palm kernal oil.
Because I am mixing the ganache chocolate with cream and butter, it doesn’t have to have a high percent of cocoa butter. It should be good quality chocolate but it doesn’t have to have an extra high content of cocoa butter.* The ganache mixtures will have low, broad melting points which makes them much softer than tempered solid chocolate.
*Lots of chocolate chemistry here that I am skipping over. The upshot is that enrobing chocolate DOES have to have an extra high content of cocoa butter in order to flow and fill the molds easily. Different types of chocolate will have different amounts of cocoa powder and cocoa butter, ranging from the white chocolate (35% cocoa butter and just enough cocoa powder to classify it as chocolate) to the bittersweet with a 72% cacao (total cacao of 72% = % cocoa powder + % cocoa butter). The more cocoa butter there is in a chocolate, the more easily it will flow when it is melted. Enrobing chocolate – that is, chocolate with a high percentage of cocoa butter – is often called couverature (covering) chocolate because of how it flows when it is melted. It is also usually more expensive because of its more specialized uses.
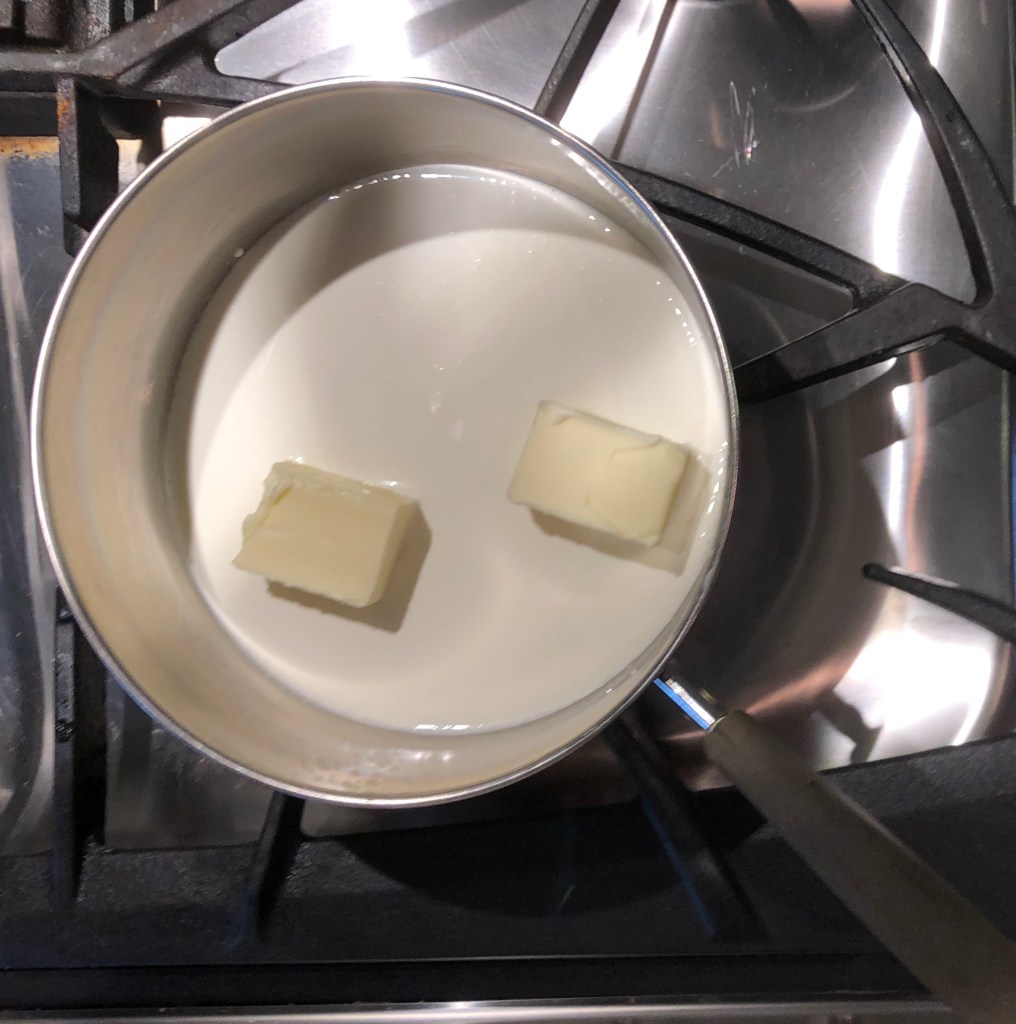
For each of the ganache centers, the cream and butter are heated together until it is steamy.
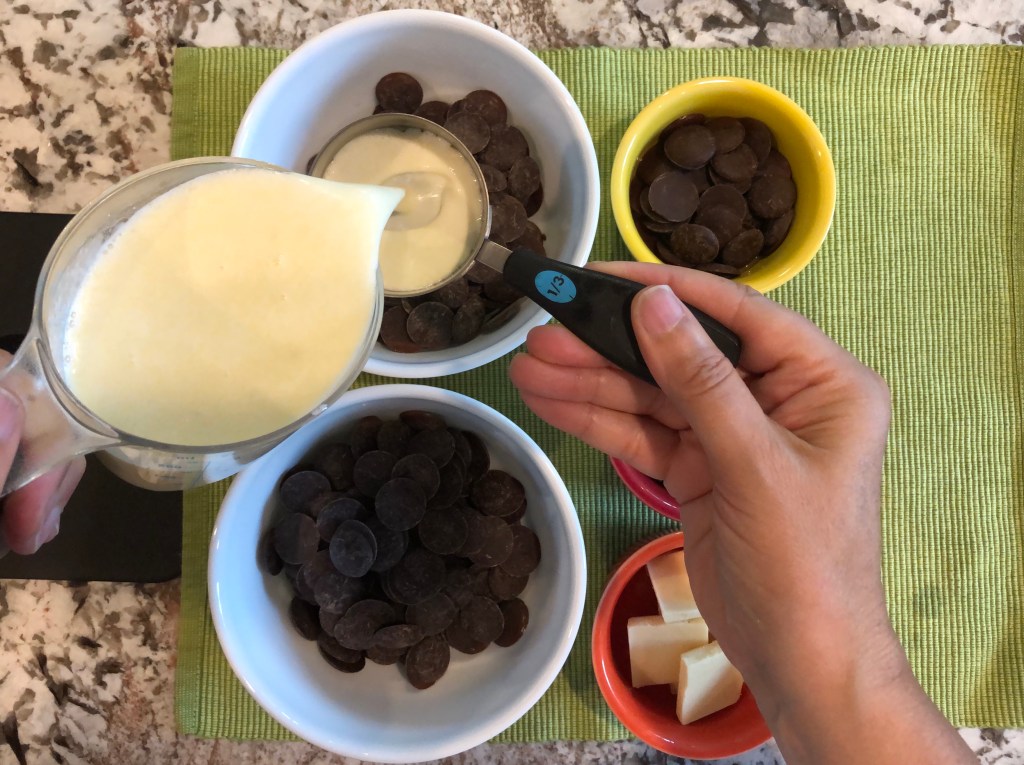
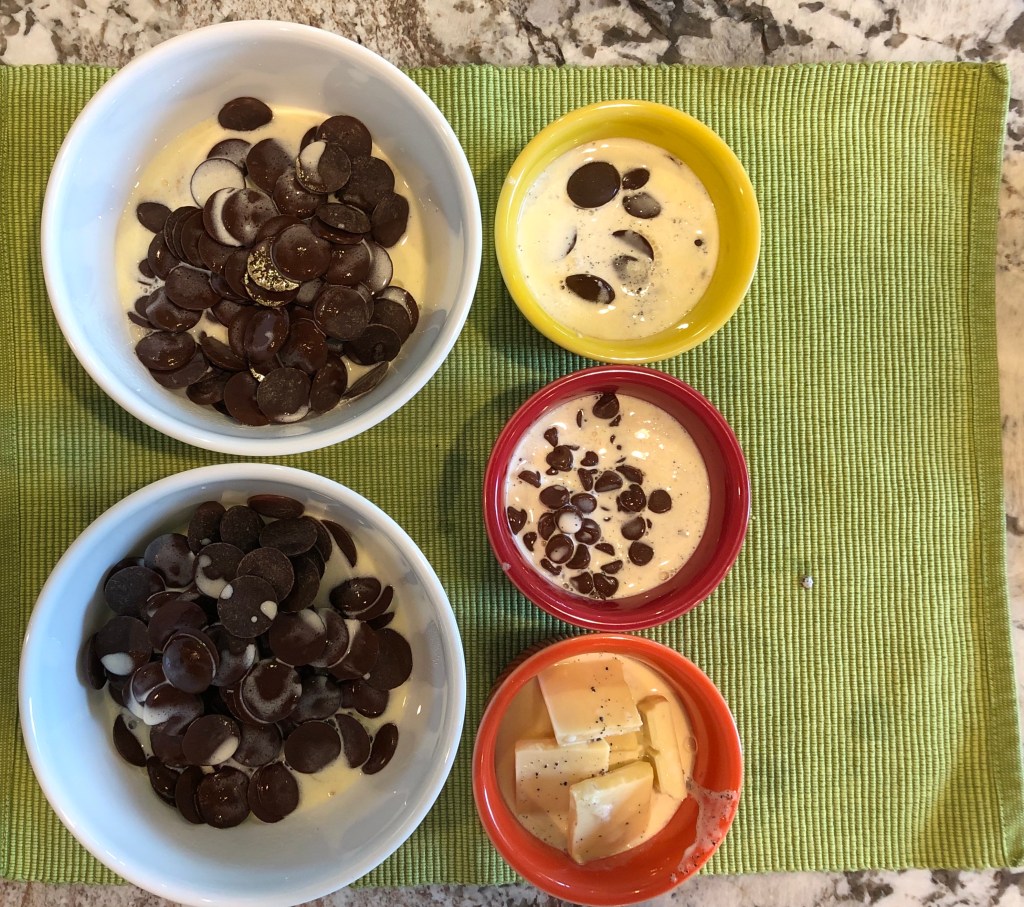
Once heated, the cream and butter mixture are added to the chocolate.
The hot cream and butter mixture is poured over the chocolate to begin melting it.I usually let the hot cream and butter mix rest on the chocolate for about 1-2 minutes before stirring. Stir the warm cream mixture and chocolate until the chocolate has melted. Sometimes a quick trip into a 50% power microwave is necessary to completely melt the chocolate.Once the chocolate is melted, it is time to add the flavoring.
The Flavorings
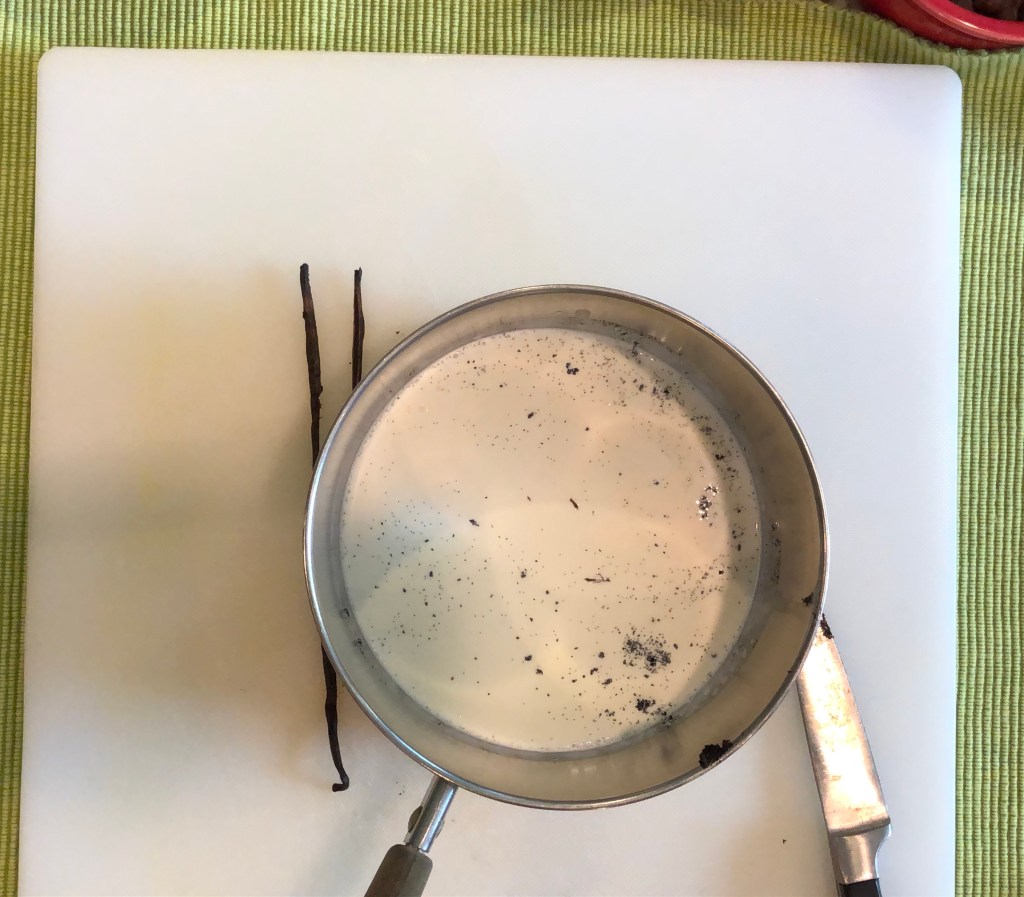
The triple chocolate vanilla bean is flavored with a real vanilla bean that has been opened, scraped, and heated in the cream and butter. This additional heated cream and butter is added to the melted chocolate mixture.
The vanilla bean ganache begins with cream and butter heated with a whole vanilla bean that has been sliced open and scraped into the cream.
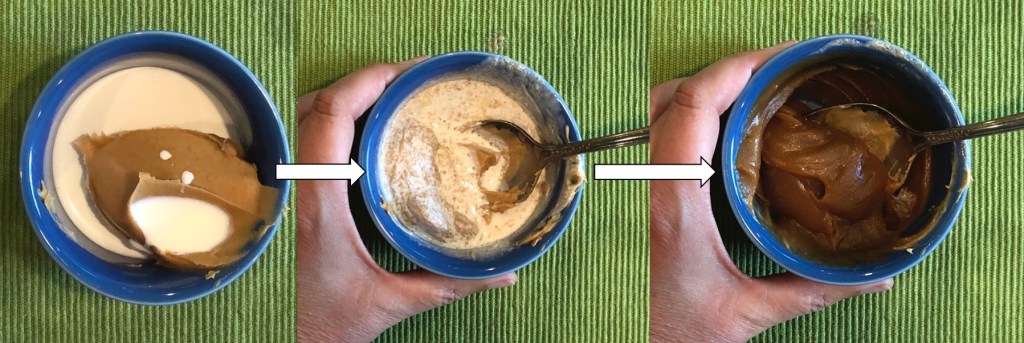
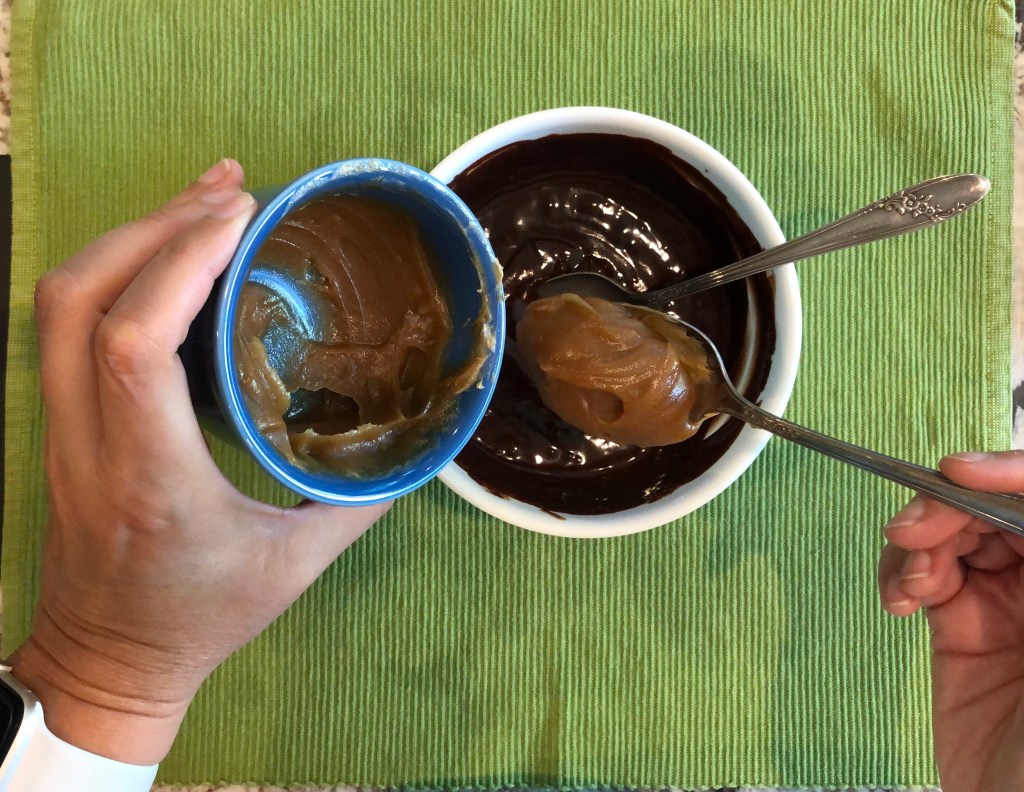
The peanut butter truffle is flavored with smooth peanut butter, mixed in with some extra cream.
Cream and peanut butter mixed until smooth.
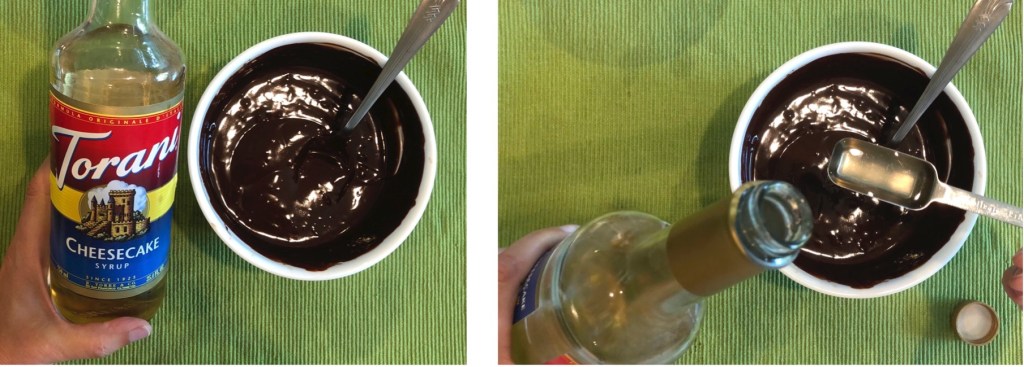
The cheesecake truffle is flavored with a cheesecake flavoring syrup. Alternatively, you could use a cheesecake-flavored oil with a slightly modified recipe. The cheesecake truffle is by far the sweetest of the three, since it uses a sweet syrup for flavoring in the semi-sweet chocolate ganache.
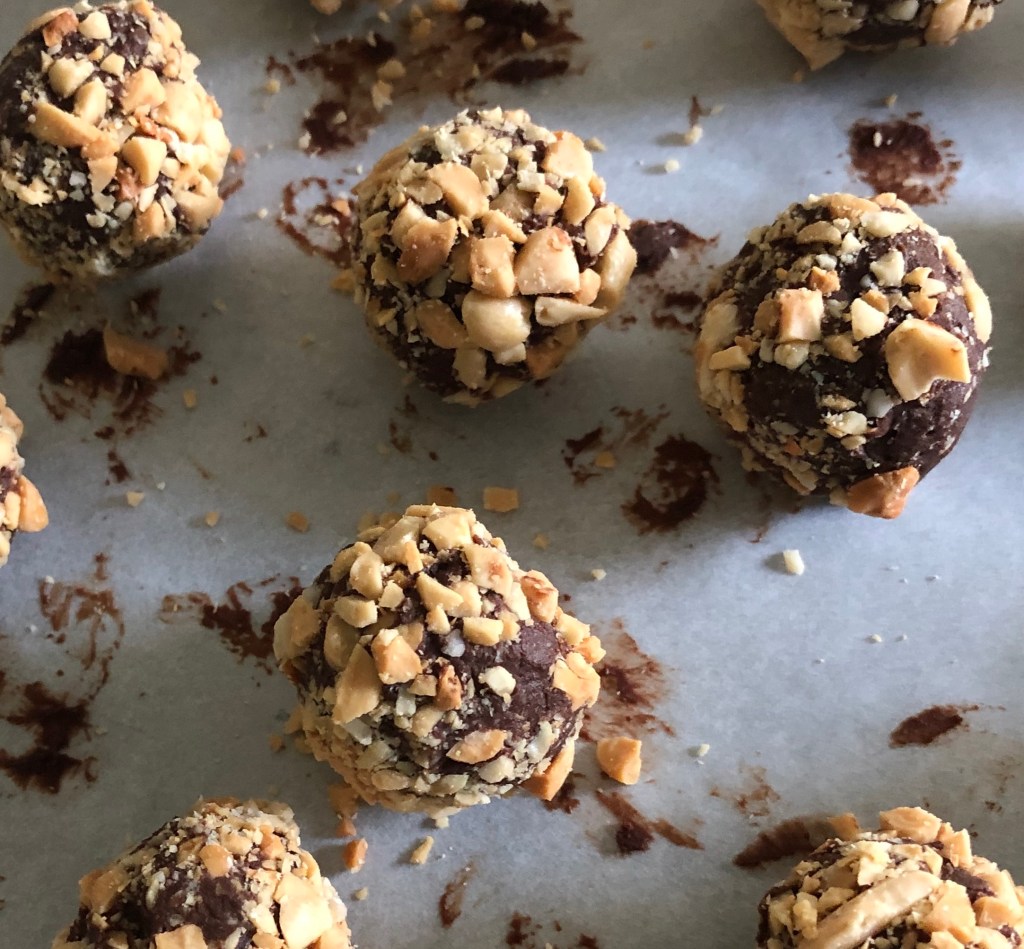
Let the centers cool to room temperature – they will begin to stiffen up. For hollow molding, I like the centers a bit less solidified, so I can use a piping bag to fill the shells. For un-enrobed truffles, as shown below, the centers should thicken up until they are the consistency of very thick frosting. I use a melon ball scoop, approximately a tablespoon, to scoop out the ganache. Then I quickly roll the ganache into spheres with gloved hands, and chill the spheres in the refrigerator for a few minutes to set up.
Peanut butter truffles rolled and ready for their adornment.
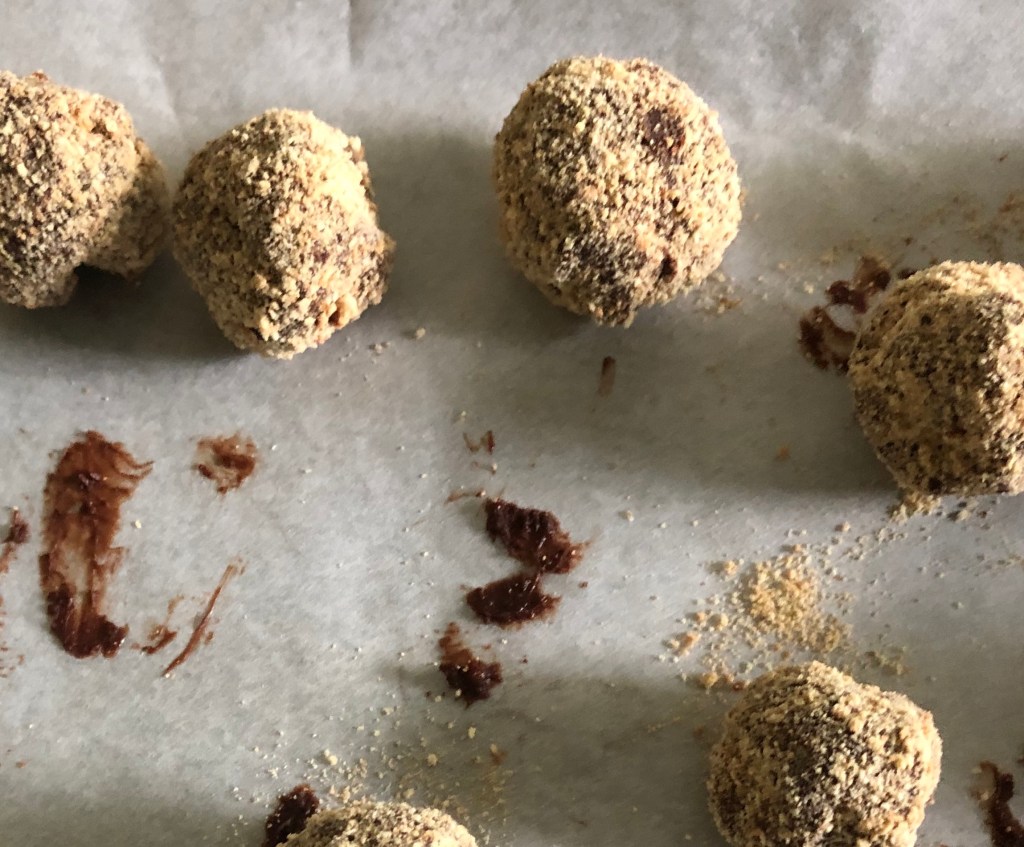
The hand-rolled truffles can be rolled in a coating (nuts, sprinkles, coconut, etc.) to keep them from melting on your fingers when eating. Remember, the centers have very low melting points, so they will immediately begin melting if you use your fingers to pick them up.
Peanut butter truffles rolled in chopped, roasted, salted peanuts.
Cheesecake truffles rolled in graham cracker crumbs.
Vanilla Bean ganache sandwiched between two Nilla Wafers. (These look like mini hamburgers to me.) Oh my, they taste delicious!
Packaged up and ready to be eaten.
These type of truffles, that is, those that are not enrobed in solid chocolate, should be kept refrigerated. Remove them about an hour before eating so that they are soft and immediately melt in your mouth. IF you can wait an hour.
I usually begin thinking about making chocolate in mid-September, once the evenings begin to cool down and the early semester activities evolve into routine semester activities. Sometimes I find myself in October – the time for caramel apples – and I have to hustle to get the chocolate ordered and my equipment set up. But this year I am ready. I placed my chocolate order last week: fifty pounds of bittersweet chocolate, twenty-five pounds of milk chocolate, and twenty-five pounds of white chocolate will be arriving as soon as it is cool enough to ship. I already have about thirty pounds of semi-sweet chocolate on hand, so I have the entire chocolate spectrum covered.
I have reclaimed our finished basement kitchenette area from the summer’s activities. I have pulled out the extra tables and covered them with the washable table cloths. My three chocolate tempering machines are out and shining. I have my lineup of classes scheduled at the local kitchen store: short-cut caramel apples in October and chocolate truffles in November. I am ready for chocolate season.
I’m only organized this year because a friend of mine asked if I could prepare a selection of chocolates for a party and I agreed. He is purchasing the supplies and I am donating my time (he agreed to make a donation to a charity for my time, which works for both of us).
I use a three-step hollow molding technique to prepare my truffles. 1) Prepare a hollow shell of solid, tempered chocolate. 2). Fill the shell with the soft, flavored ganache centers. 3) Seal the bottom of the shell with tempered chocolate. I use professional grade, transparent polycarbonate molds that have 24-36 depressions and have a smooth, mirror-quality finish.
Preparing the ganache centers is easy to do, but tempering the chocolate is not so easy to do. It’s fussy. Unless you have a tempering machine ($$-$$$), tempering chocolate requires a lot of attention and a special thermometer ($). If you don’t want to mess with tempering the chocolate, you can cool the ganache completely, roll into spheres, and coat with your favorite topping (cocoa powder, sprinkles, nuts, powdered sugar, etc.). Or you can use confectioner’s coating, which does not require tempering.
Two parts to a truffle: soft ganache center encased in a hard shell of solid, tempered chocolate.Triple chocolate vanilla bean truffles fully decorated and ready to package.
The up-coming chocolate-themed posts will focus on how to prepare the ganache centers, how to temper chocolate, and the details of the hollow molding technique.
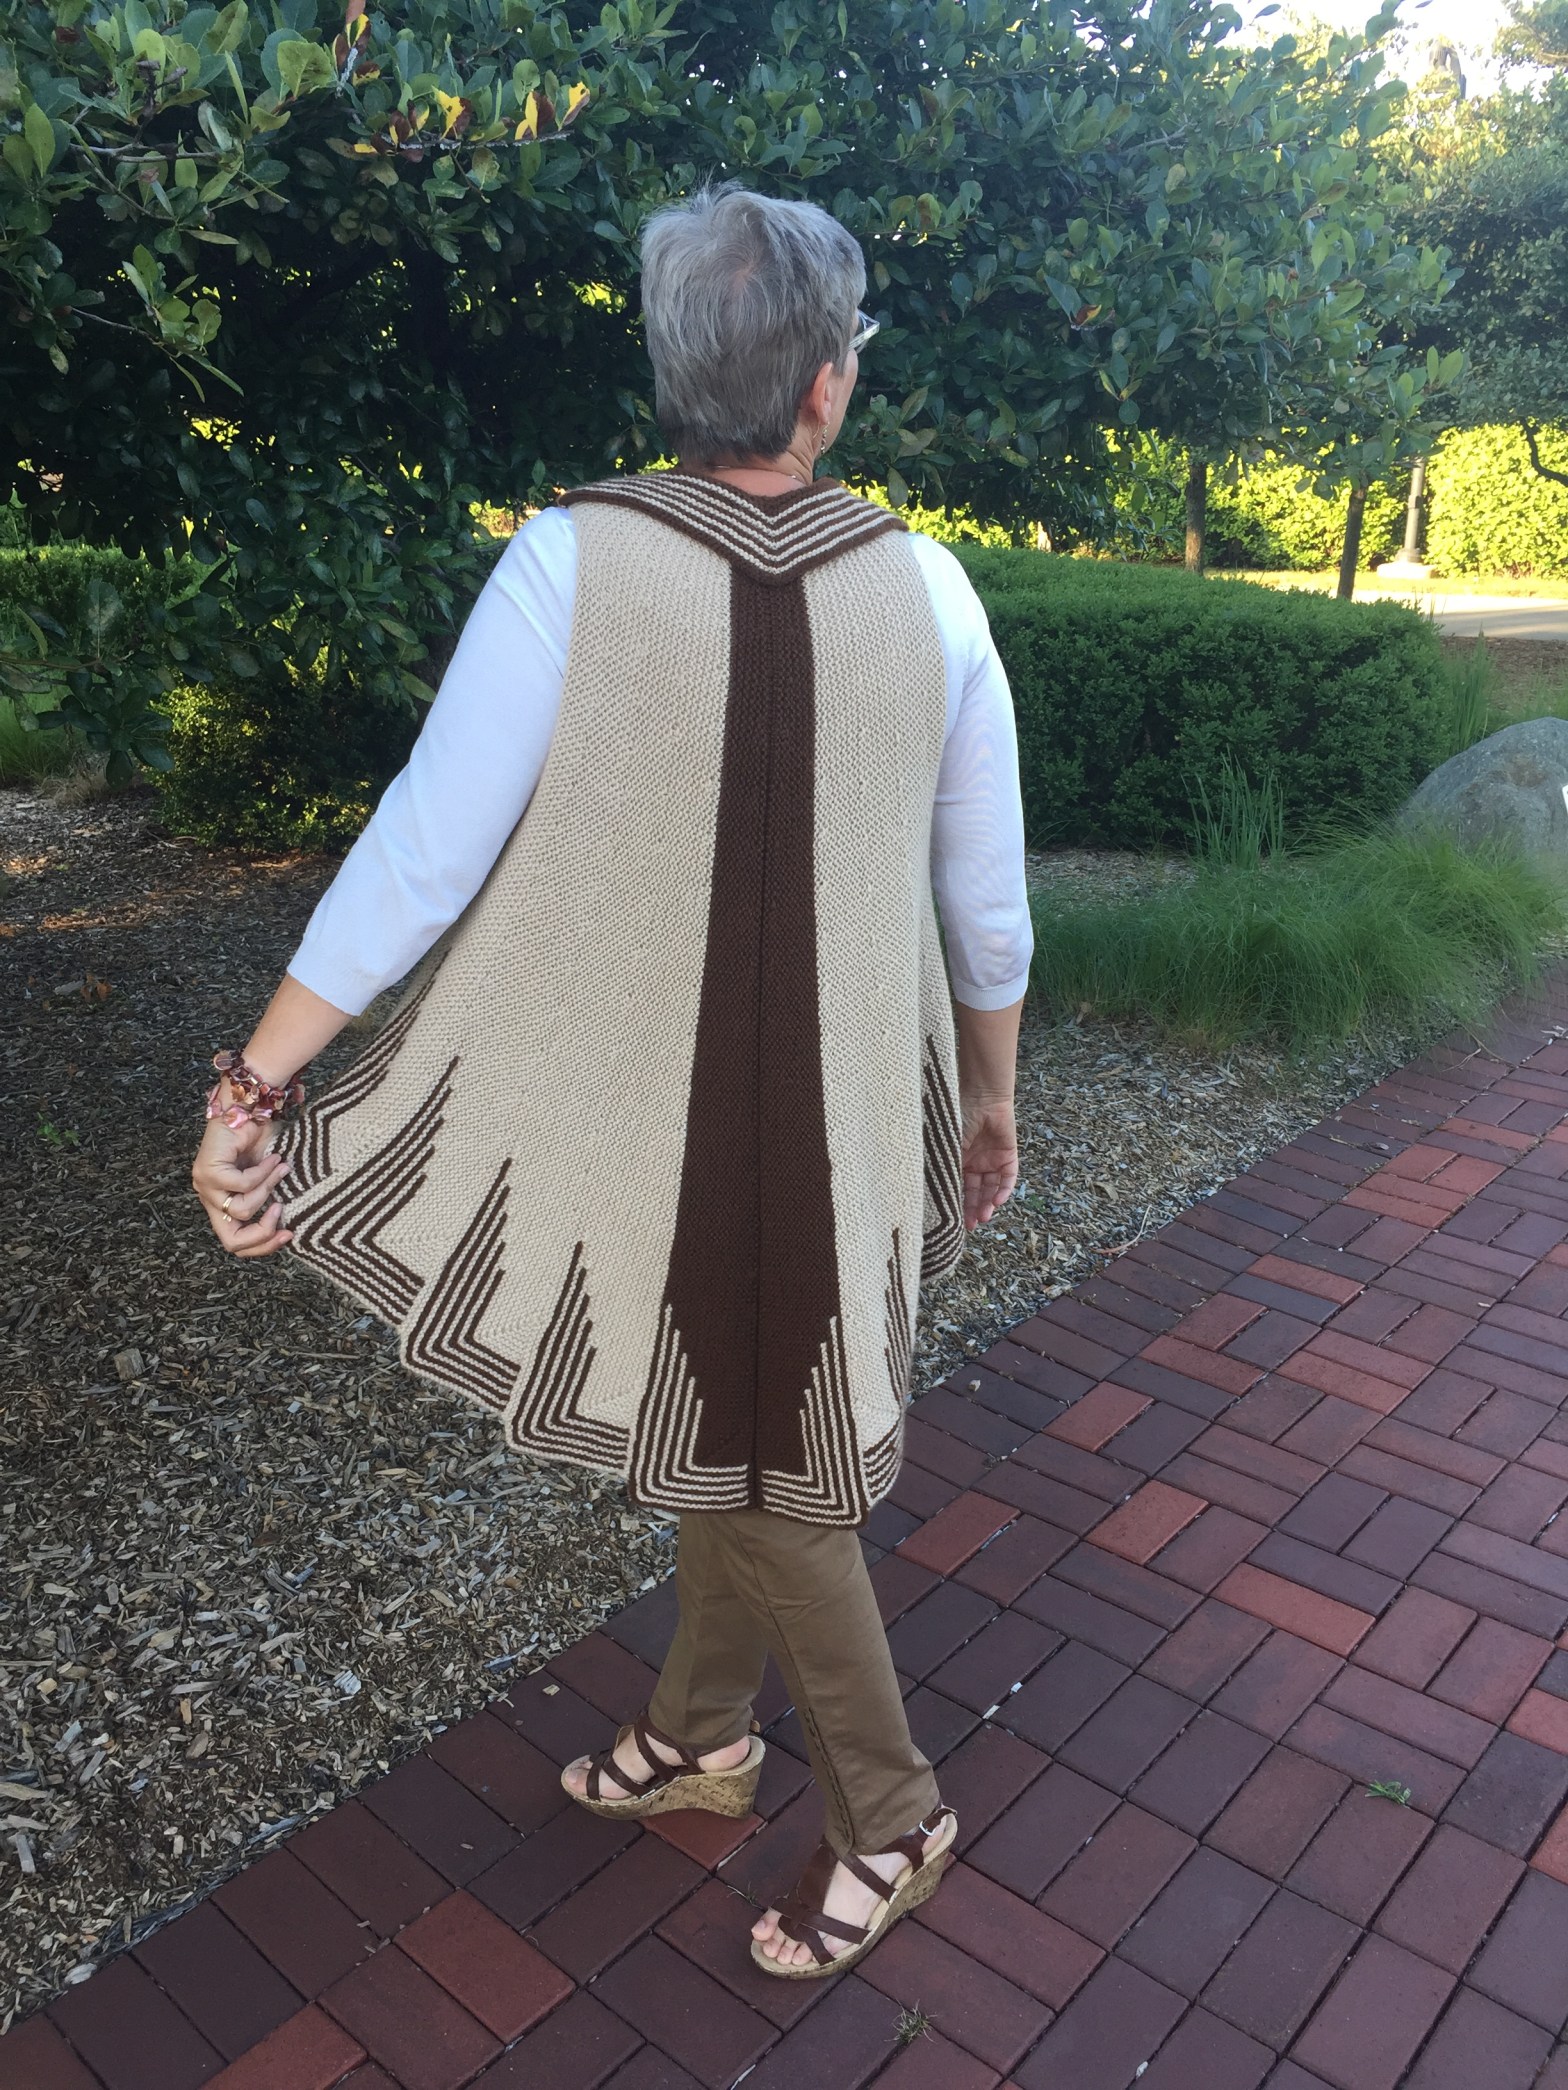
Swing Your Tail Feathers in worsted weight alpaca, garter stitch. Short rows are used to make one side of each connected triangle in this swing vest.
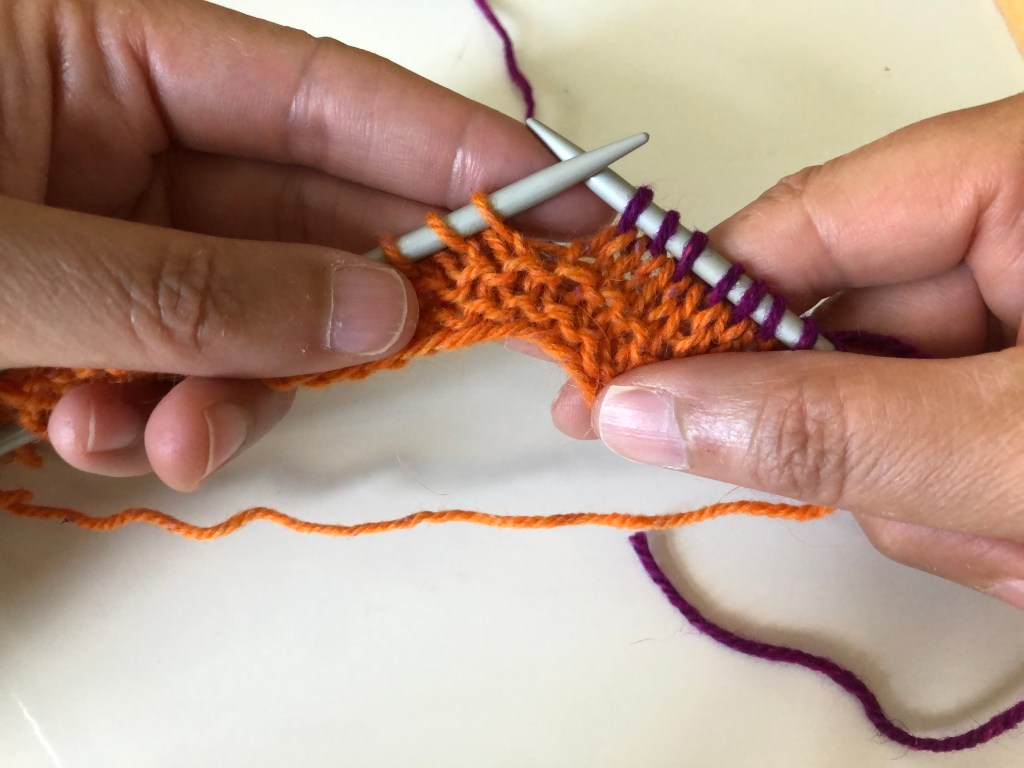
The wrap and turn technique for short rows is similar in garter stitch. There are two parts: 1) working the turn, and 2) working through the turn. Both right side and wrong side are worked the same way, and it is nearly identical to working a wrap and turn in stockinette stitch with the right side facing you. The only difference is in Step 7 below, when you move the yarn to the back side to begin knitting on the wrong side of the piece.
Wrap and Turn: Garter Stitch
Part 1: Working the Turn
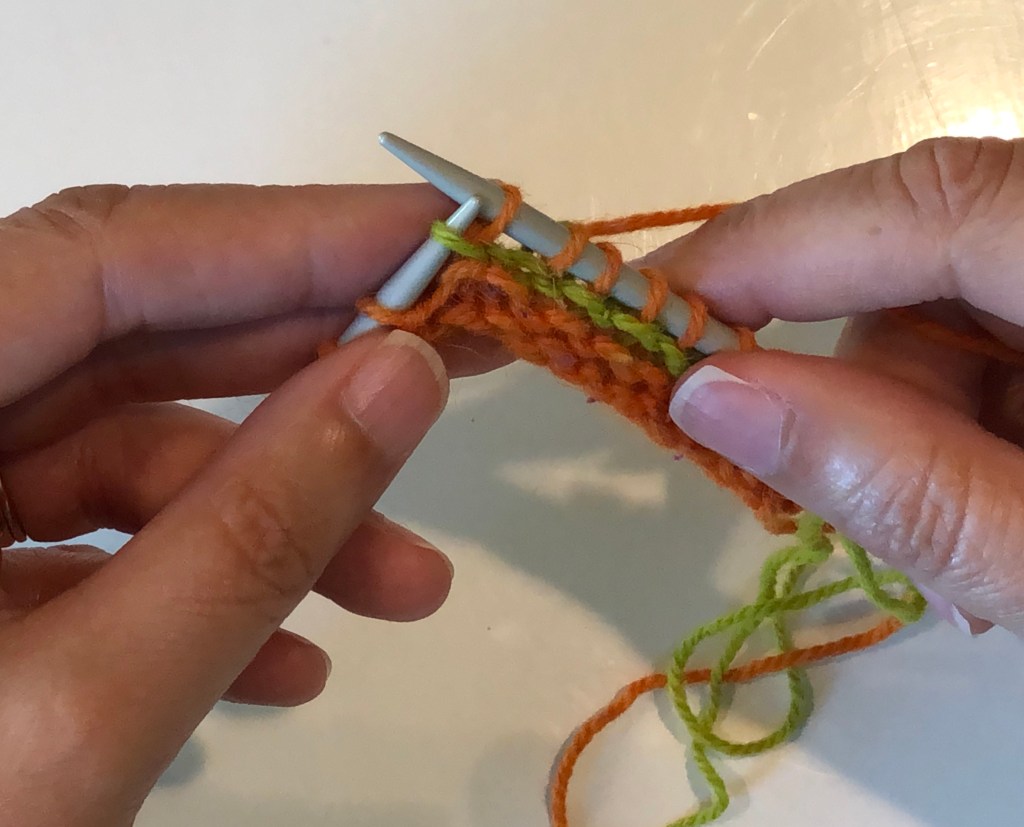
Step 1: Work up to the turning point. Step 2: Bring the yarn to the front of the work.Step 3: Transfer the next stitch, purl-wise, from the left needle to the right needle.Step 4: Wrap the yarn around the slipped stitch, bringing it to the back of the work.Step 5: Move the slipped stitch back to the left hand needle.Step 6: Turn the work so that the wrong side is facing you.Step 7: Since we are working in garter stitch, move the yarn to the back of the work, wrapping all the way around the stitch.Knit to the end of the row or until the next turn.
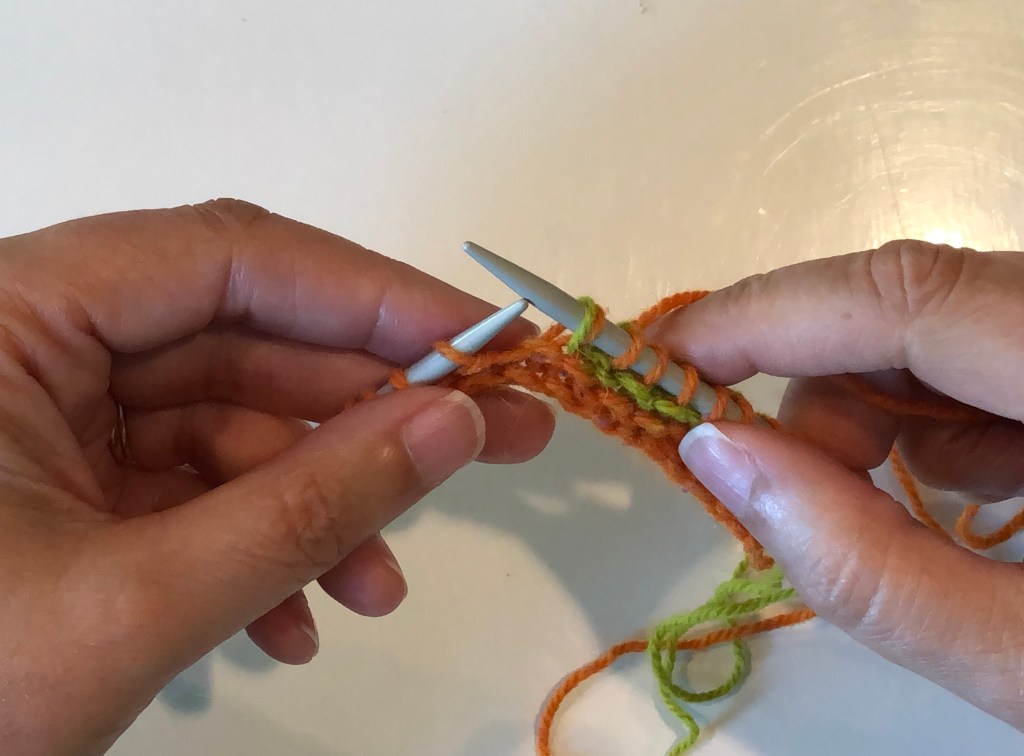
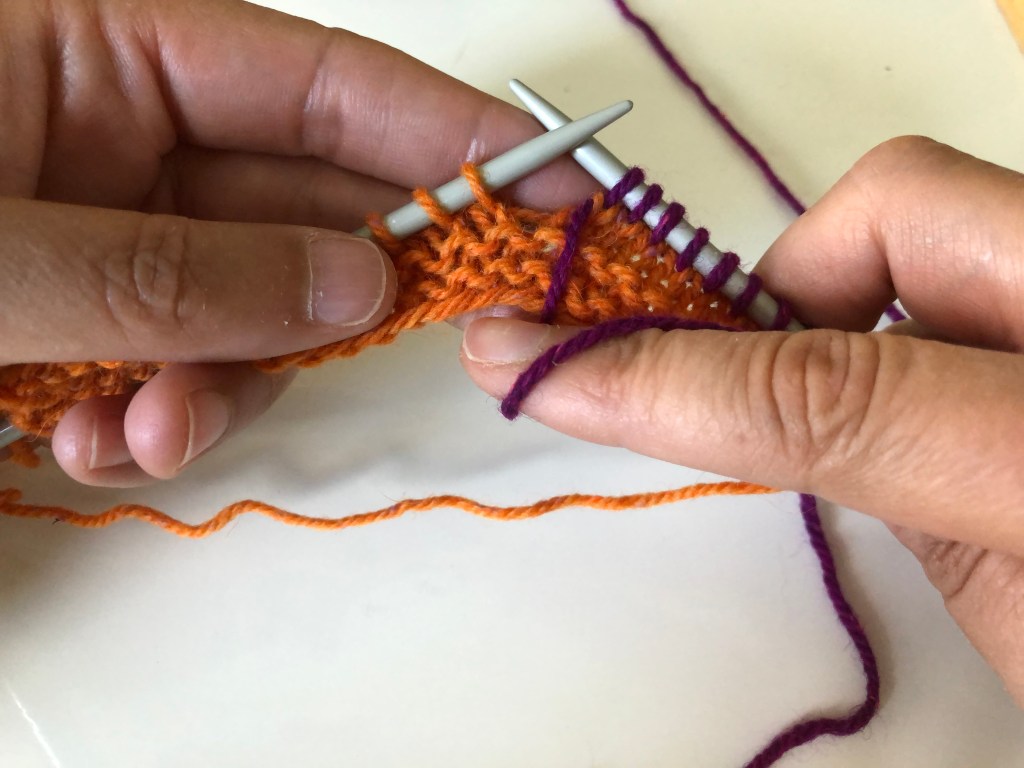
Working Through the Turn
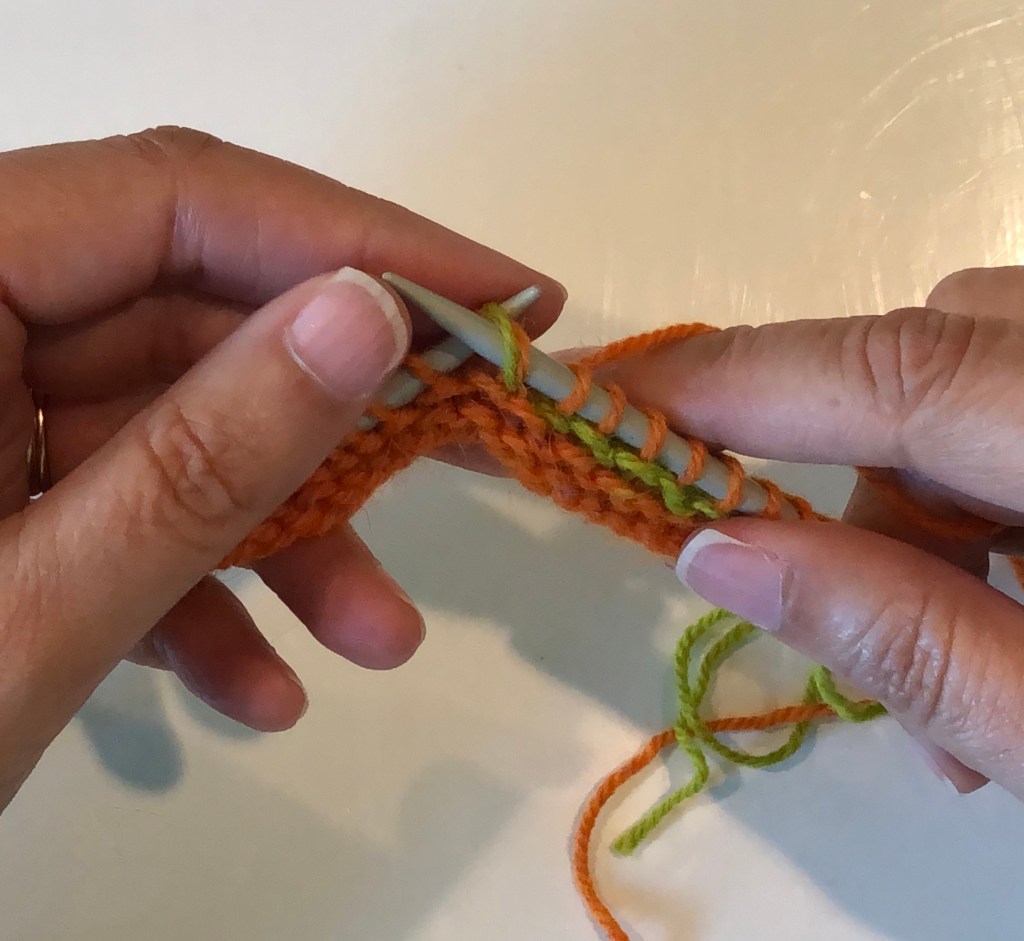
Work up to the wrapped stitch and slip this stitch (purl-wise) to the right hand needle.Pick up the wrap with the tip of the left-hand needle and place it over the slipped stitch.The wrap (green yarn) is over the slipped stitch (orange yarn).Move the slipped stitch and the wrap back to the left hand needle.
Knit the stitch and the wrap together.
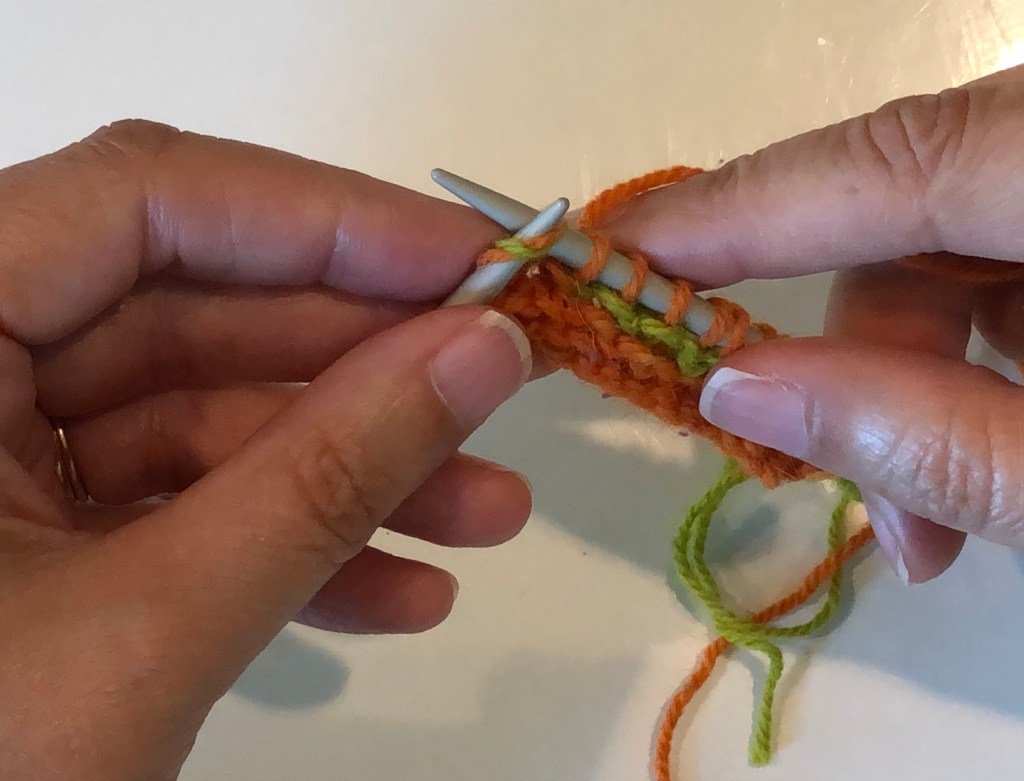
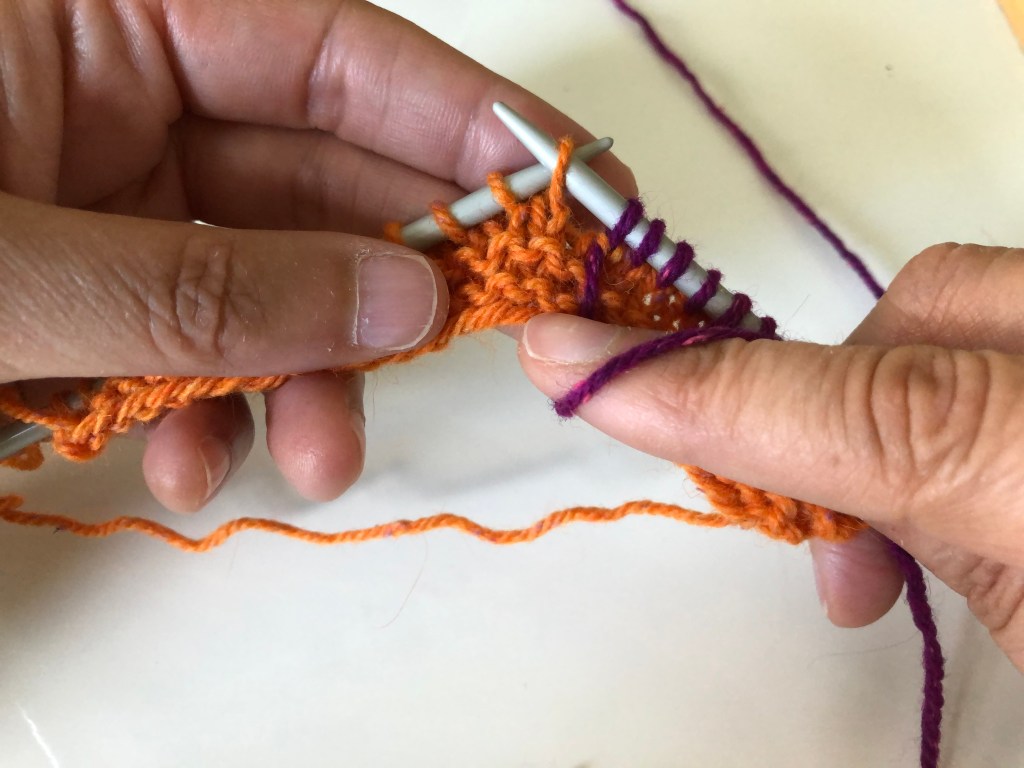
Right-side and Wrong-side Views
View of the short row from the front of the work. The wrap is hidden on the back of the work.View of the short row from the wrong side of the work.
Coming soon: German and Japanese short rows. But first, some posts about chocolate.
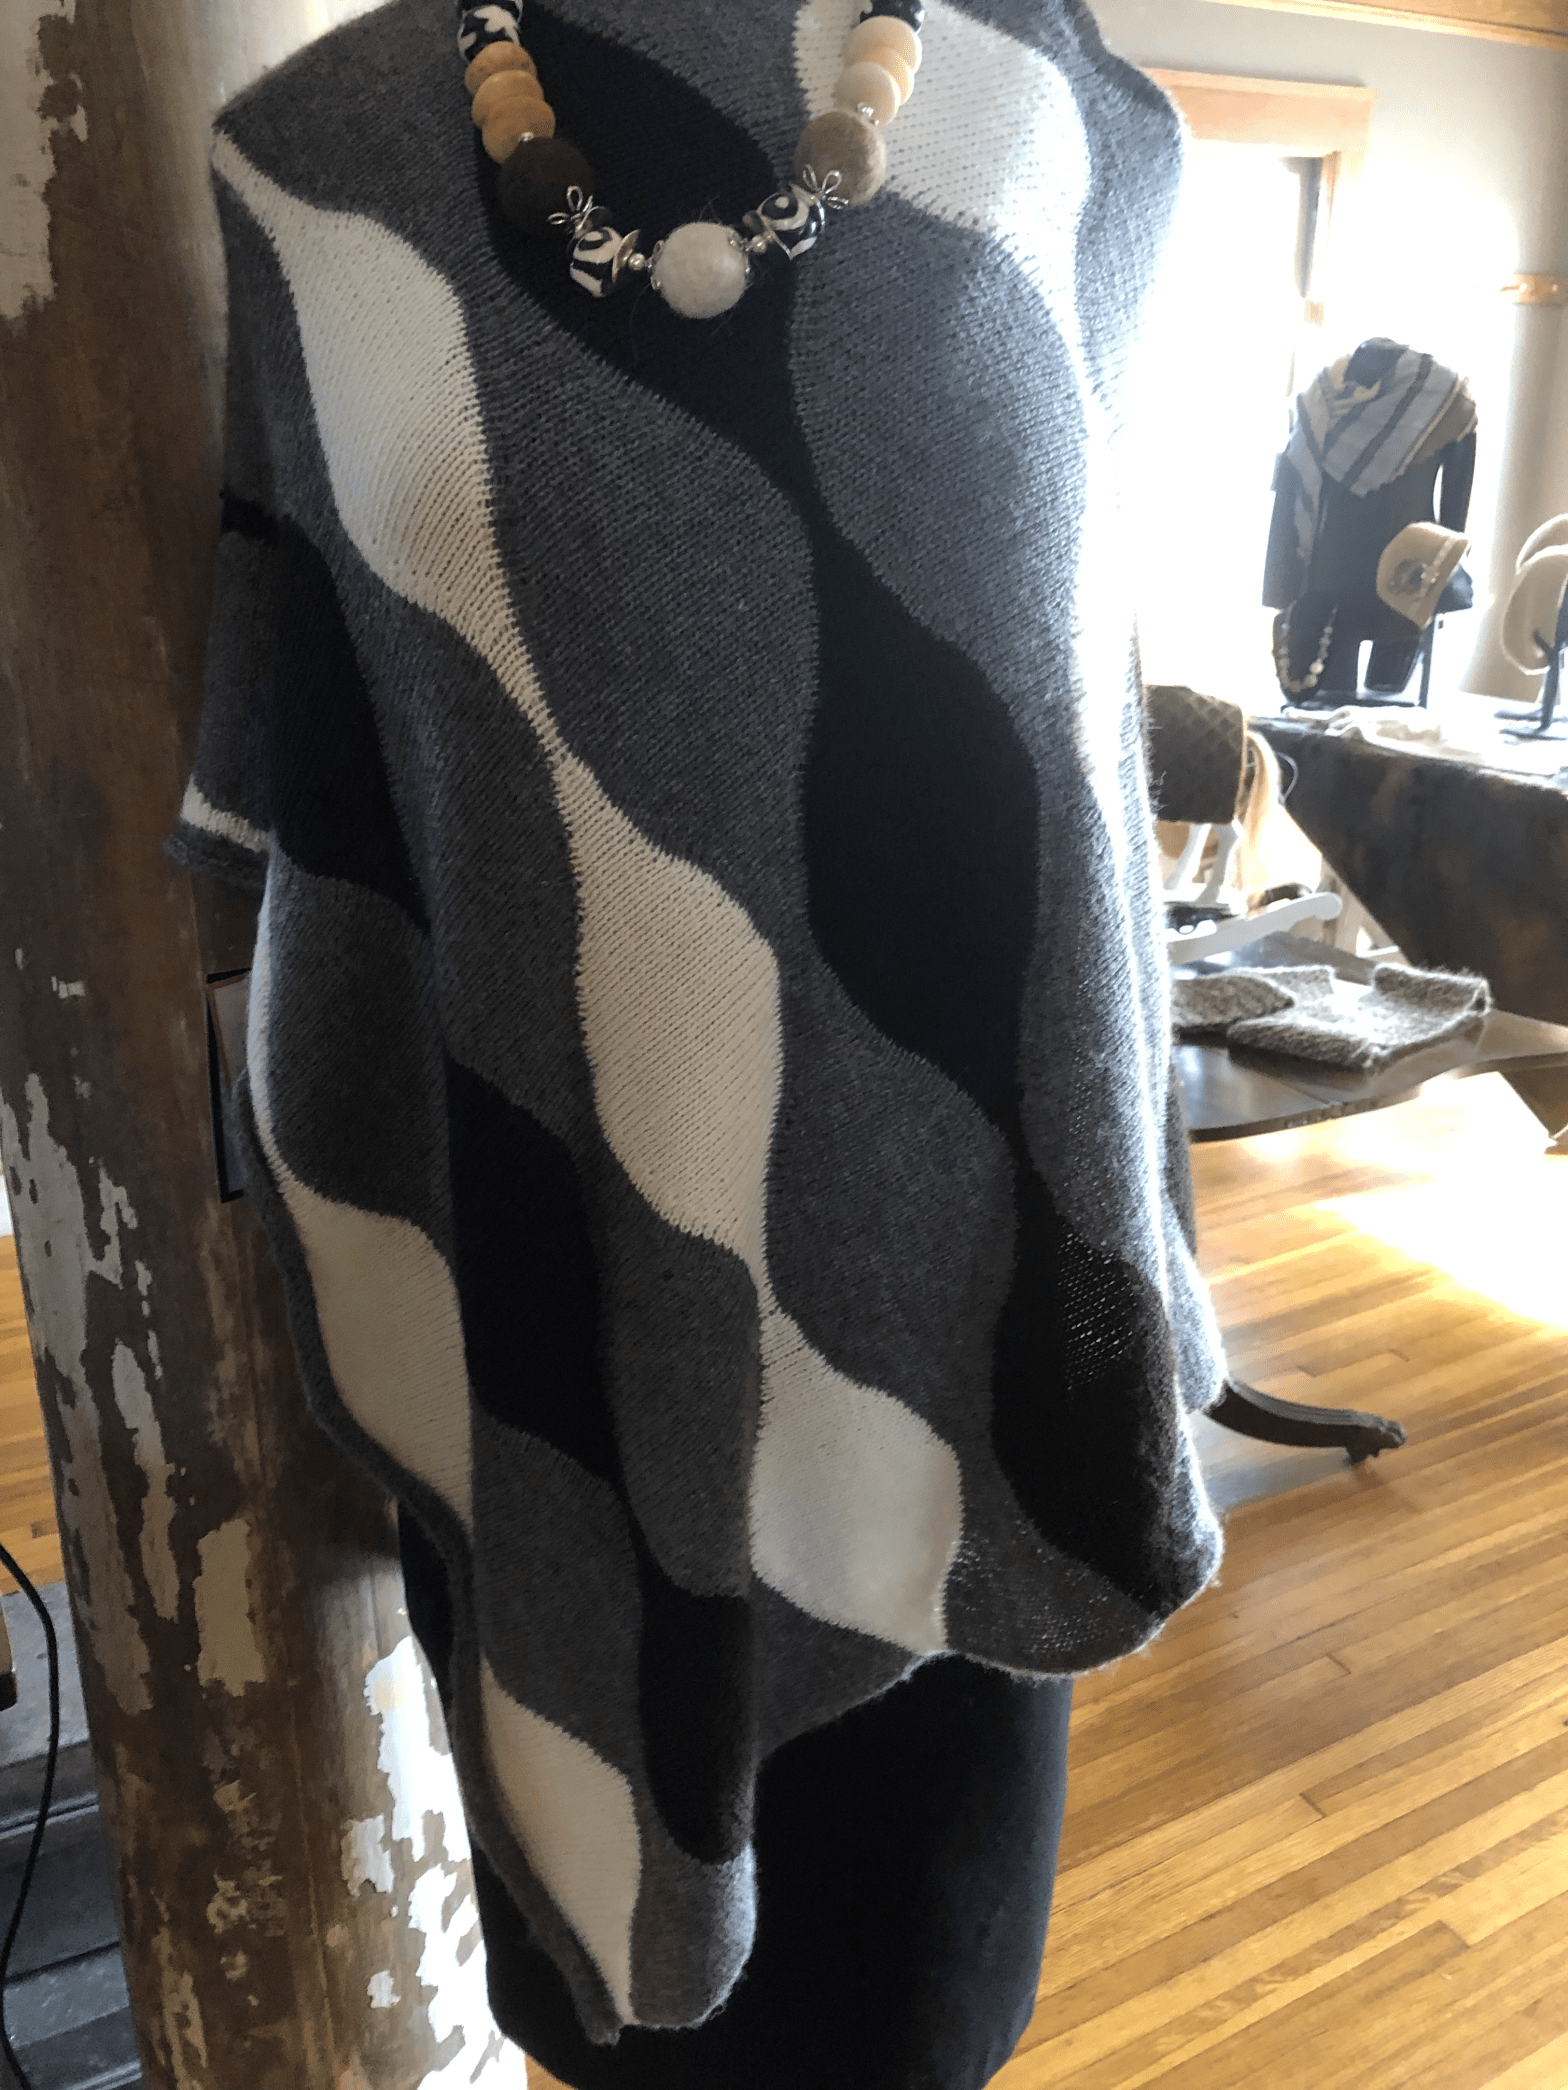
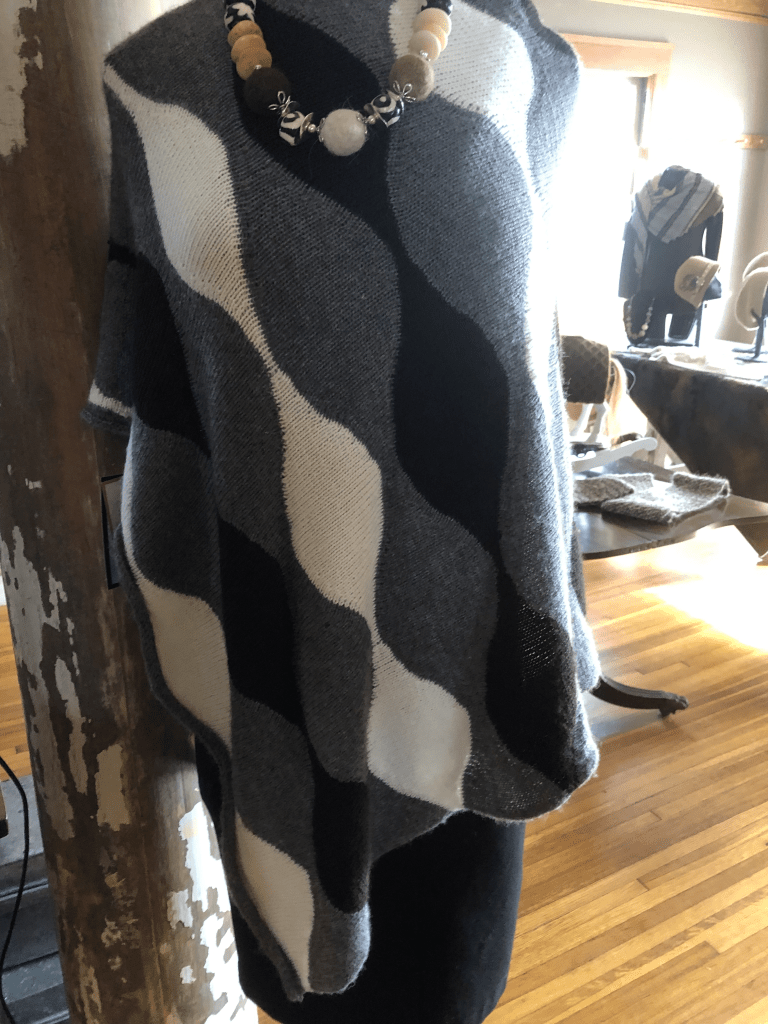
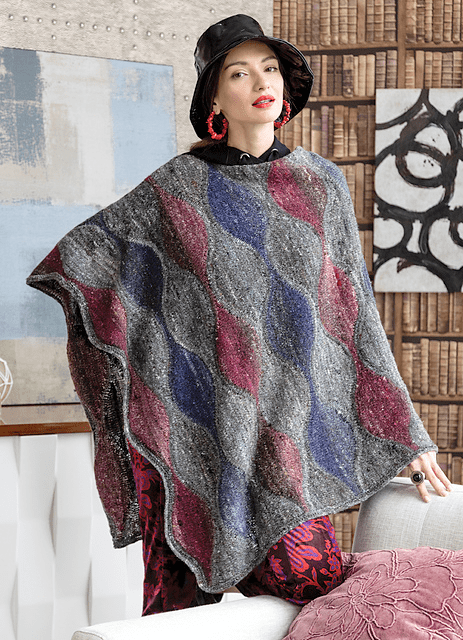
These blocks of color are incorporated into the poncho using short rows.
Short rows are commonly used to incorporate a slope or extra fabric in an object. For example, you can use short rows at the shoulder slope for easier shoulder seaming and on sleeve caps for nice, even shaping at the top of the sleeve cap. Short rows can also be used for incorporating extra fabric where you need it and blocks of color in wavy patterns as shown in the poncho above.
Simply turning and working back will produce a small hole at the turn. This can be used as part of the design, but usually you want to avoid a hole at the turn, especially on pieces that are not lacy to begin with (like a stockinette stitch sweater). There are several techniques for working a short row that eliminate the hole, including Wrap and Turn, German, and Japanese methods.
There are two parts to working every short row: 1) working the turn, and 2) working through the turn. If you are using short rows at the sleeve cap or shoulders of a sweater, you will work some with the right side facing you and some with the wrong side facing you. Both the right-side and wrong-side methods for working a wrap and turn short row in stockinette stitch are shown below.
In the videos and photos below, the short row is worked in a contrast color (purple) so that you can see where the wrap ends up and how visible it is on the front side of the work. Some methods of working short rows are more visible than others. It’s good to have a couple of different strategies for working short rows, depending on your project.
It might seem like there are a lot of steps to work a short row, but once you have practiced and have some muscle memory, the turns go quickly. Picking up the wrap and slipping the stitches can become one fluid movement. The pattern for wavy poncho shown above is available in the Fall/Winter 2019, Issue 15, #12 of Noro Knitting magazine. It’s a great project to practice short rows because there are a LOT of them!
Step 1: Work up to the turning point.Step 2: Bring the yarn to the front of the work.Step 3: Slip the next stitch, purlwise, to the right needle.Step 4: Bring the yarn to the back of the work, in front of the slipped stitch.Step 5: Return the slipped stitch back to the left needle.Step 6: Turn the work so the wrong side is facing you. Step 7: Purl the next stitch and continue working the row.
Working the turn of a wrap and turn short row (stockinette stitch).
Part 2: Working Through the Turn, Right Side Facing You
Step 1: Work up to the wrapped stitch.Step 2: Slip the wrapped stitch, purlwise, to the right hand needle.Step 3: Using the tip of the left-hand needle, bring the wrap up onto the right needle and onto the slipped stitch.The wrap is on top of the slipped stitch.Step 4: Transfer both the wrap and the stitch back to the left needle (purlwise).Step 5: Knit the wrap and the stitch together. Step 6: Continue working the row.
Working through the turn of a wrap and turn short row (right side).
Wrap and Turn Short Row Finished Views
Notice that you can barely see the wrap, even if it is a different color.Backside (wrong side) view of the wrap and turn short row. You can see the wrap on the back side of the work.
Part 3: Working the Turn, Wrong Side Facing You
Step 1: Purl up to the turn.Step 2: Move the yarn to the back.Step 3: Slip the next stitch KNIT-WISE Step 4: Bring the yarn to the front. The knitwise slip looks twisted, but it will end up not twisted when you work through the wrap. Step 5: Slip the wrapped stitch back to the left needle.
Step 6: Turn the work. The wrap should be in front of the slipped stitch, and the working yarn in the back of the work.
Step 7: Knit across the row.
Working the turn from the wrong side in stockinette stitch.
Part 4: Working Through the Turn, Wrong Side Facing
Step 1: Work up to the wrapped stitch.Step 2: Slip the wrapped stitch (purl-wise this time).Step 3: With the tip of the left needle, move the wrap to the right needle, placing it on top of the slipped stitch.Note how the wrap is on top of the slipped stitch on the right-hand needle.Step 4: Transfer both the wrap and the slipped stitch back to the left hand needle.Step 5: Purl THROUGH THE BACK of the loops. This will keep the wrap on the back of the work and untwist the stitch that you slipped knit-wise.Purl through the remaining stitches to the end of the row or to the next turn.
Working through the turn on the wrong side of stockinette stitch.
Finished Views
View from the right side. Note the wrap is on the back side and barely visible and the stitches next to the short row are not twisted.
View from the back side. You can see the wraps from the back.
What happens if you slip the stitch purl-wise in Part 3, Step 3 or if you don’t purl through the backs of the loops (Part 4, Step 5)? If you slip the stitch purl-wise, the stitch next to the short row stitches will be twisted. You probably won’t notice it unless you are looking for it. If you don’t purl through the back of the loops, the wrap will show on the front of the work as shown in the second photo below.
Notice the twisted stitch at the end of the arrow, next to the short row stitches. It is not immediately obvious, so I wouldn’t worry if you forget to slip knit-wise instead of purl-wise.Part of the wrap shows on the front of the work if you don’t purl through the back of the loops. It would not be as obvious in the same color, but many of them together (like at the top of a sleeve cap) can draw the eye.
The next post will show how to work a wrap and turn in garter stitch.
I sometimes get frustrated when I knit gifts for people, and I don’t think this frustration is unusual. I want the gift receiver to love and cherish their gift, but I also want to be acknowledged for the gift. Because I created this object, the object itself now has significance to me; in fact it has much more significance to me than something I purchase. After all, anyone can go out and buy a gift. Not every one can create a gift. It may not be significant to the recipient, but it IS significant to me, and I feel like the recipient should be made aware of that.
Most of the people I routinely knit for get this. For example, both my daughter and daughter-in-law are such fun to knit for. If my time and funds were both unlimited, I would knit all the projects for them. They both routinely help choose project, pattern, yarn and most importantly, use the knitted objects that I make for them. I like including them in the process and keeping them updated on the progress.
For each of the pieces shown below, my daughter and daughter-in-law were heavily engaged in the creative process: choosing, modifying, or helping to design the pattern, and choosing the yarn.
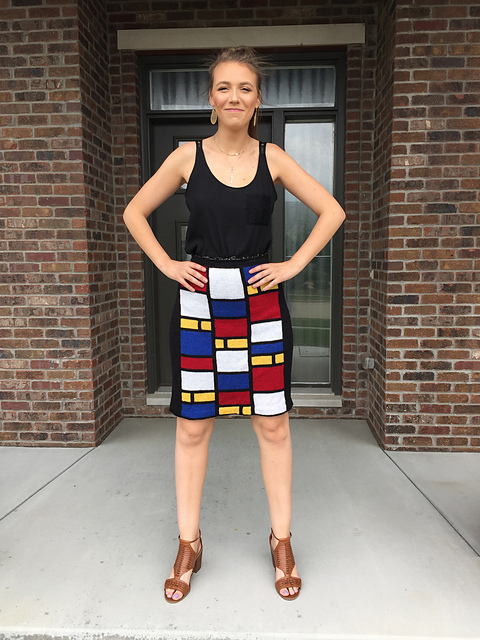
My Mondrian Skirt, pattern by Candace Eisner Strick, knit for my daughter, an elementary school teacher.
Modified Dale of Norway pattern. My daughter wanted a reindeer sweater for Christmas. I used the stitch pattern from a mitten and modified a traditional Norwegian sweater pattern to have raglan sleeves rather than steeked sleeves.
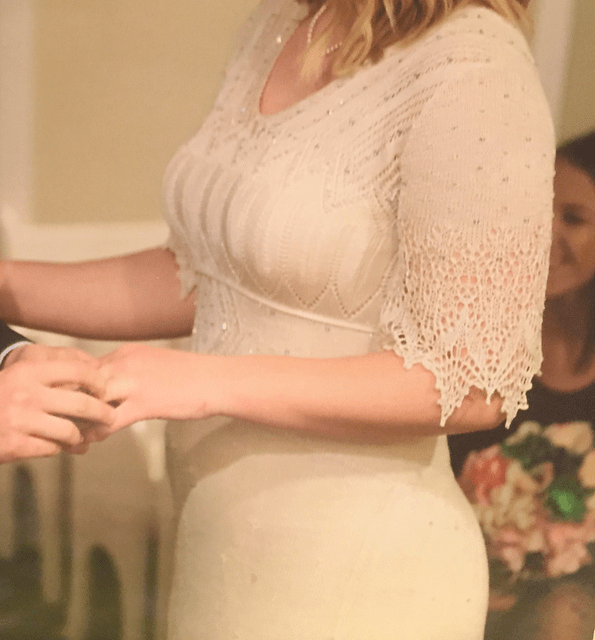
Knitted wedding dress. My daughter-in-law helped me design this dress. OMG, it is still the most beautiful thing I have ever knit. I plan to devote an entire post (or several) to the design and techniques in this dress.
I try not to surprise people with gifts anymore, because tastes in knitted objects differ widely. I find I’m far more likely to get positive feedback and see the person using the object if I include the recipient in the process, like I do with my daughter and daughter-in-law. However, sometimes I will knit something as a gift without the recipient’s input. This is when I find it especially helpful to include a note that explains the significance of the gift. I feel like if I could just find the right words to include with the gift, I might better communicate the significance of time and energy I spend creating something special, just for them. After all, I only do this for few very special people in my life.
I have a couple of templates for notes that I use when I give gifts, and I’ve included them below. Please feel free to update and use with your own hand-knit gifts.
Dear (Friend), You are a special person in my life and that is why I have made this hand-knitted (insert object name) just for you. I hope you will cherish this gift. I chose the pattern and yarn with you in mind. I enjoyed making this for you because with each stitch, I was thinking fondly of you. I hope that every time you see it/use it/wear it you will think fondly of me as well. Since I am still learning my craft and honing my skills, there are likely to be mistakes in this (object). Please consider it a symbol of our relationship and treat it carefully: Hand Wash, Dry Flat, Do Not Wring or Stretch, Do Not Iron. I would love to have a photo of you using the/wearing the (insert object name).
The next template is specialized for a wedding gift (specifically wedding lace). I created this when a dear friend of mine got married. It describes some of the techniques used in the lace along with a wee bit of marital advice.* The original note was sappy and I cried a lot while I was writing it to my dear, dear friend.
*Note: I’m not qualified to give marital advice.
After modifying it and removing some of the more personal notes, I have used some of the wording again for other wedding lace gifts.
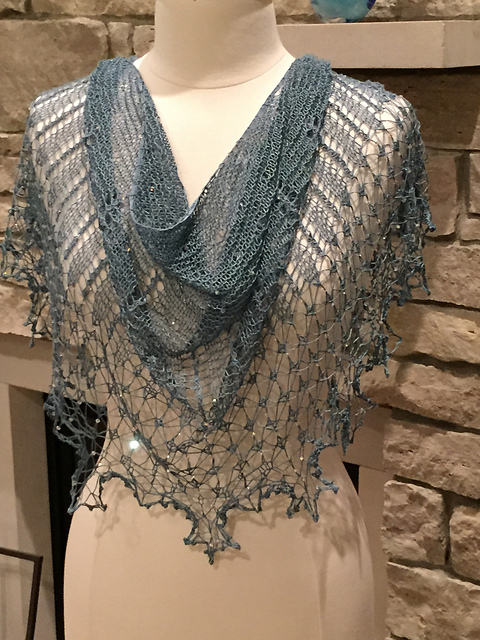
Beaded Wedding Shawl/Lace
As my hands were working, I was thinking about you. Each stitch in this shawl/lace represents a prayer for you, a loving thought, and an inward smile.
The knit and purl stitches produce the body of the fabric. These are the most abundant stitches in the shawl/lace. In the wedding shawl/lace, these stitches represent the daily routine in a marriage. Though not always exciting, these stitches produce the body of the knitted fabric. Without these, the shawl/lace would have no shape. These abundant stitches represent our daily routines: the “please,” the “thank you,” and the “I love you” that we share with our loved one every day.
The Knit Two Together and Slip, Slip, Knit stitches are leaning stitches. A beautiful symmetric pattern emerges when these stitches are used together. These stitches represent the times you lean on each other, with each one taking a turn leaning and being leaned on.
The Yarn Over stitch produces a hole in the fabric. These holes may seem like a problem, but with the right perspective, they make a beautiful pattern. The yarn over stitch represents disappointment and setback. No one looks forward to disappointments and setbacks, just as no one looks forward to a hole in the fabric. But, just like holes in the knitted fabric, we should try to use our setbacks to our advantage and emerge with something beautiful as a result.
The Yarn
Over stitch is often used in combination with the leaning stitches. This is a reminder that when we have a
disappointment in life we should lean on each other for support.
Knit Three Together: These stitches are often at the center of a pattern. They represent the times that we lean not only on our spouse, but also on our families, our friends, and/or our faith.
Make one stitch, right and Make one stitch, left: These stitches each make a new stitch and increase the size of the fabric. These stitches are balanced at the center and on the edges of the shawl. These stitches represent the new memories and experiences you will have together. A relationship will thrive and grow with new experiences together.
This wedding shawl/lace has beads. Most of the beads are placed on the stitch before it is knit. This is a Bead Before stitch. These shiny little beacons symbolize the happy moments, the laughter, and the joys we anticipate. Some of the beads – not many – are placed on the stitch after it is knit. This is a Bead After stitch. These beads symbolize those experiences that we may not be able to smile or laugh about until much time has passed.
Mistakes and flaws – they are there. If you
go looking for them, you will find them. In life or knitting, seeing the beauty
of the whole rather than focusing on the mistake or flaw is a true gift.
The pattern of the shawl/lace is a combination of ALL the stitches. The boring and mundane, the holey stitches, the leaning stitches, the new stitches, and the beaded stitches all combine to produce the pattern of the beautiful fabric that we see. The crescent shape of this shawl/lace symbolizes arms wrapping around to embrace you.
When you wear this lace, remember that you are loved!
Wedding shawl for my niece. BooKnits pattern using DyeForYarn silk and Swarovski bicone crystals.
Wedding shawl made for a dear friend and college roommate. BooKnits pattern, DyeForYarn silk yarn, Swarovski bicone crystals.
I hope you find these templates useful. If you have other ideas about how to convey the significance of giving or receiving hand made gifts (of any type), please let me know!
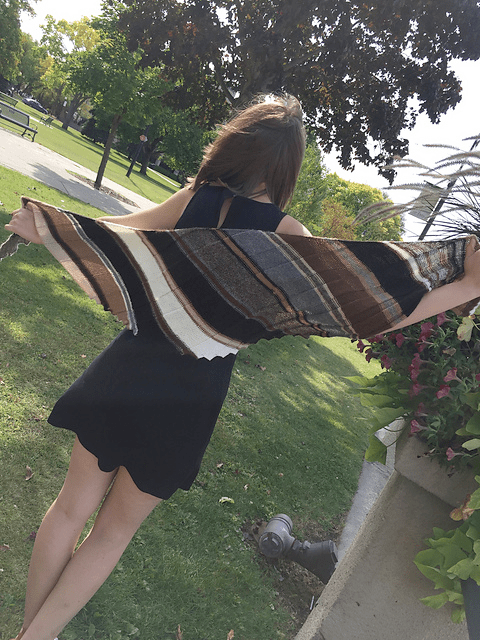
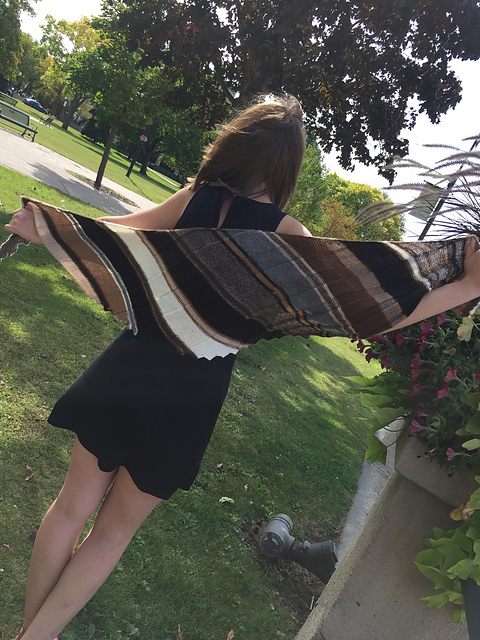
All the colors of the United Colors of Alpaca Scarf
I never expected that this would be the first pattern about which I would write, but here we are…
Even though it was an afterthought and last minute addition to the display pieces in our Stitches Midwest booth this past weekend, the United Colors scarf was the best-selling pattern and kit at our booth. As I was having fun working the booth and enjoying the events of Stitches, I took a short break and checked in with Facebook. I noticed that my daughter-in-law marked herself “safe” (thankfully!) and learned of the mass shooting in El Paso, Texas.
Sadly, yet not surprisingly, there were multiple mass shootings again over the course of the weekend. At least one of these mass murders was racially motivated as evidenced by the shooter’s manifesto.
Ironically, this design was created on another summer weekend marred by racial tensions.
During the summer of 2017, I was working on a scarf/shawlette pattern for 5MilesEast and der Bauernhof Farms. My vision was that this pattern would incorporate several of the natural, neutral colors of alpaca. I wanted it to be simple to knit and use a reasonable amount of yarn, so that the kit was not too expensive*.
*NOTE: Anything worked in 100%, quality alpaca is going to be expensive. If you have found an inexpensive alpaca yarn it is probably 1) second cutting from the shearing – these are short staple fibers that make a very low quality yarn, 2) coarser staple fibers sheared from legs or neck and spun into fiber, or 3) mixed with an inexpensive filler yarn.
The stitch techniques used in the
pattern are those that a beginner knitter should know: Knit, Purl, Increase,
Bind Off. There is a simple chart showing the rows for the colors of the
stripes – a good introduction to reading charts associated with knitting
patterns.
After I had the construction of the scarf and stitch pattern figured out, I began working on the color combinations for the scarf. I was planning to make swatches with a variety of color combinations to determine which I liked the best. I planned to spend the day knitting (and hopefully finishing) a prototype. As I often do, I was listening to the radio while knitting.
These are the NPR headlines from Saturday, August 12, 2017:
White Supremacist Rally in Virginia Turns Violent
White Supremacist Protest in Virginia Leaves One Dead
Trump Speaks Out Against Violence in Charlottesville
– as you might recall, this was the speech where the president avoided criticizing
the white nationalists, whose demonstration was the catalyst for the violence, and
rather attributed the events of the weekend to hatred, bigotry and violence on many sides.
As I watched and listened to the events of that day unfold, what began as a simple color-swatching experiment ended up as my own personal craft-i-vism statement on anti-racism using all the colors of alpaca that I could find. I named it the United Colors of Alpaca. It was beautiful in all the shades including white, beige, fawn, light brown, medium brown, rose gray, gray, dark brown, and black. All the colors mixed and matched and made up a beautiful, united piece.
I’m afraid racism has found a safe haven in this country and I am so sad and angry. Diversity is our strength. Diversity makes us better. Diversity makes us stronger. Diversity makes us beautiful.
Once the scarf was completed, I chose my favorite color combinations, knitted up a display piece, and wrote the pattern for those colors. I kept my original piece and wear it frequently. I wore it to Stitches this past weekend and wouldn’t you know, people wanted kits in ALL the colors!