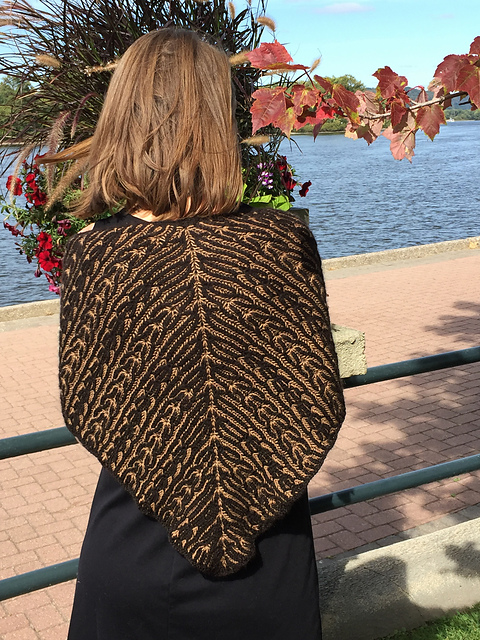
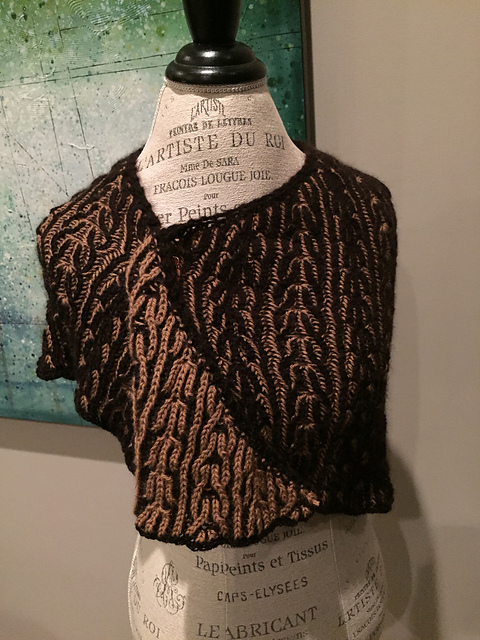
Reversible Brioche Wrap
And Other Brioche Objects
I have another class coming up at the community college – Brioche Knitting. The next post will be the password protected materials for that class. In the meantime, here is a brief introduction to brioche knitting.
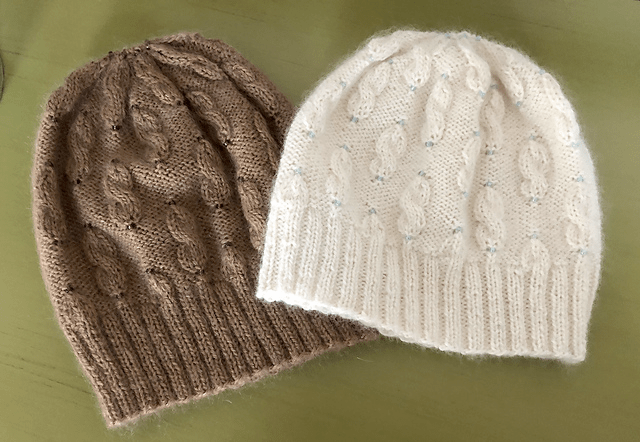
Brioche knitting is a slipped-stitch technique that results in a stretchy knitted fabric where the partially visible floats add interest to the fabric design. When worked in a rib pattern, as in the Reversible Brioche Wrap shown in the photos below, the fabric does not compress as much as traditional ribbing. But like a traditional rib pattern, the fabric doesn’t have an obvious right side or wrong side, which makes it an appealing stitch to use in scarves and wraps where both sides can be visible. In the photos below, the fawn-colored floats are visible on the side with the more prominent black knitted stitches. On the reverse side, the black-colored floats are visible with the more prominent fawn-colored knitted stitches.
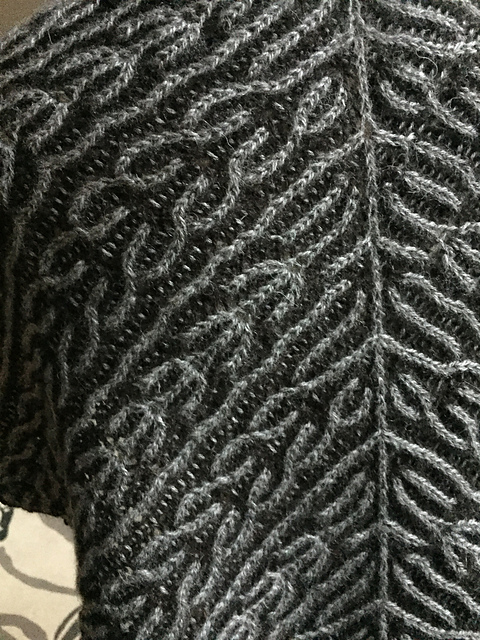
Each row in brioche knitting is worked twice–in the first pass through a row, half of the stitches are worked and half of the stitches are slipped using the brioche slip (essentially a YO worked across the slipped stitch), which sets up those stitches for the subsequent pass across the row. In the second pass through the row, the pattern is alternated: work the slipped stitches and slip the worked stitches from the previous pass. Because the float yarn is worked together with the stitch, it produces the characteristic look of brioche knitting where the floats are partially visible.
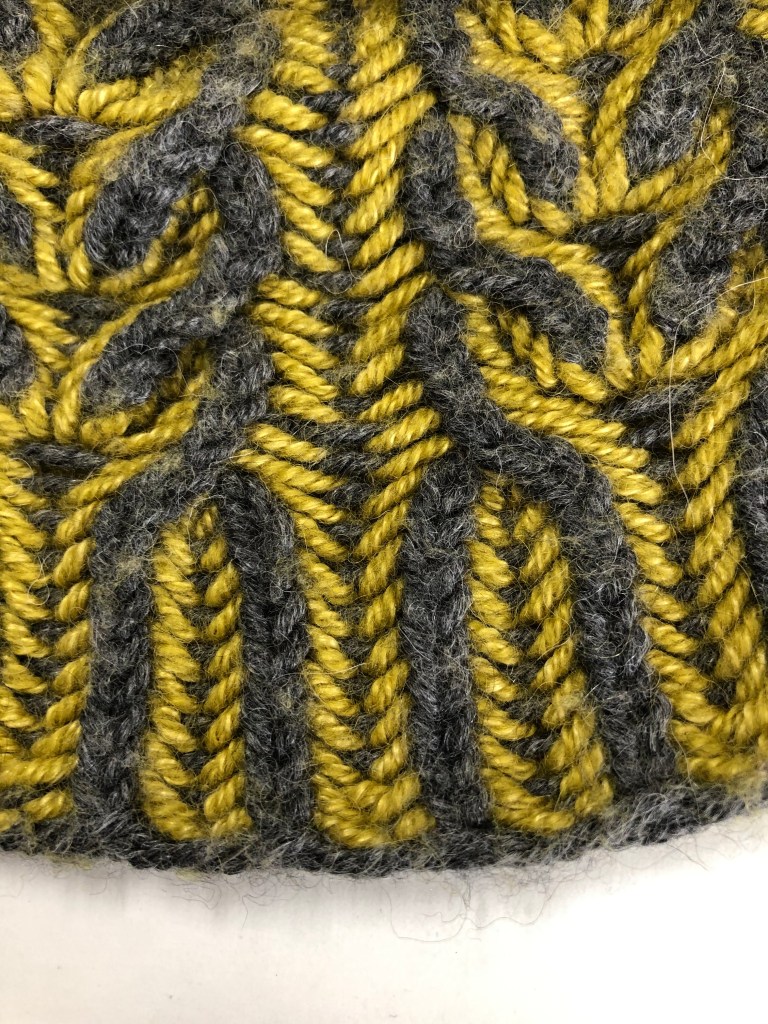
Because each row is worked twice, circular needles are required, even when working a flat object.
While the brioche technique can be a challenge, it produces such an interesting and beautiful fabric, it is well worth the effort to learn!

Katrin Schubert’s Wheat and Chaff Cowl 

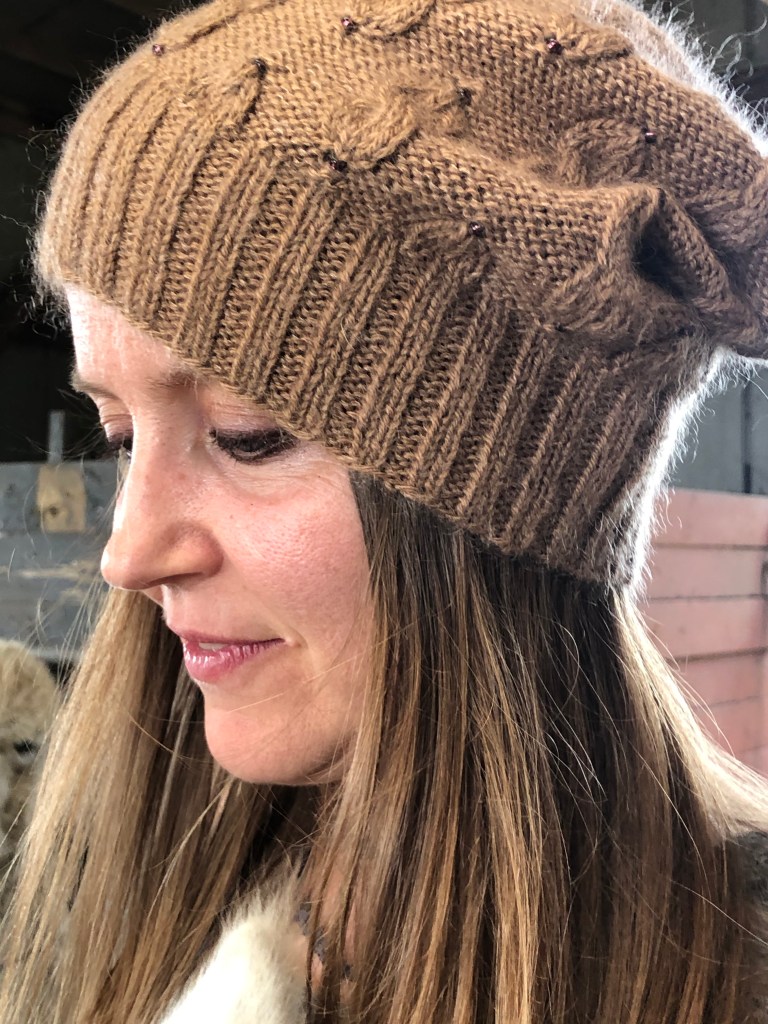
Brioche Beanie 
Heading up to the top of the bluff in the Brioche Beanie 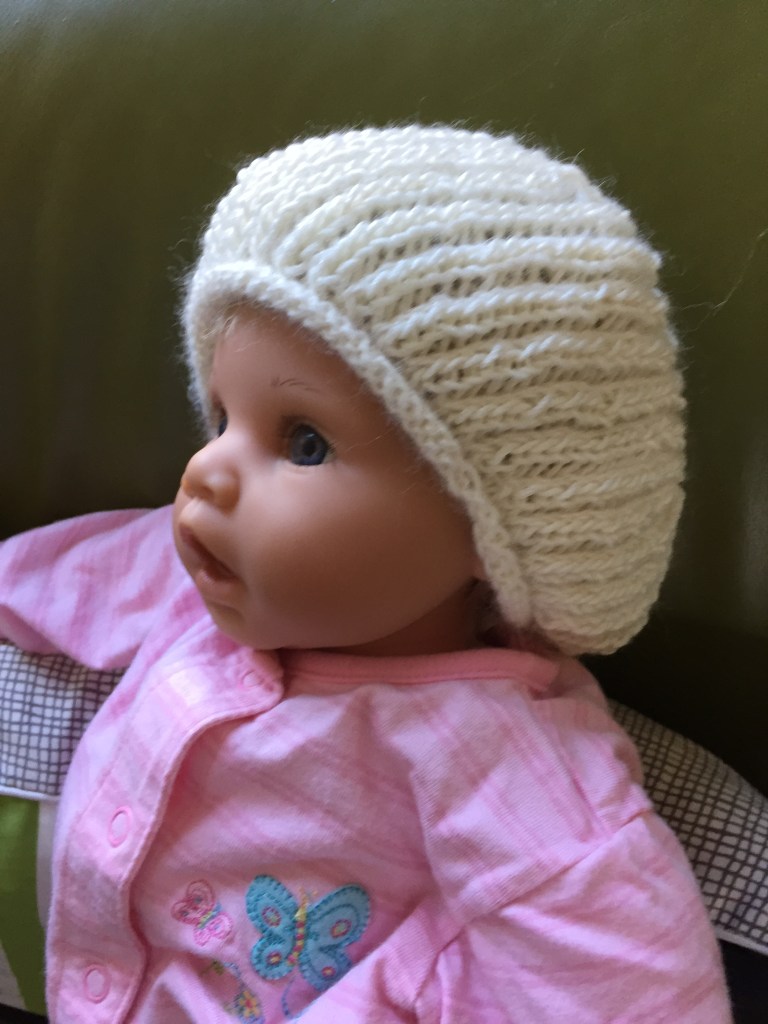
Child size brioche beanie. 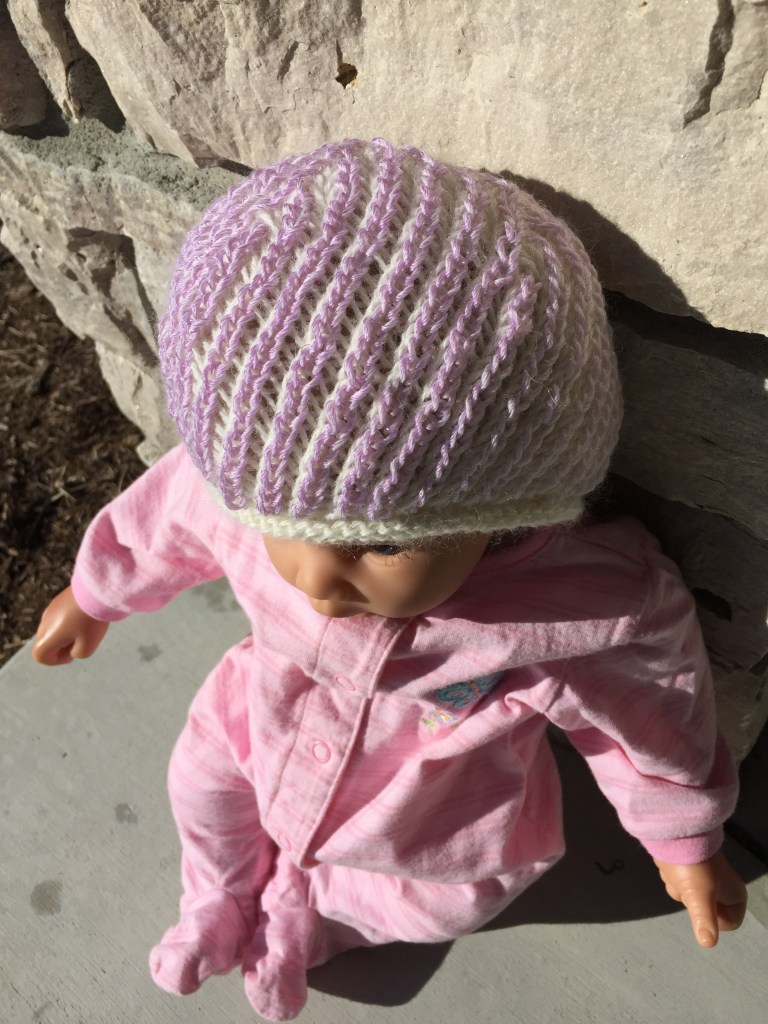
Abracadabra yarn changes color in the sunlight.
For more information about knitting classes at Heartland Community College, please visit the continuing education site at: http://www.heartland.edu/continuingEd/personalEnrichment.html
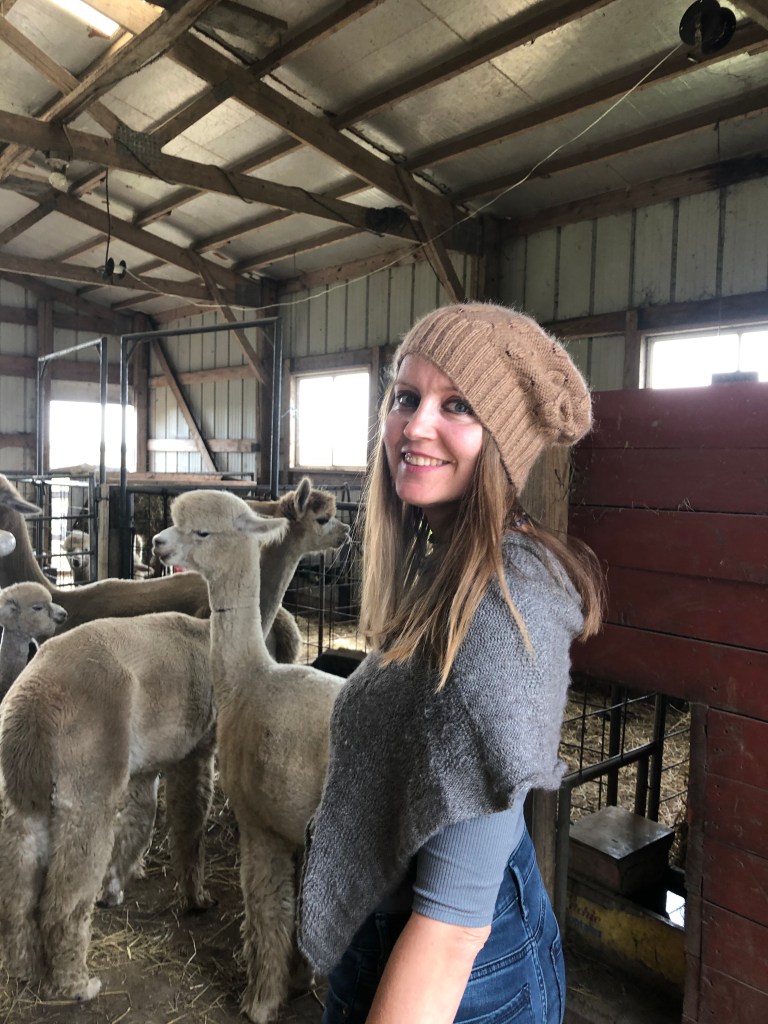
Caramelized Sugar Hat
I have a new pattern ready to be test knitted and for use as a blog tutorial. If you are interested in test knitting this pattern, providing feedback on the pattern, and providing feedback on the blog tutorial, let me know in the comments below.
The hat is beaded and cabled, and constructed with two yarns held together. Super soft royal baby alpaca and a lace weight mohair give each stitch extra loft and warmth. Beads adorn the tops and bottoms of each of the broken cables in the pattern.
Techniques highlighted in the tutorial will be cables and beading.
You can purchase the alpaca yarn (~200 yards) through der Bauernhof Farms and the lace weight mohair (~230 yards) through your favorite local yarn shop or at Webs (Southampton Yarn).
Working in the Round
Small Diameter Tubes
Sleeve Cuffs, Socks, Mittens, and Hat Crowns


There are at least three methods for working small circumference tubes. They are:
- Using one circular needle with a long connecting cord, known as the “Magic Loop”.
- Using two circular needles.
- Using a set of 4 or 5 double pointed needles.
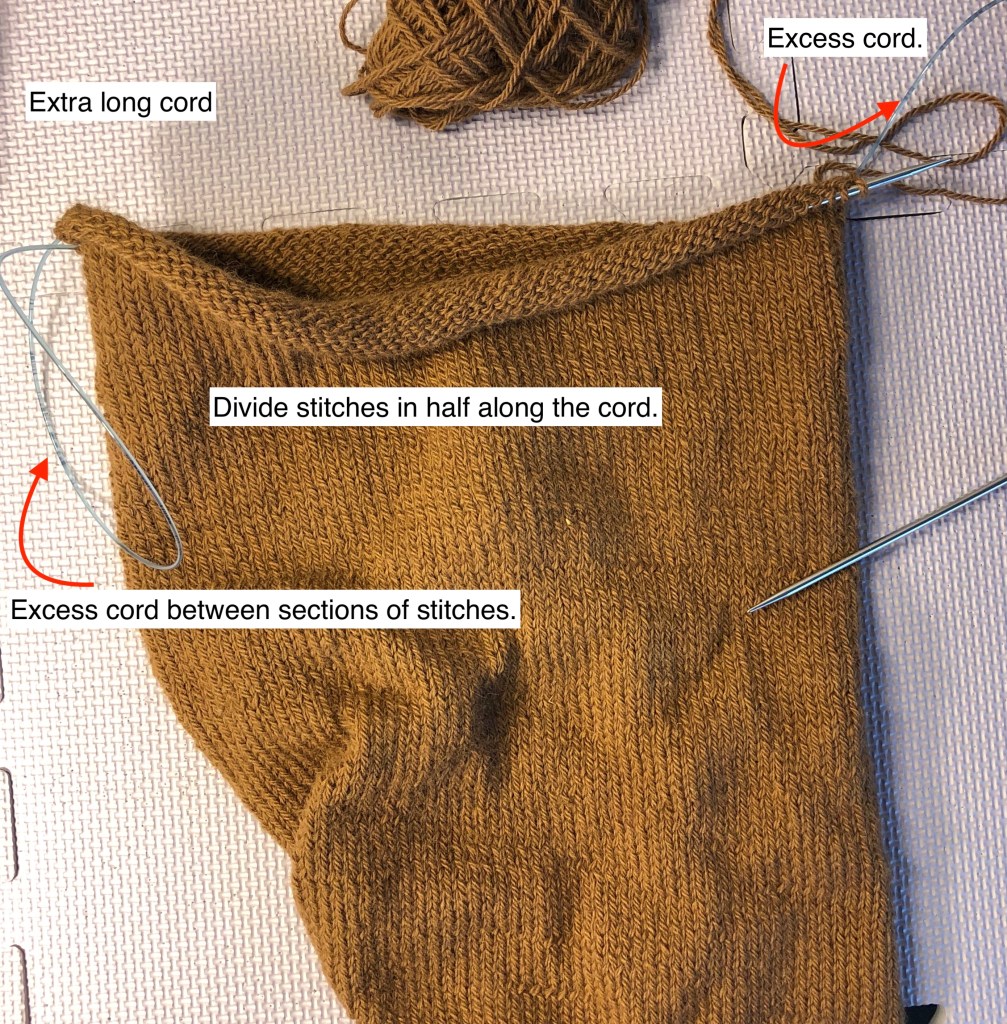
For all types of small circumference circular knitting, the stitches are divided into sets which are separated either by the flexible length of cord of the circular needle (magic loop), or on separate needles.
The thing to be wary of in this type of knitting is producing “ladders” at the intersections of the sets of stitches. Ladders are a gap between the stacks of stitches where you can see the yarn on the back of the work from the front side. Frustratingly, they don’t always disappear after blocking, especially when they are all stacked on top of each other, so it is best to try to avoid them. Ironically, ladders can form both from stitches that are too loose OR too tight, so you really need to pay attention to your stitch tension at the beginning and end of each set of stitches.
Magic Loop
For the Magic Loop, you will need a very long, flexible cord on your circular needles. *Note: This is one reason to invest in a set of interchangeable needles, even though they are expensive. It’s easy to change the cord length while keeping your project on the same needles.* To work the magic loop, you divide up the stitches into two sections (front and back) with a loop of the excess cord separating them. The front set of stitches (those closest to your body) should be at the end of the left hand needle, ready to work. The back set of stitches (those farthest from your body) will be on the cord with the right hand needle extending out.
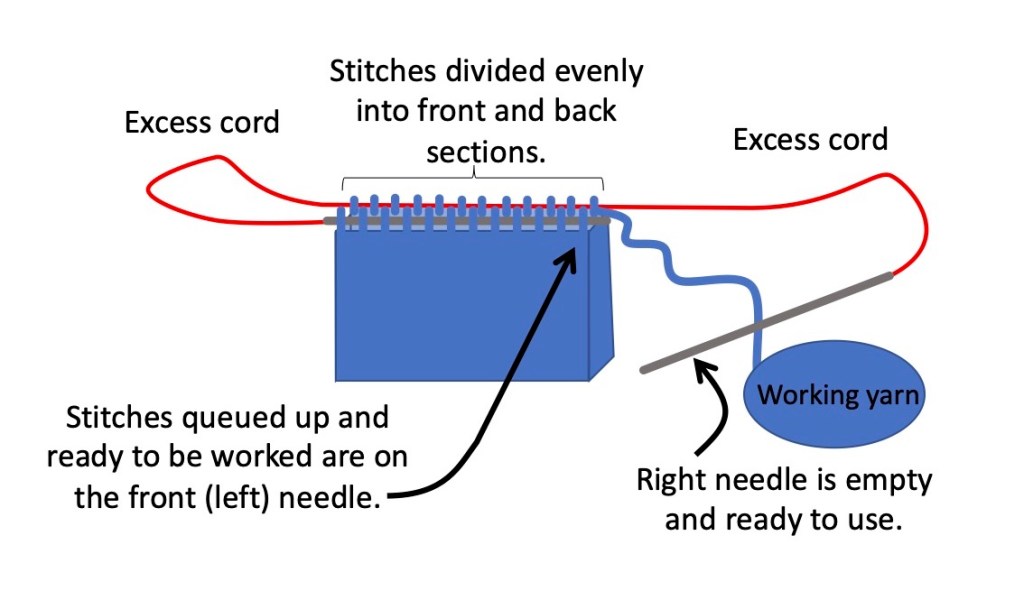
With the right hand needle, begin working the stitches off of the left hand needle using care not to pull the working yarn too tightly from the last stitch on the back set of stitches.

Work across the entire set of stitches on the left needle.
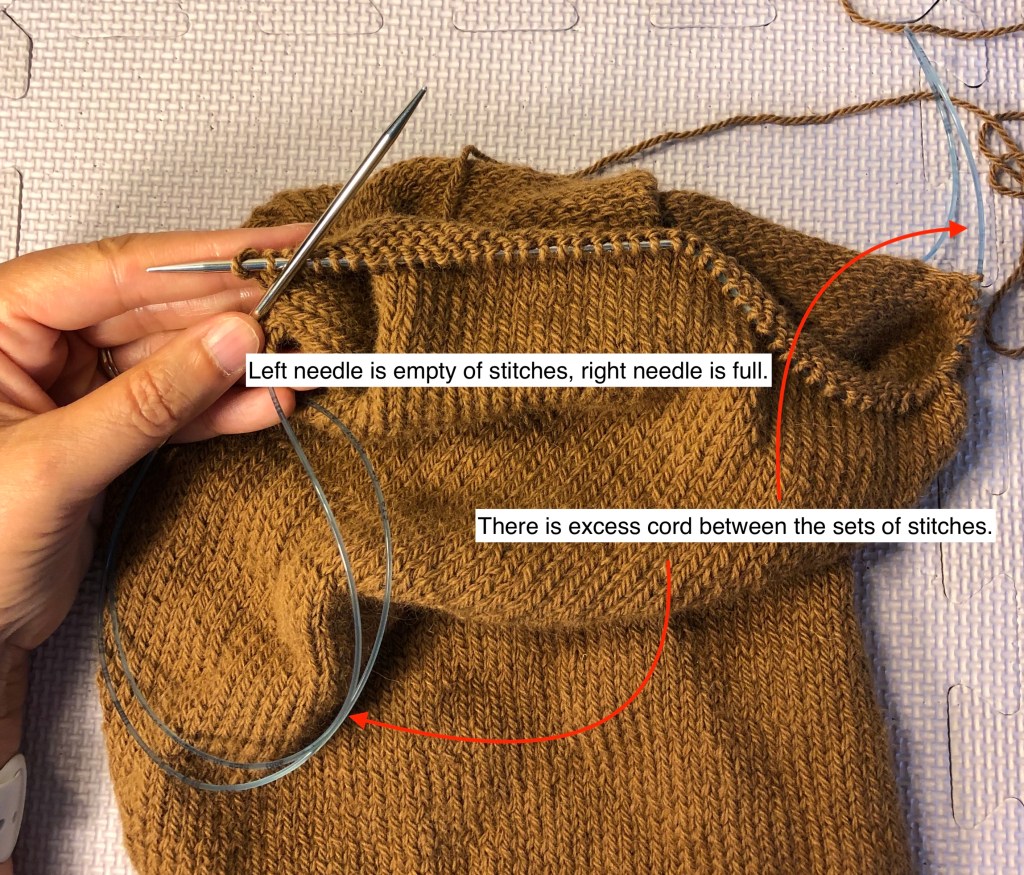
Gently pull the cord through the back set of stitches (pull to the right) so that they are loaded onto the needle. Be careful not to pull the needle out of the stitches.

Turn the work. Now slide the back set of stitches off the needle and onto the cord so that the right hand needle is available for new stitches.

Now you are ready to work the second set of stitches (now on the front needle). Continue working and sliding stitches. Be aware and careful of the tension at the stitches between the front and back sets of stitches.
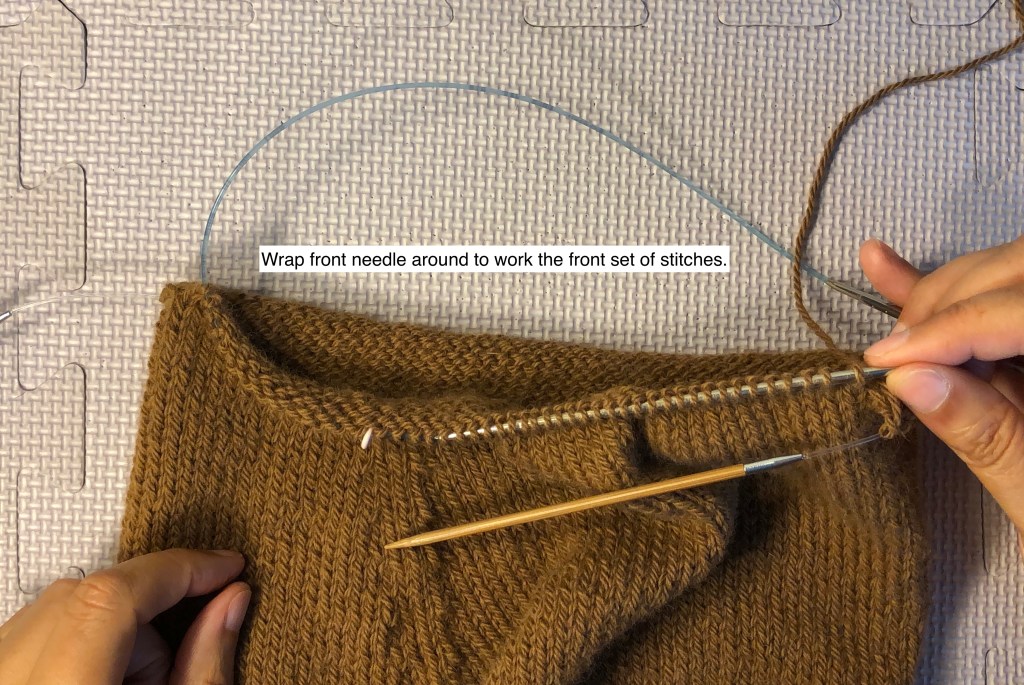
Two Circular Needles
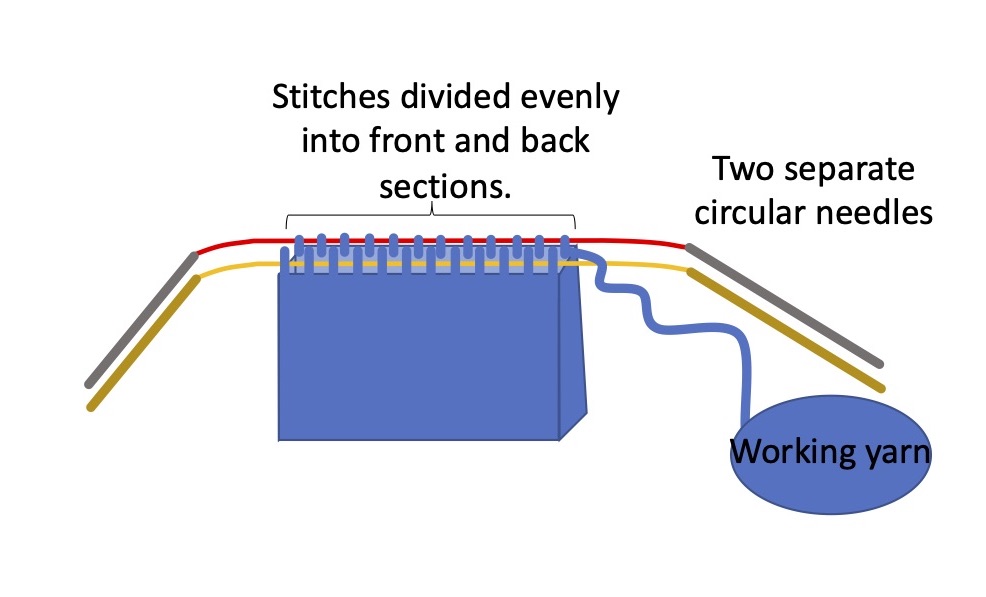

The technique is almost the same, except now you have two needles rather than excess cord. When working, you will always use the same needle for the same set of stitches. In the photos below, the front set of stitches is on the aluminum needles and the back set of stitches is on bamboo needles. I will always use the aluminum needles to work the stitches on the aluminum needles. I push all of the stitches up onto the left hand aluminum needle then wrap the right hand needle around to work the first stitch. The bamboo needles are hanging, or held out of the way. Be sure to check the tension of the first stitches. Once the set of stitches on the aluminum needles are worked, turn the work and use the bamboo needles to work that set of stitches.
Aluminum needles 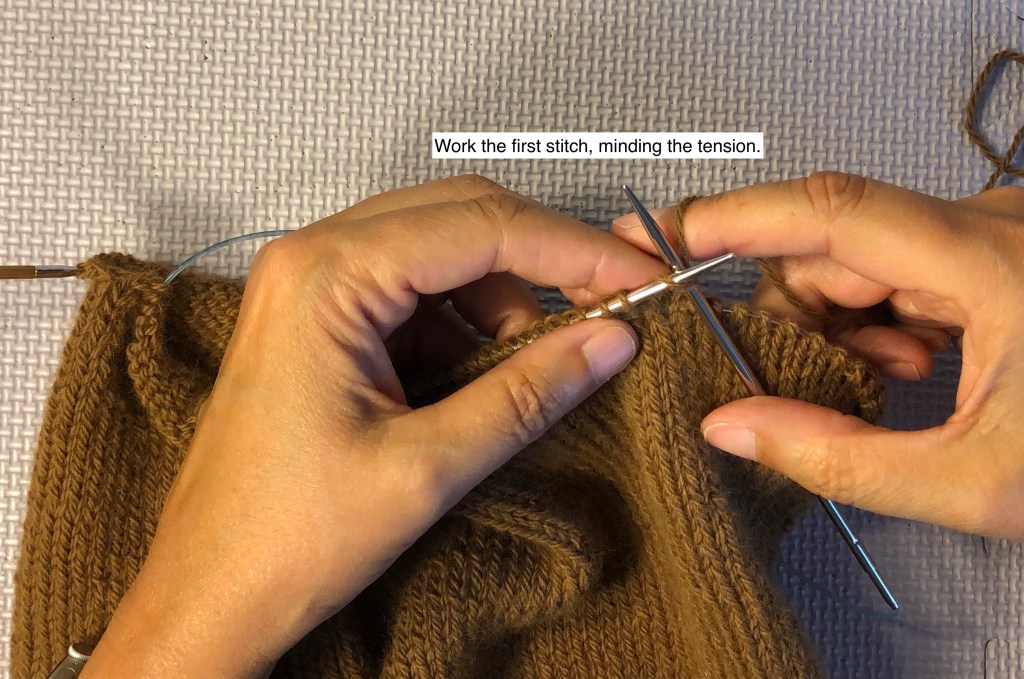
Aluminum needles 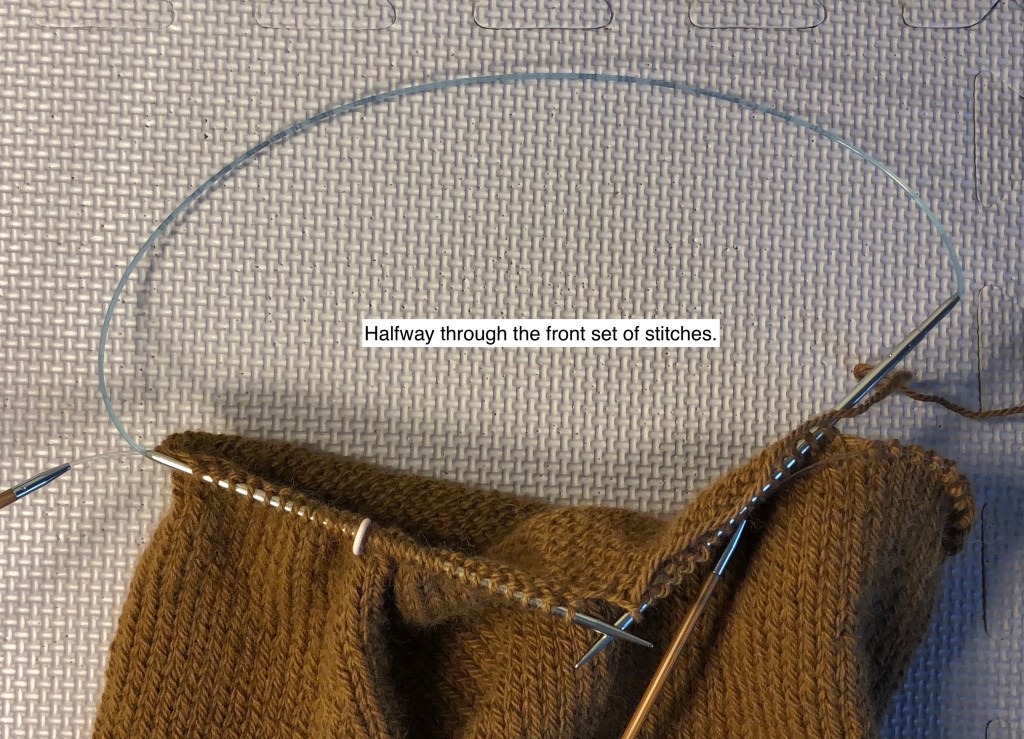
Aluminum needles 
Bamboo needles 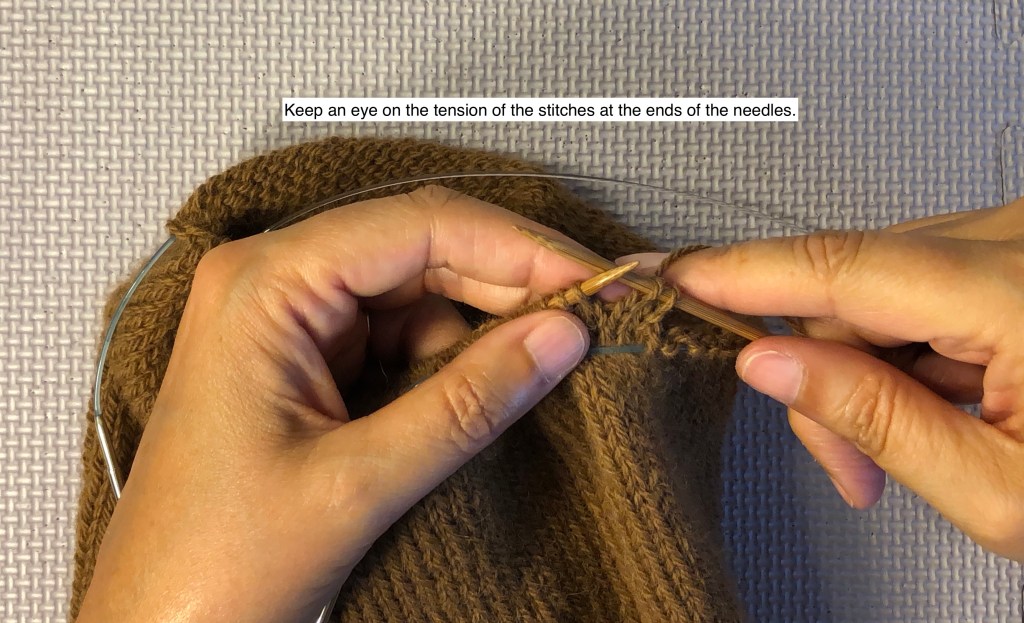
Bamboo needles
Double Pointed Needles
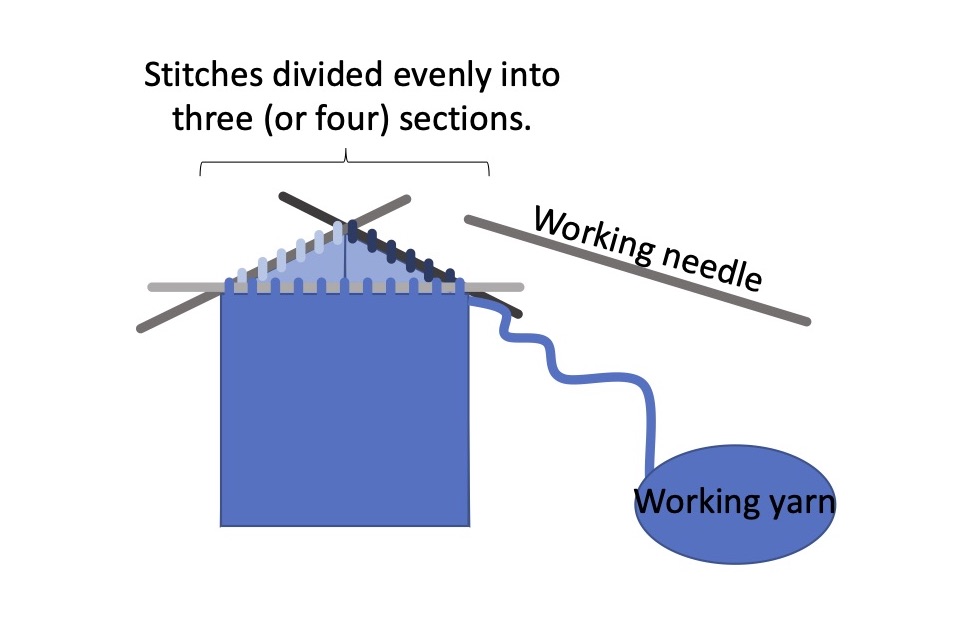
Double pointed (DP) needles come in sets of 4 or 5. If you have a set of 4 DP needles, you will divide the stitches evenly over three needles to set up. If you have a set of 5 DP needles, you will divide the stitches evenly over four needles. The technique to work the stitches is exactly the same as above: check the tension at the first stitch on the new needle. It should not be too tight or too loose. The advantage of DP needles is that there is not a sharp turn (180o) between needles, so I think it is easier to control the tension of those first stitches. The disadvantage is that since you are dividing up the stitches into more than two sets, there are more intersections of needles to work with, potentially more opportunity to create ladders in your knitting, and working with the needles can be a bit fussier (that is, there can be a lot of fiddling with stitches and needles as you work around the tube). And, because the DP needles tend to be shorter than circular needles, you may find that stitches fall off the ends while you are working or removing from storage. This is easily fixed with needle tip protectors, but those can make the DP even fussier to use.
There are a couple of EASY ways to prevent ladders with DP needles that you can’t use with the magic loop or with two circular needles. But there is no easy way (that I have found) to prevent the fussiness of DP needles. However, I learned to knit using DP needles, and I don’t hate using them.
The following video shows some of the strategies I use for handling the DP needles and preventing ladders.
Heartland Community College Classes

Hi all,
I’m teaching four (!) knitting classes at Heartland Community College this fall. They are:
- Learn to Knit
- Sweater Class
- Chart Reading
- Basic Brioche
Each course will have its own password protected post. The posts will be available only to registered students. I’ve had to assure the HCC Continuing Education Office that I won’t share class-specific information with people who aren’t registered for the course, and that seems fair. Both the community college and I want people to continue to want, need, and enroll in these types of classes. As far as I know (I asked), the continuing education office doesn’t have course-specific server space, so for now, I’m using this site as that platform.
I’m still planning to have posts about general techniques available without a password. I’m working on a public post about circular knitting and another about blocking. This information is also (or will be) available through the pattern-specific posts. I’ve been working on many posts simultaneously and I feel like my progress is frustratingly slow.
If you are helping edit or with the content/organization of the Steventon Shrug Pattern post (thank you!), that password is still the same. I’ve been adding all the updates to the Steventon Shrug to the post titled “Project Notes for the Steventon Shrug” so it is super long now. There are just a few more additions to that post and it will be complete. Eventually, all of that information for the Steventon Shrug pattern will be available on that one page, but I’m still trying to figure out the best way to copy, convert, and format while I’m trying to finish adding all of the information to the post. (It’s been so much work! Fun work, but really, I did not know what I was getting myself into!) If your password to THAT post, linked above, no longer works, please let me know, because I’m hoping that I can divide up the posts into public (no password), pattern-related and class related, each with a different set of passwords.
As an additional note, right now, the HCC classes are scheduled to be in person, however, they might be converted to remote learning via Zoom if (when??) the county slips back into Phase 3 or Phase 2. I’ve been working hard to make this possible (probable?) transition to remote learning easier on myself and still effective for the students. Part of my strategy is use this site as a resource in addition to the live Zoom meetings.
If that works well, I hope to offer my own patterns, content, and classes through this site and generate another revenue stream for this post-chemistry-career experiment that I’m doing. I’m still trying to figure out how I can make this knitting experiment profitable (well, at this point, I would settle for breaking even). It’s been a tough year for everyone I know in the fiber community. My community college classes were canceled. Stitches Midwest was cancelled/moved on-line. Stitches Midwest provided an important venue to sell my patterns. In the past, pattern sales from that venue were enough to support many of the costs associated with this new adventure (including the cost of this site subscription). Right now, everything about this experiment is unsustainable, but I’m hoping that it will turn around in the next 6-9 months.
In short, I value your continued support through comments on these posts, feedback on the pattern-specific pages, and your continued enrollment (in person or remotely) in the community college classes, and of course through pattern sales via my Ravelry store.
Stay healthy my friends!
Melinda
Protected: HCC Learn to Knit
Pick Up and Knit
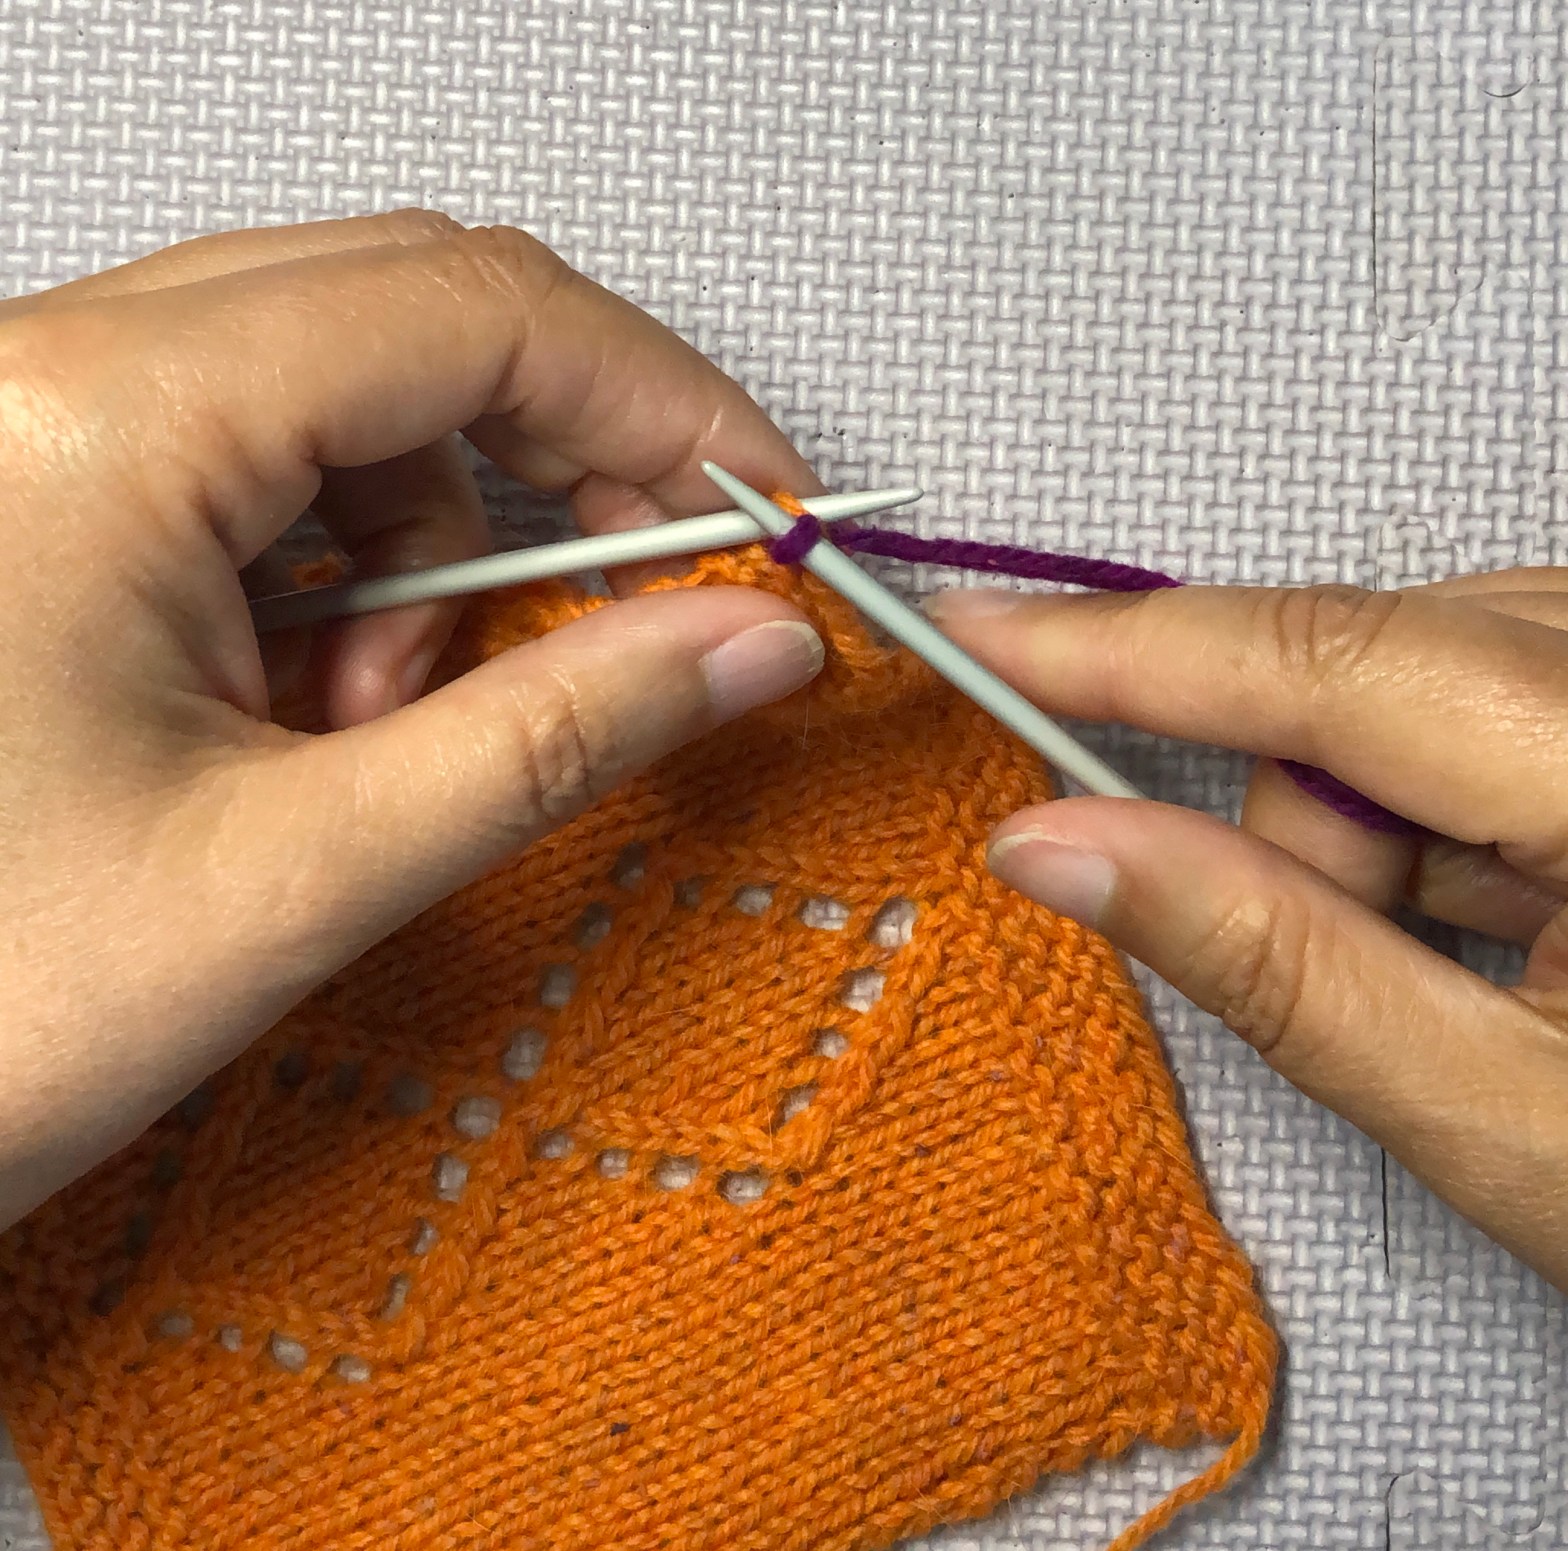
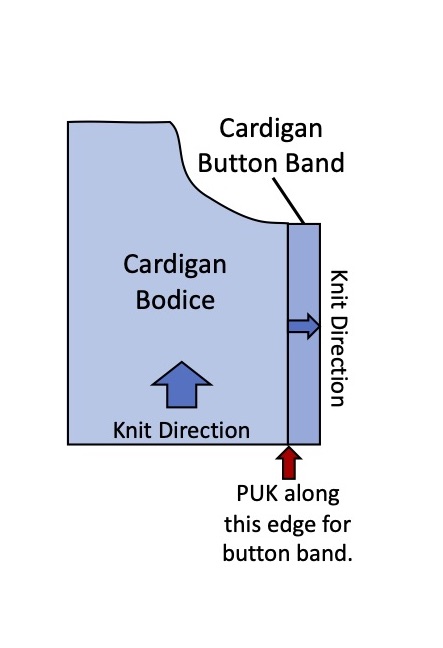
Pick Up and Knit (PUK) is an important skill to have in your skill project bag. I have used PUK innumerable times over the years. It is most commonly required for the button bands of cardigans and at the neckline for the collar. A PUK is used when you want to begin working perpendicularly to a set of stitches, like at the button placket of a cardigan. It can also be used extensively in modular knitting, such as in the Harlequin Swing Cardigan by Jane Slicer-Smith.

The Technique
The photos and video below demonstrate how I perform a PUK.
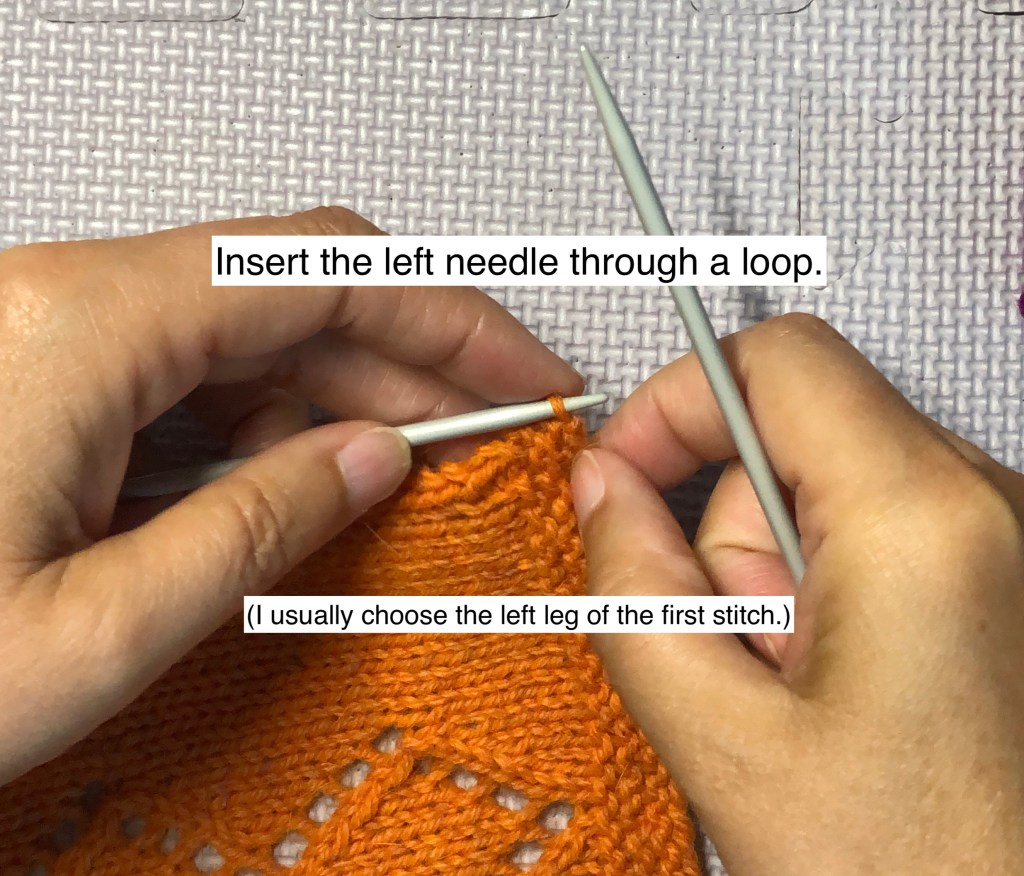
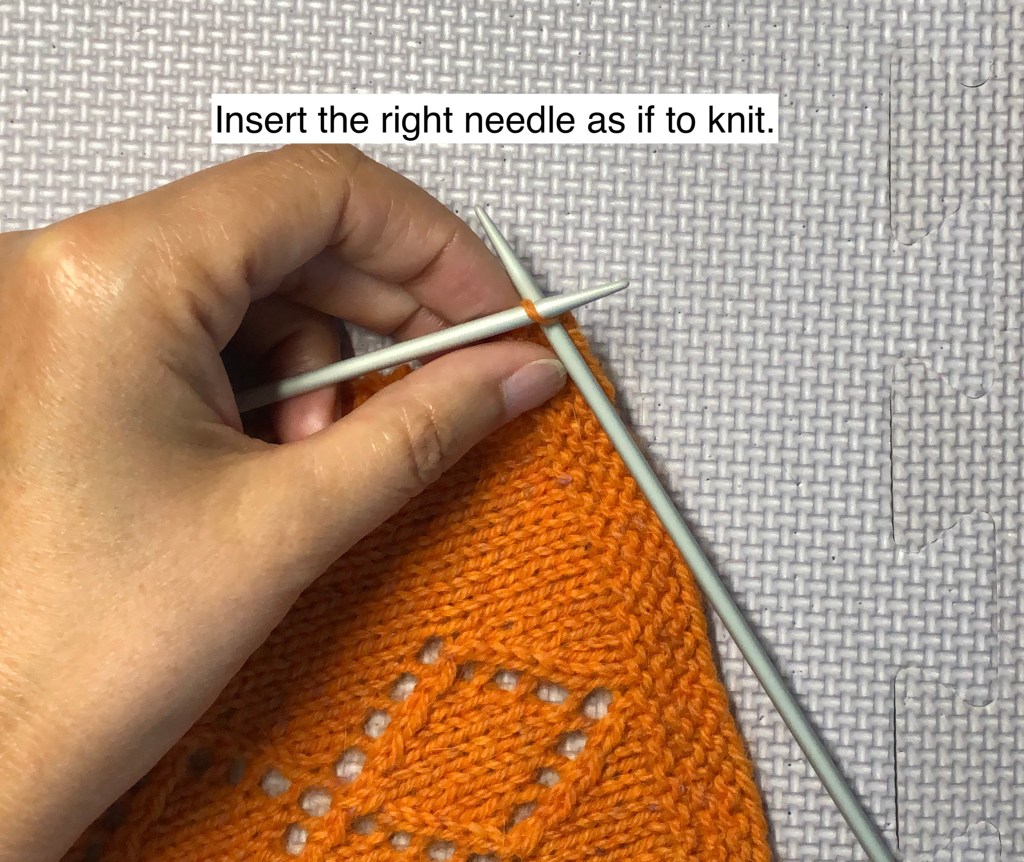
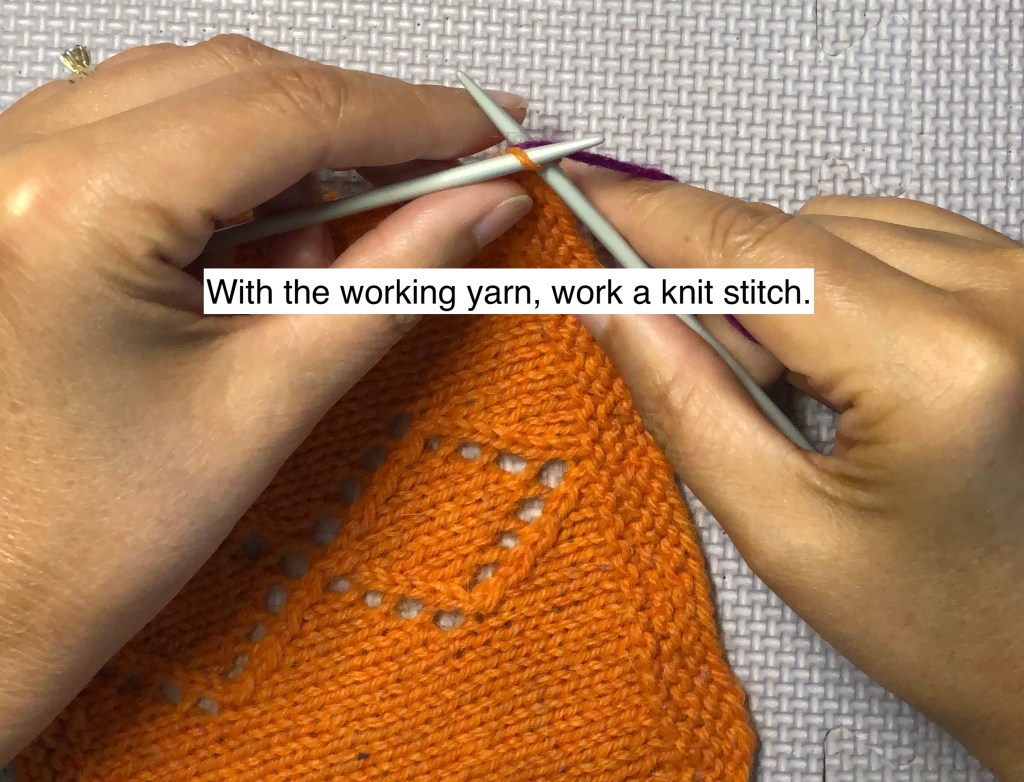

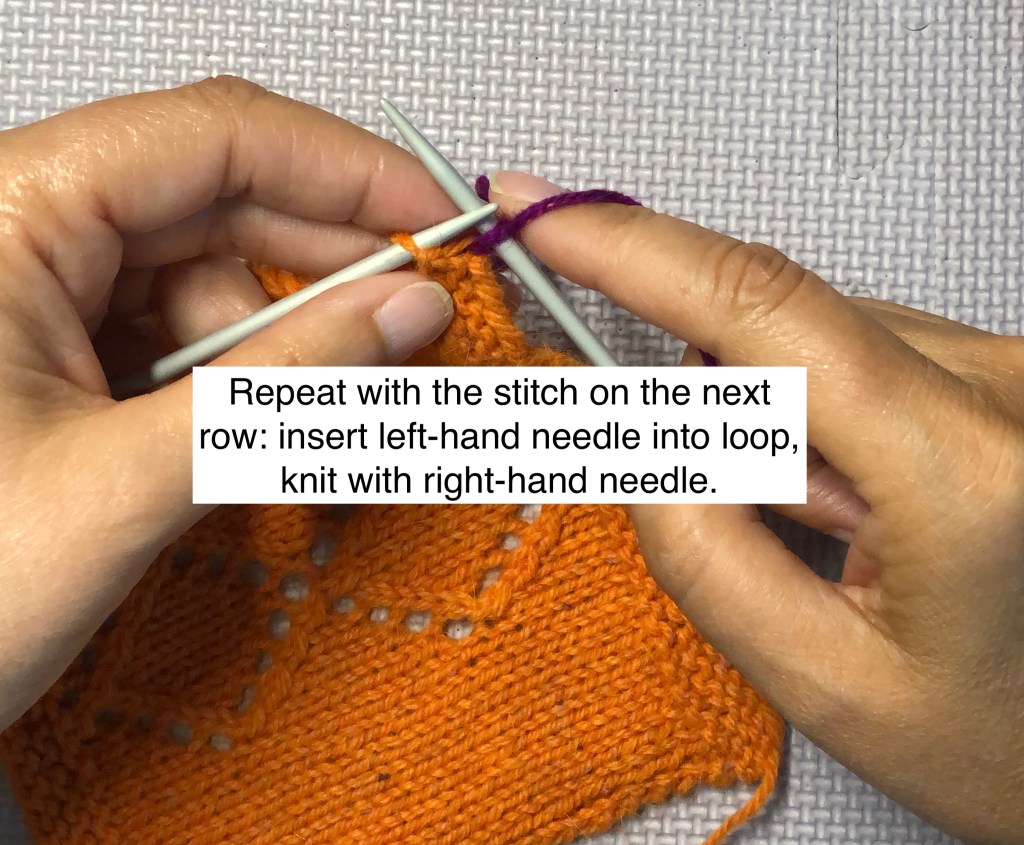
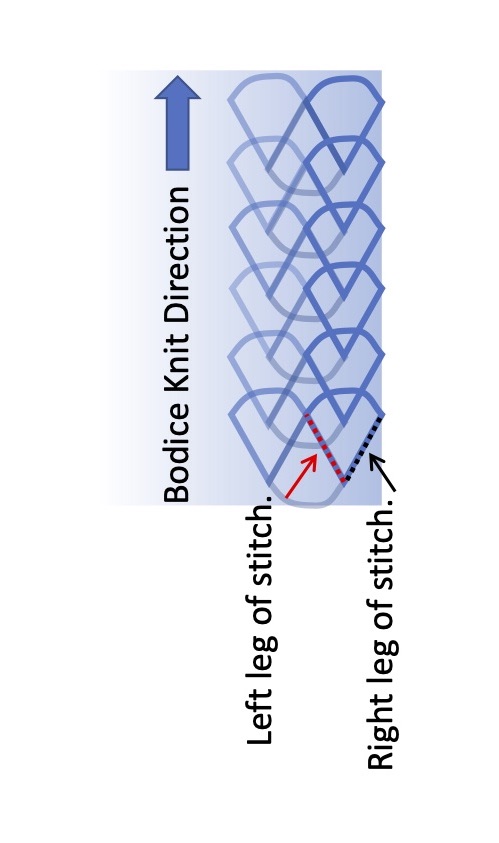
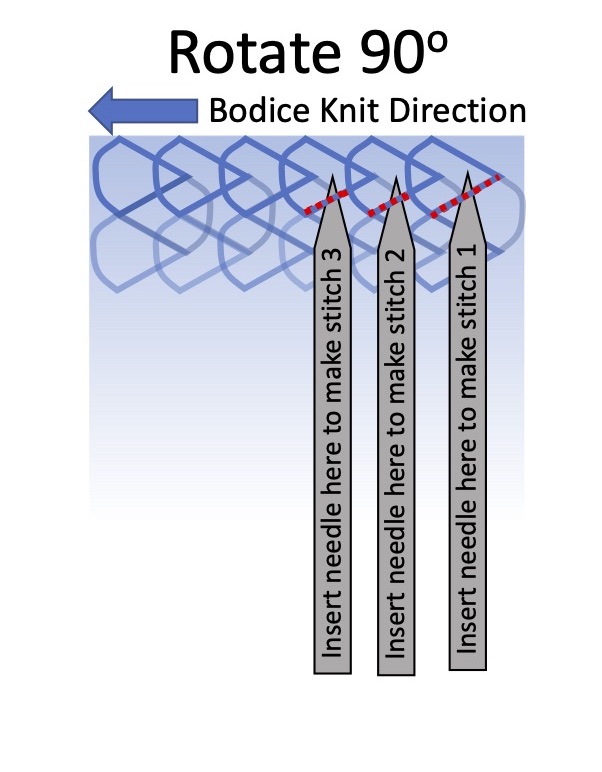
To pick up stitches for a button band on a cardigan, for example, I would first rotate the bodice 90o to the left (counter-clockwise) and begin picking up stitches on the right-hand corner. I insert the left-hand needle into the left leg of the first column of stitches and knit into this loop, forming the first stitch of the button band. I continue to pick up stitches in the left leg of the first stitch up the column of stitches up the edge of the bodice.
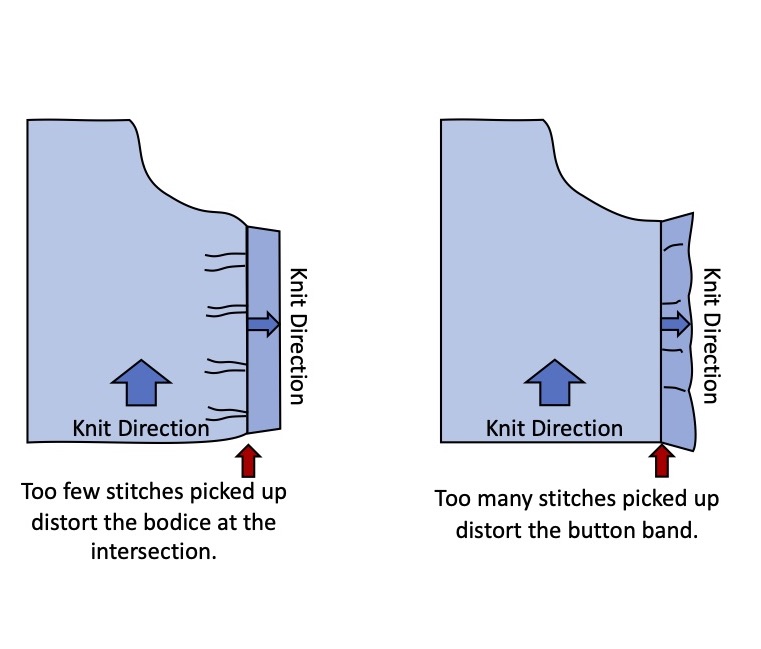
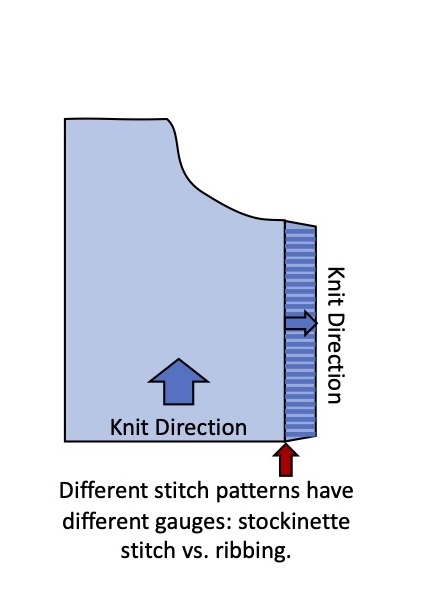
If your stitch gauge and row gauge are exactly the same (unlikely), you can pick up one stitch for every row. In all my years of knitting, I have never had this occur. So to prevent puckering of the bodice or distortion of the button band, you will likely have to skip some–but not too many–rows as you pick up stitches along the edge. If you pick up and knit too few stitches, the bodice will pucker. If you pick up and knit too many stitches the button band will be wavy with too much fabric. If you are using a ribbing stitch to form a flat button band, the gauge of ribbing will be different than the gauge of stockinette, and the button band will naturally compress at the outer edge.
How Do I Know When to Skip a Row? A Good Place to Begin:
I use a couple of general rules when picking up stitches. They are listed below.
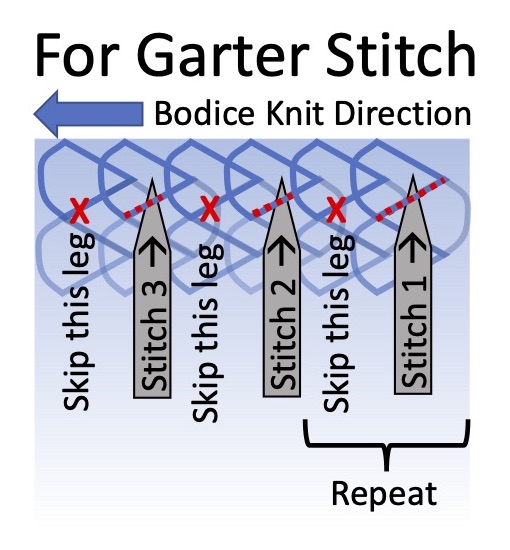
- To pick up along garter stitch, I pick up one stitch for every garter stitch ridge.
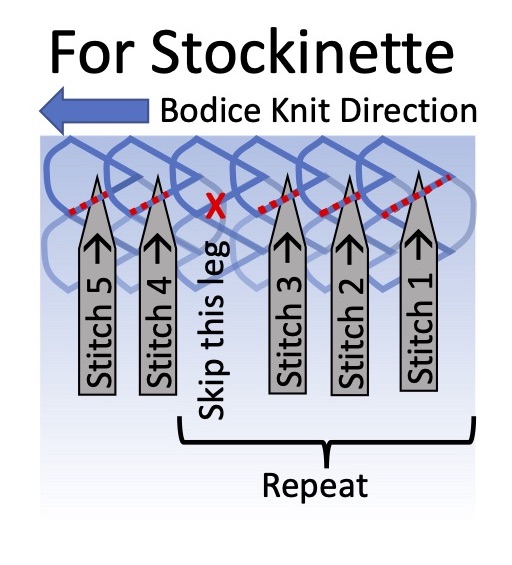
- To pick up along stockinette stitch, I pick up one stitch in every row for three rows, skip the fourth row, repeat along the edge. In other words, pick up 3/4 of the number of rows along the edge.
Sometimes my gauges are different enough from the 3/4 ratio that I need to calculate how many stitches to pick up. I’ve detailed below how to calculate the number of stitches to pick up, the number of skips, and where to place the skips.
Calculations
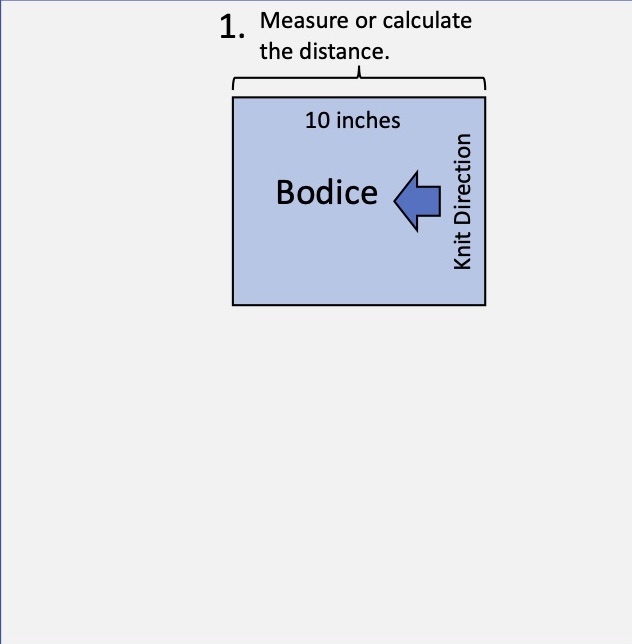
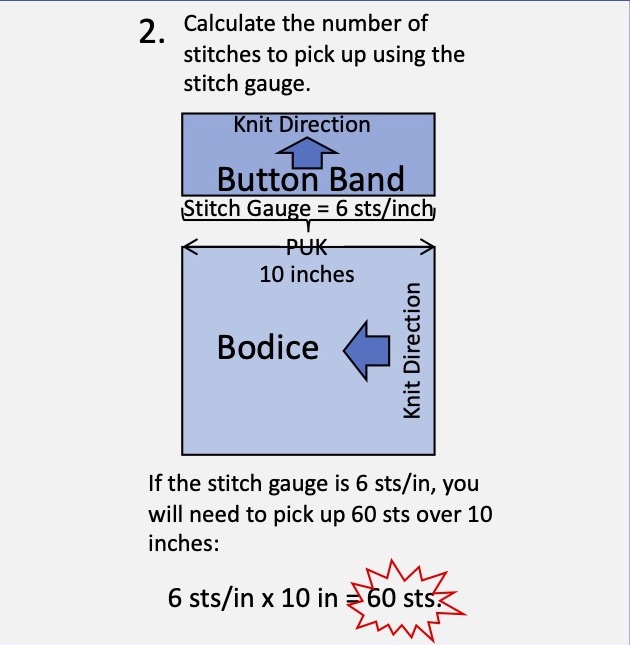
Strategy for calculating how many stitches to PUK and where to place them:
- Measure (or calculate using your row gauge) the length of the section where you will be picking up stitches.
- Calculate how many stitches to pick up using your stitch gauge.
- Calculate when/where to skip rows.

The Calculations for Step 3–Showing the work for determining the combination of skips.

Divide the numerator (85) by the denominator (25) and show the integer, disregard the decimal places. 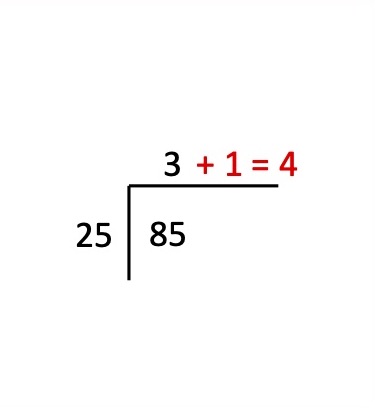
Add 1 to the integer. 
Multiply the integer and denominator, write below the numerator. 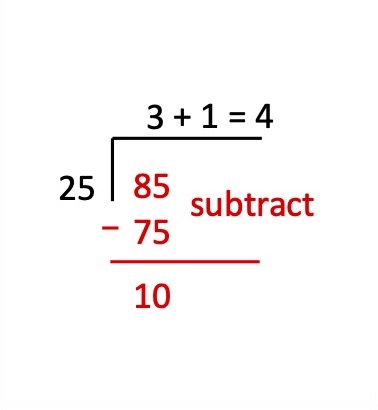
Subtract to obtain the remainder. 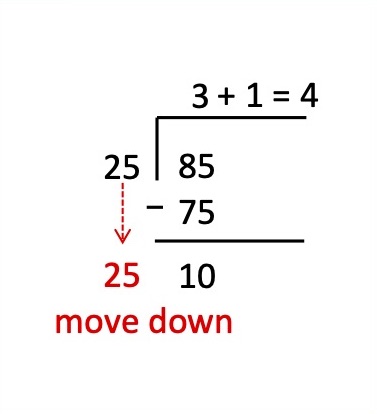
Transcribe the denominator down. 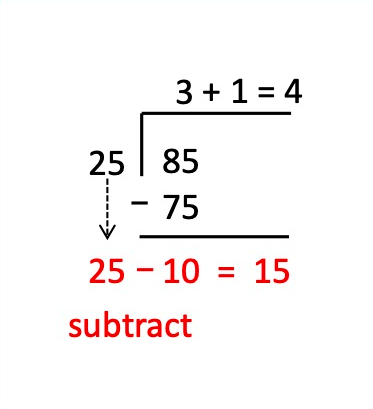
Subtract the remainder from the denominator. 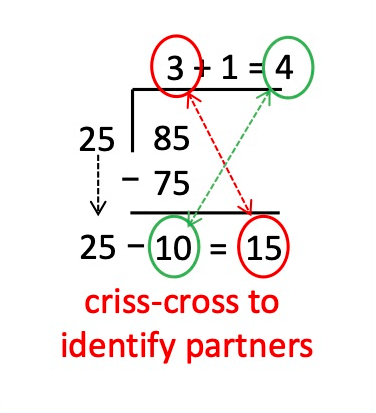
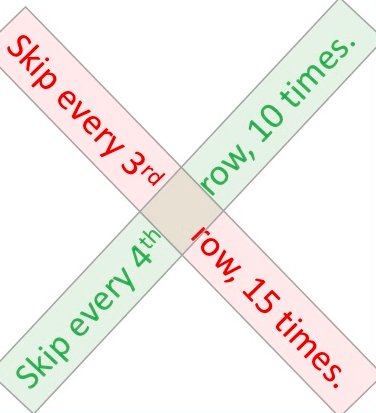
There are several ways to skip every 3rd row 15 times and every 4th row 10 times. To avoid puckering or wavy fabric, you should try to space these skips out evenly rather than grouping together. Perhaps something like this:
Repeat the skip pattern: [skip every 3rd row, 4th row, 3rd row, 4th row, 3rd row] a total of 5 times.
Or, repeat the skip pattern: [skip every 4th row, 3rd row, 3rd row, 3rd row, 4th row] a total of 5 times.
Be reassured that as long as you are close to the correct distribution of skips, it will look good!
Protected: Project Notes for the Steventon Shrug
Mobile Stitching

In April and May, I was fully expecting my plans for June and July to completely disappear, and I was mentally preparing myself for that disappointment. I purchased yarn and made project lists to last me well into 2021, as I anticipated hanging out on my patio, in my home office, and in the family room all summer long. My plans have changed significantly from when I made them last December, but as things begin to open up, it now looks like I will be able to make use of at least some of those reservations.
As we learn more and more about this virus, I feel like there is not too much risk heading out in for some mobile knitting, as the camper has self-contained cooking, bathroom, and sleeping. The science I’ve seen indicates that this virus doesn’t last long in the sunshine (UV radiation kills it quickly), and at warm temperatures it doesn’t last long on surfaces, so being outside is one of the best places to be. I have packed my masks for grocery shopping, hand sanitizer and soap for hand care, and disinfecting wipes for surfaces, along with hiking boots and poles, bear spray, insect repellent, first aid kit, and sun screen.
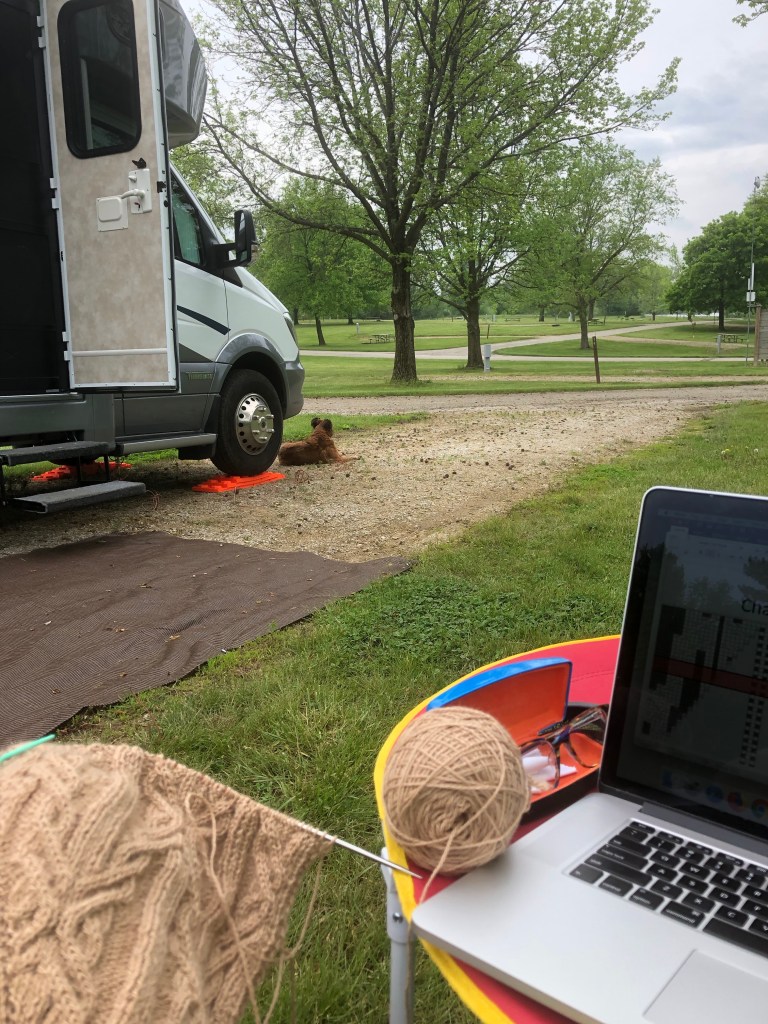
I’m also beginning to plan the stitching projects I’ll take along. Space is at a premium in the camper, so there are tough decisions ahead. Do I take the yarn winder? Yes. Do I take blocking mats and supplies? Maybe not. I already know that I will over pack the projects, predicting that I’ll get much more finished than I really will. Instead I’ll spend my days walking the dog, dipping toes in the water, hiking, with evenings by the campfire. Doesn’t it sound glorious?

Early morning Lake Evergreen 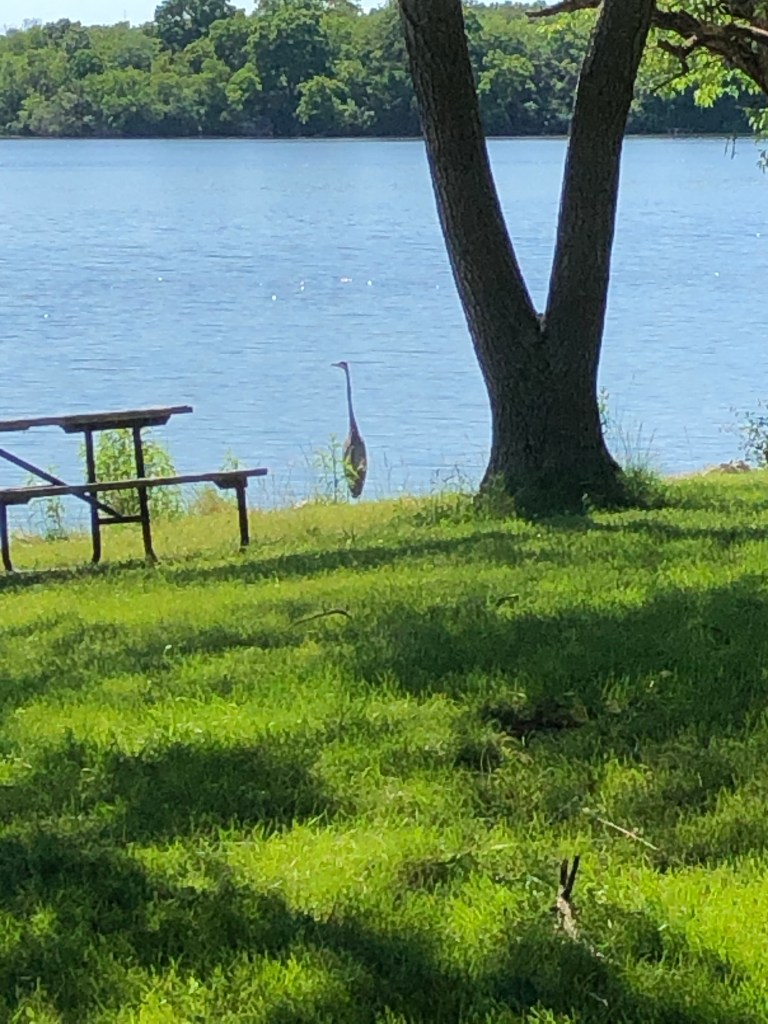
Great Blue Heron near a picnic site. 
Lucie gets her toes wet. 
Bald Eagle. 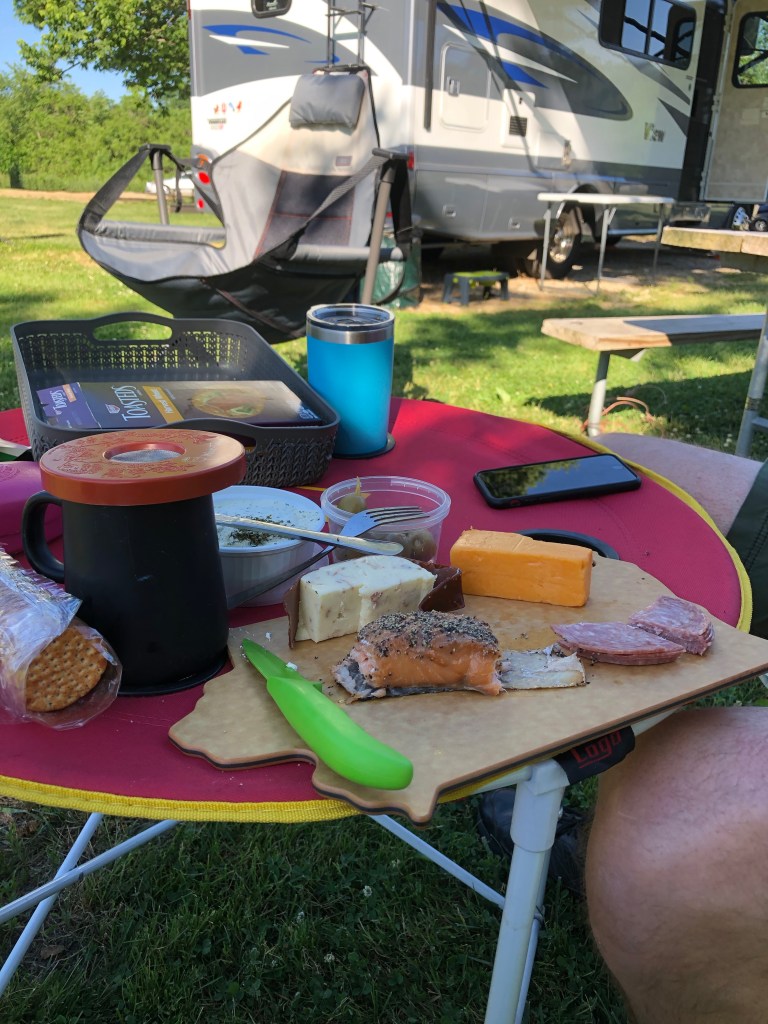
Perfect “no-cook” dinner. 
Not enough chocolate for this enormous marshmallow.
We head out this weekend for a close-to-home practice trip which was originally planned for March, then April, then May. My daughter and I head out the following week for an extended stitching road trip that takes us to the upper Midwest and eventually out to Montana and Glacier National Park where we will meet up with a few friends and family (properly socially distanced and outside, of course).
Already added to my project box (not just a bag, but a box!) is the yarn for two National Parks inspired projects that I’ve been planning for >2 years. I’ve had these ideas bouncing around in my head but no time to swatch and work on them. I’ve got yarn for small projects (hats and cowls) as well as the yarn for all of my current projects.
Cheers,
Mindy
Measuring your Swatch and Calculating Your Gauge
Hi Friends!
Once you have knit your swatch and it is blocked and dry, you can measure it to calculate your gauge.
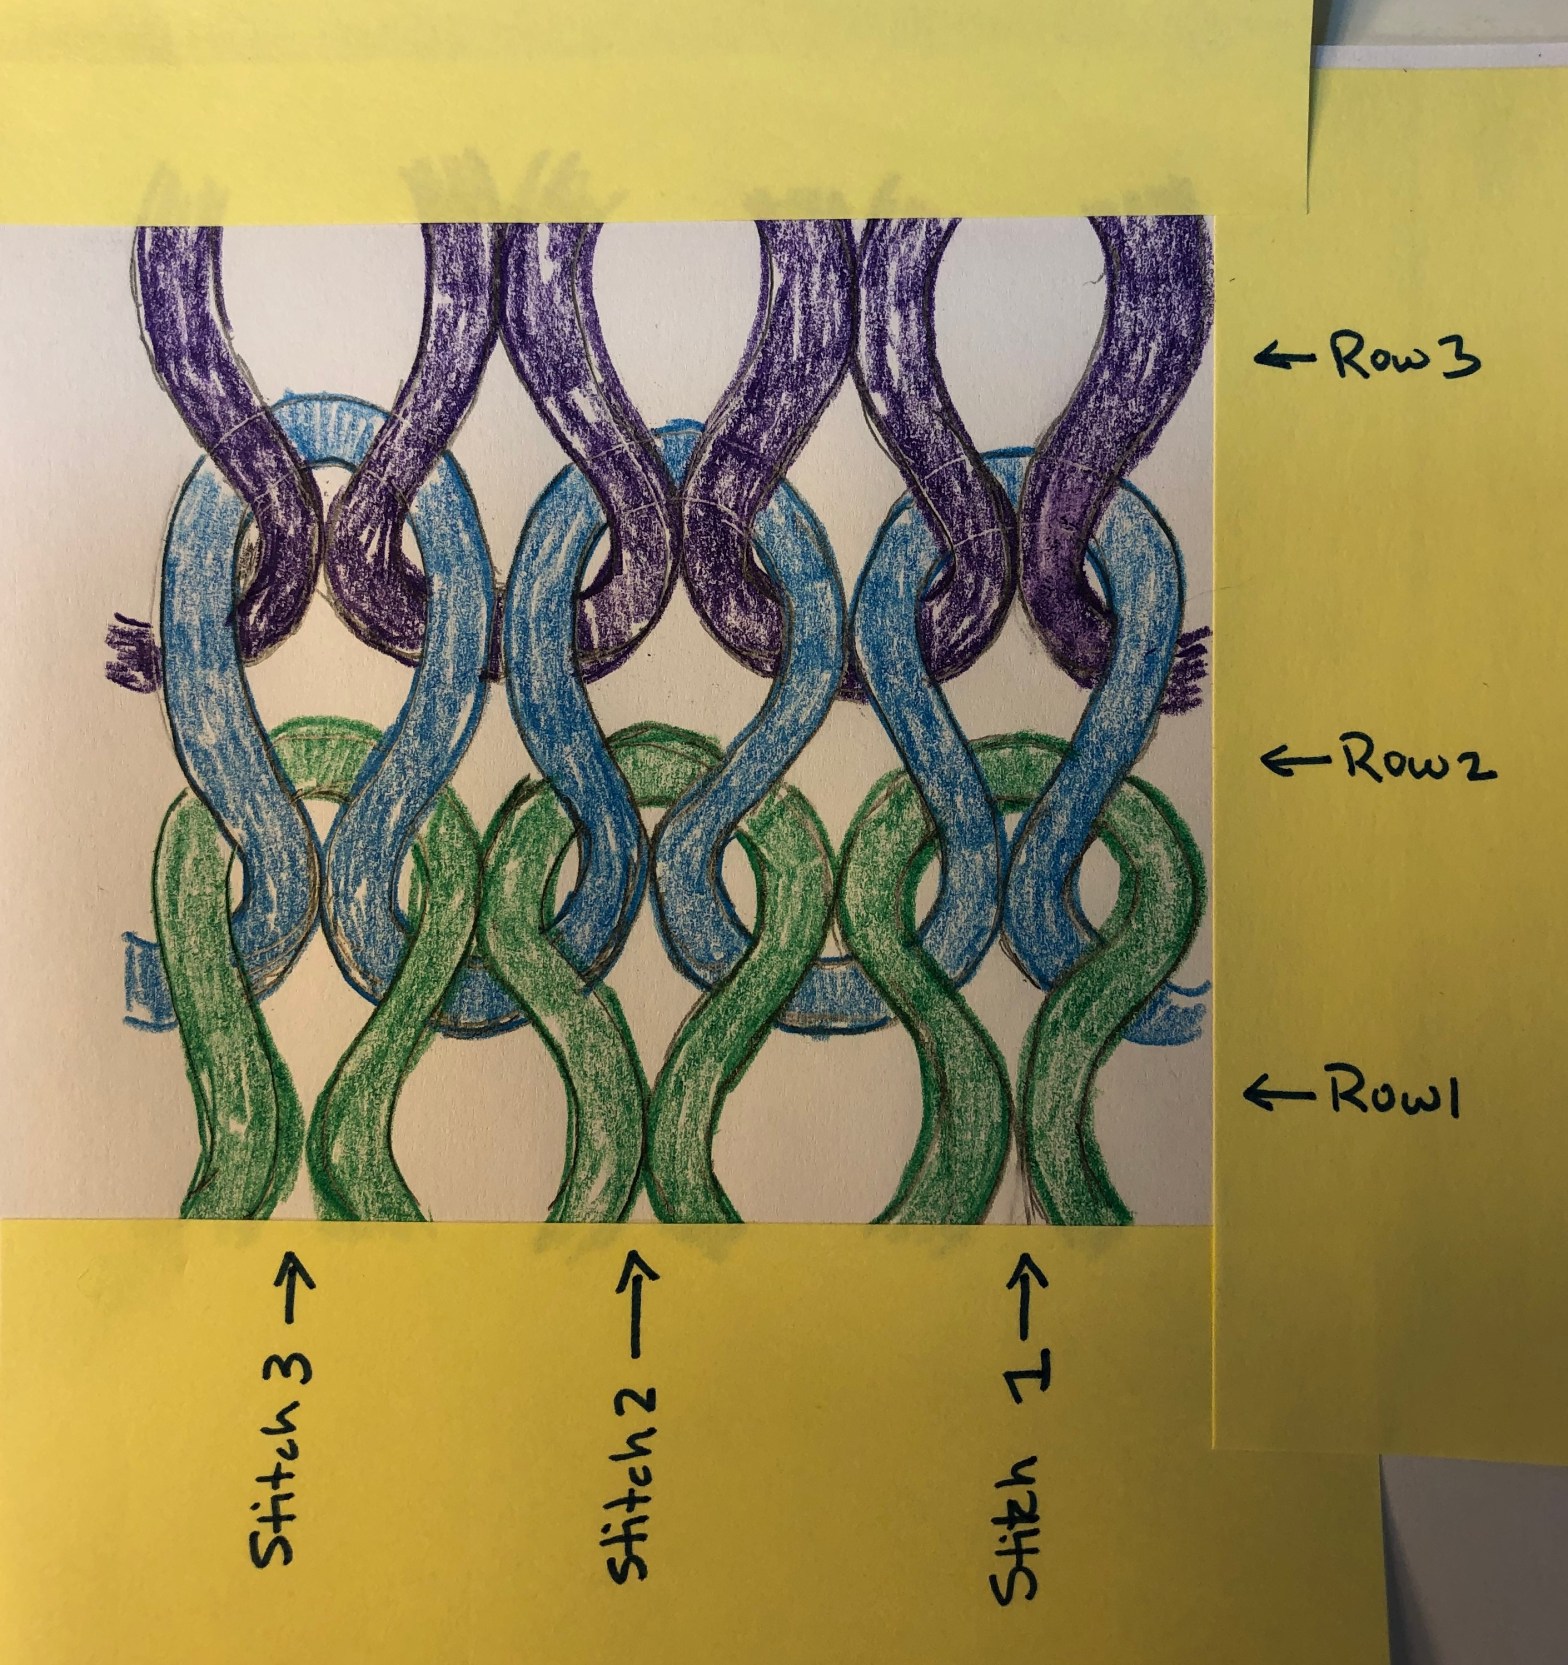
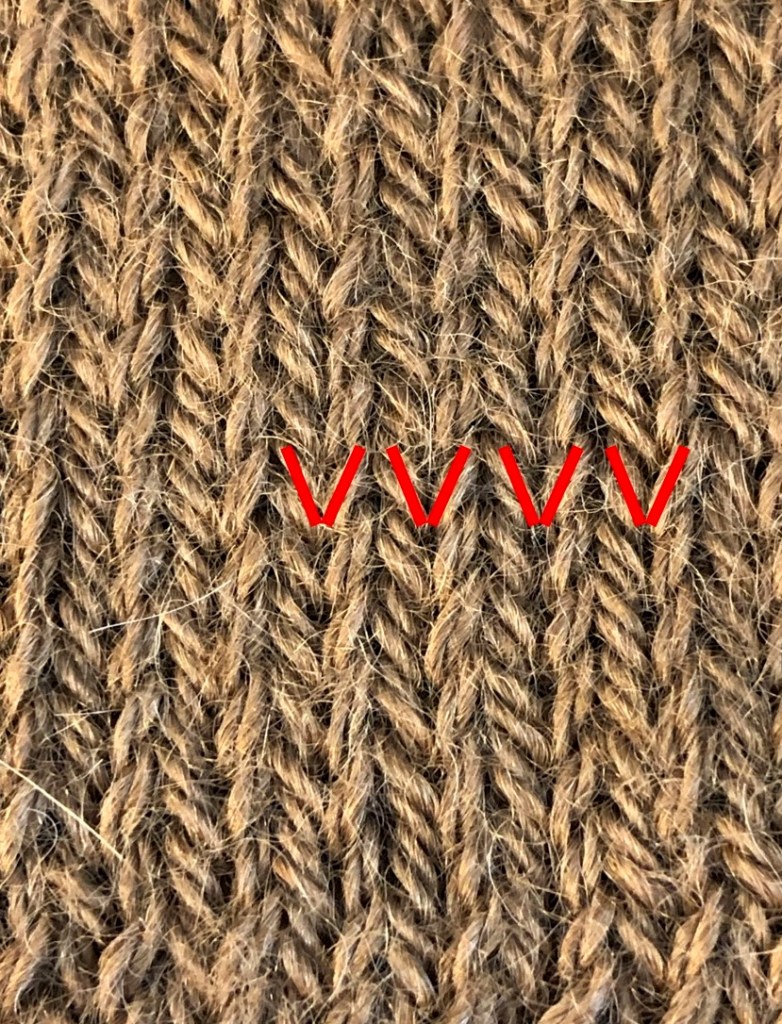
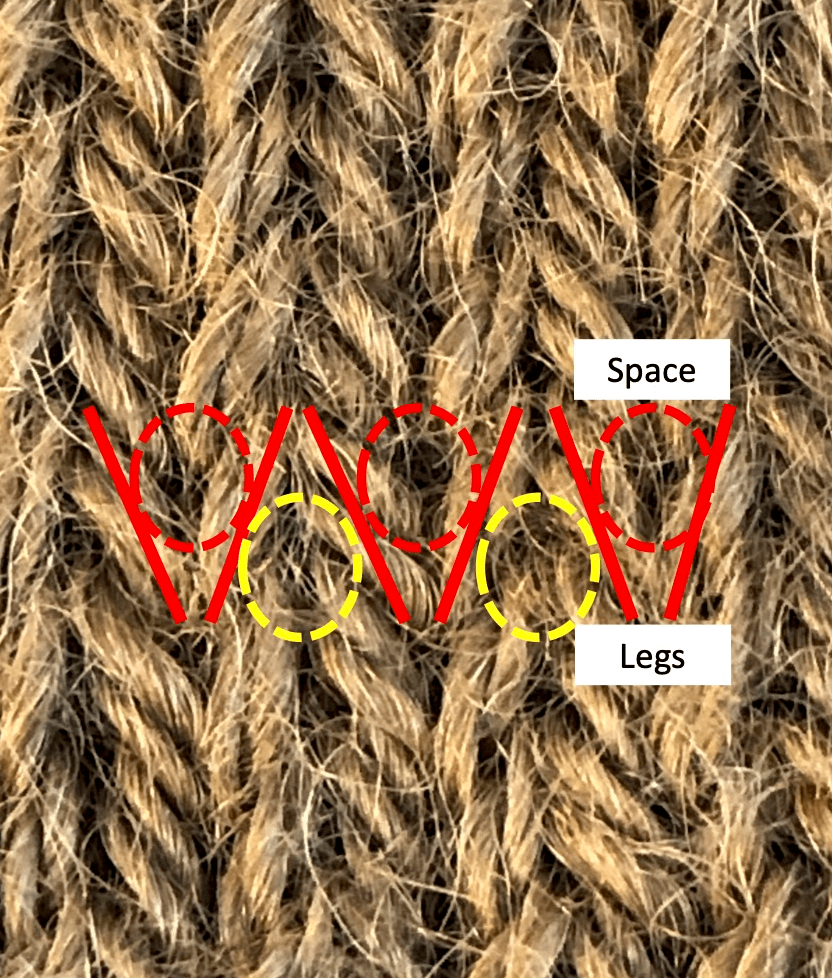
First, let’s look at the anatomy of a knit stitch to make sure we know what to look for on the stockinette stitch swatch. In the cartoon figure below, there are three stitches and three rows of stockinette stitch. Row 1 is in green, Row 2 in blue, and Row 3 in purple. The right side (public side) of stockinette stitch is made up of what looks like row-upon-row or stacks of V-like stitches. Can you identify the stitches in the photo of the swatch? The sides of the V are known as the “legs” of the stitch. They are highlighted in red in the third photo below. Don’t get confused by the plies that make up the yarn. You can see some of the plies making up the legs in the stitches below.


In addition to identifying the legs of the stitch, we also want to identify the three different spaces associated with each stitch. There is one space in the center of the stitch (shown in red oval below), and one space on each side of the stitch (each shown in yellow ovals below). These spaces will be our points of reference for measuring.

Since the gauge is the measure of the average size of the stitch, the more stitches you measure, the more accurate your average stitch size measurement will be. This is the reason we make our swatch larger than a 1 x 1 inch square. If you are only measuring a few stitches, the probability of having one wonky stitch changing the average size of the stitches increases. So, we want to measure as many stitches as possible, which is why I measure across the entire body of the swatch. I know the number of stitches in the body of the swatch (because I know how many stitches I’ve cast on) and I often know the number of rows in the body of the swatch (because I’ve hopefully remembered to keep track), and that means there is little to no counting of stitches. This is especially helpful when you are working with dark colored yarns, because all the parts of the stitches are harder to see, so there ends up being less guessing.
Stitch Gauge
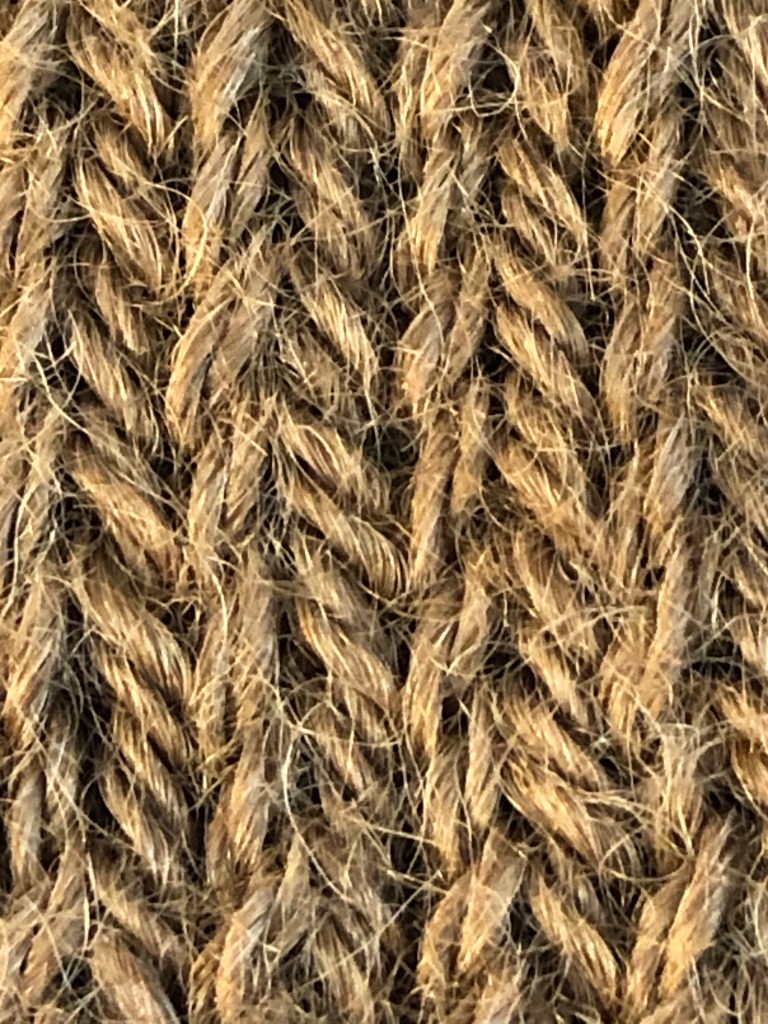
When you measure to obtain the stitch gauge, you want to measure from the side space on the left side of the far left stitch to the side space on the right side of the far right stitch, as shown in the last photo below. Note: In real life, you will be measuring across more the three stitches!
Stockinette Stitches 
V-shaped legs of stockinette stitches. 
Spaces in stitches: red are center spaces, yellow are between stitches. 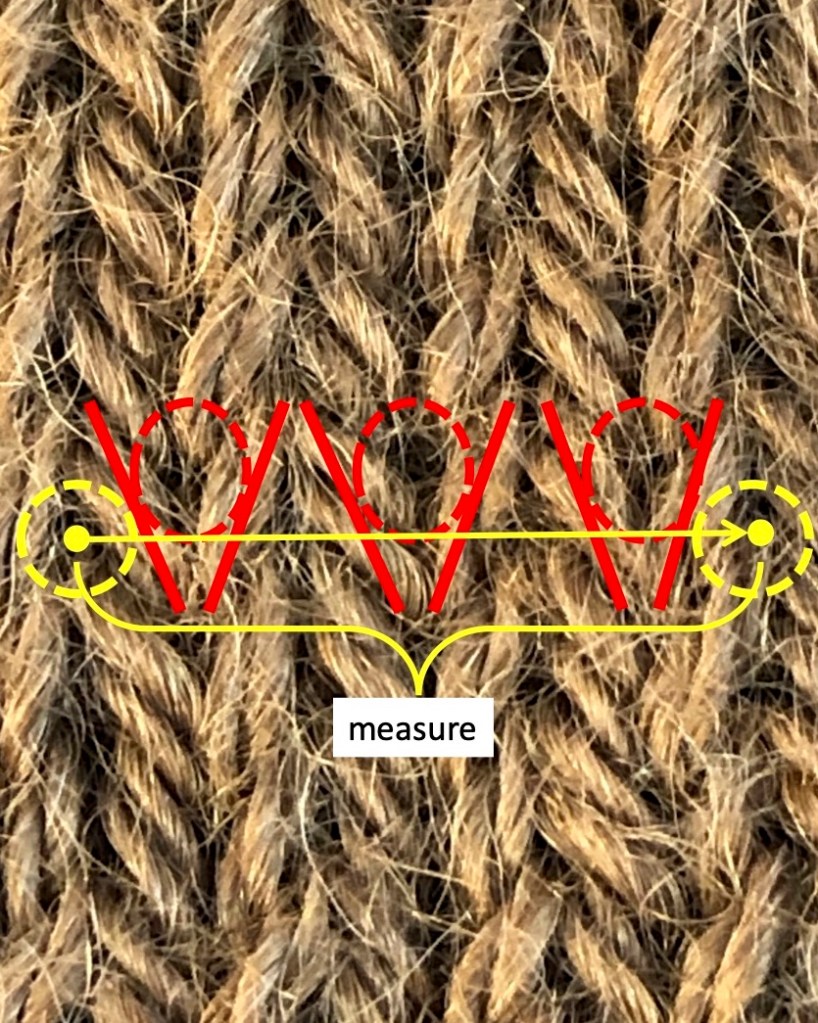
In my swatch, I cast on 40 stitches. There are 2 edge stitches on each side of the swatch (remember each right side row begins with a K1, P1 and ends with a P1, K1). That means we have 36 stitches across the body of the swatch. I find the easiest way to measure the stitch gauge is to simply measure across the body of the swatch (not including the edge stitches).

Place a pin in right side space of a row of stitches. Follow the row across the swatch. 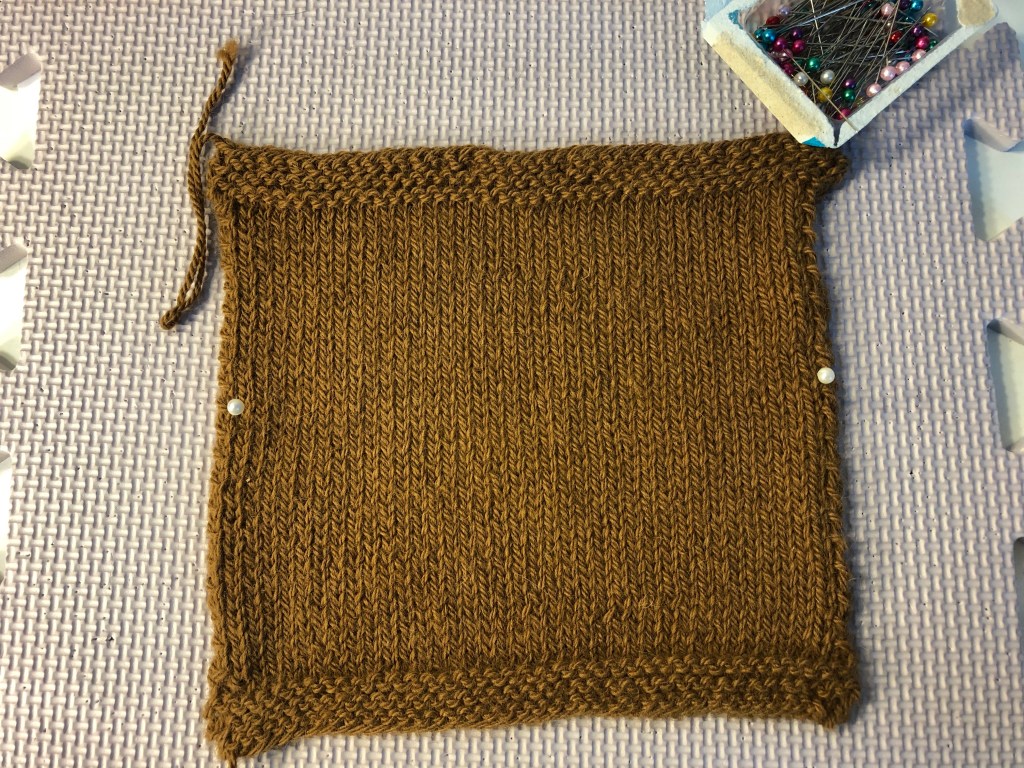
Place a second pin in the left side space on the left side of the swatch. 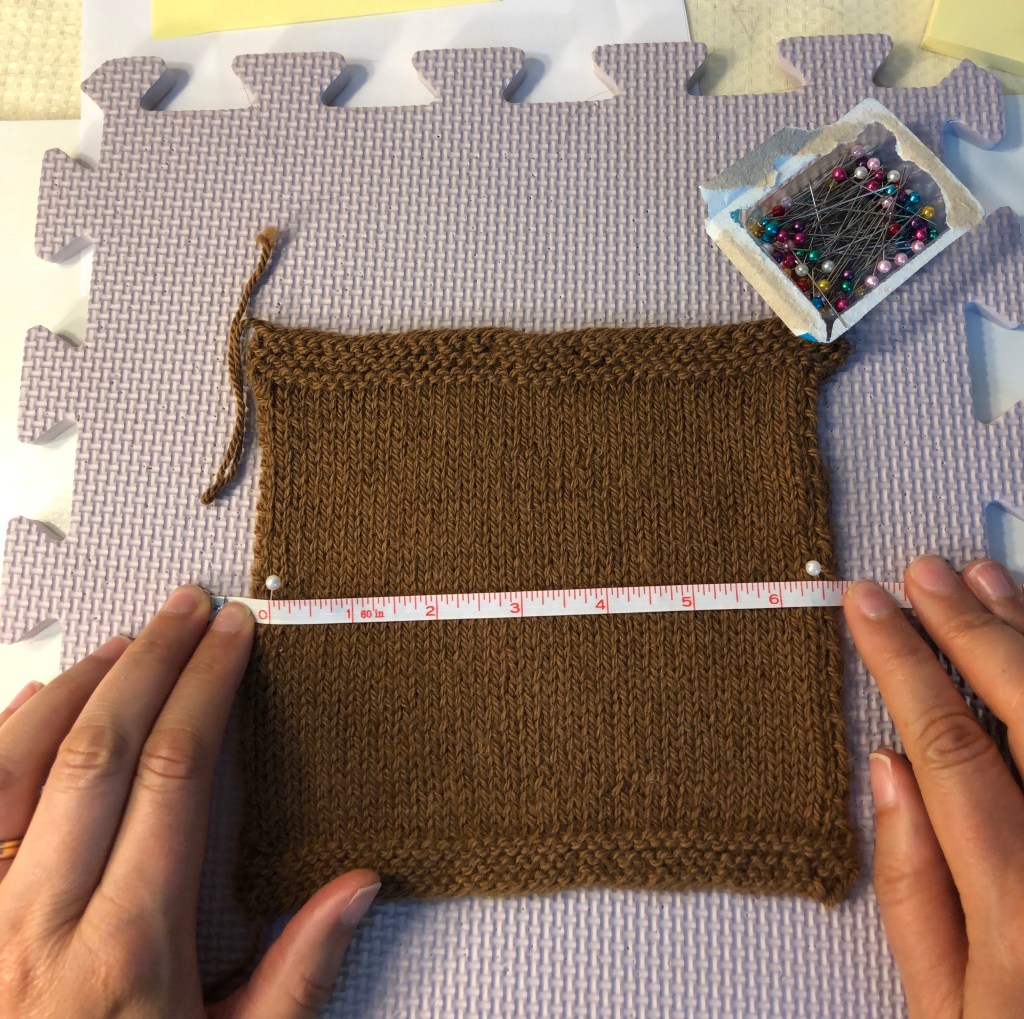
Measure from the base of one pin to the other.
Hold on to your hats, because here comes the math! To calculate the stitch gauge, divide the number of stitches that you are measuring (36 sts) by the width (6.44 in) = 5.6 sts/in. The gauge is given for 4 inches, so multiply this number by 4 = 22.4 sts in 4 inches.


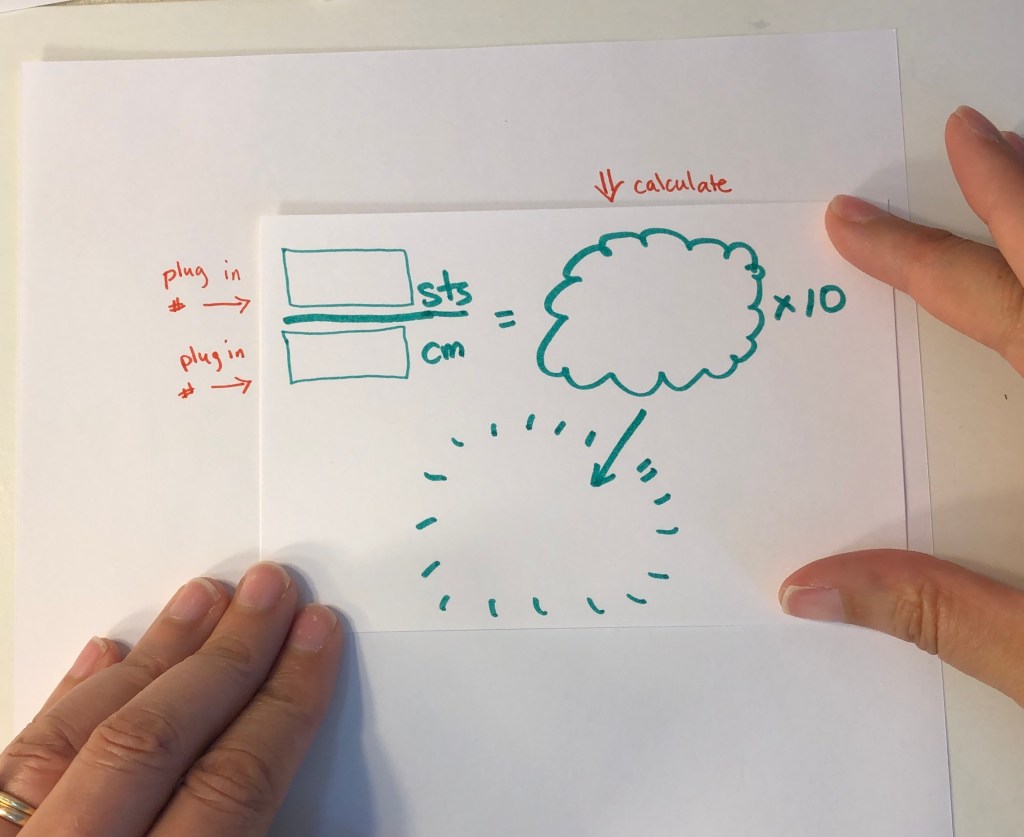

Note: I usually use centimeters because the math is easier and I find it to be more accurate. The math is similar: 36 sts divided by the width in cm (16.4) = 2.195 sts/cm X 10 cm = 21.95, or 22 sts in 10 cm.
Row Gauge
For row gauge, you will measure from the center space to center space in the same column of stitches. The center spaces are marked with the red circles in the photos below.

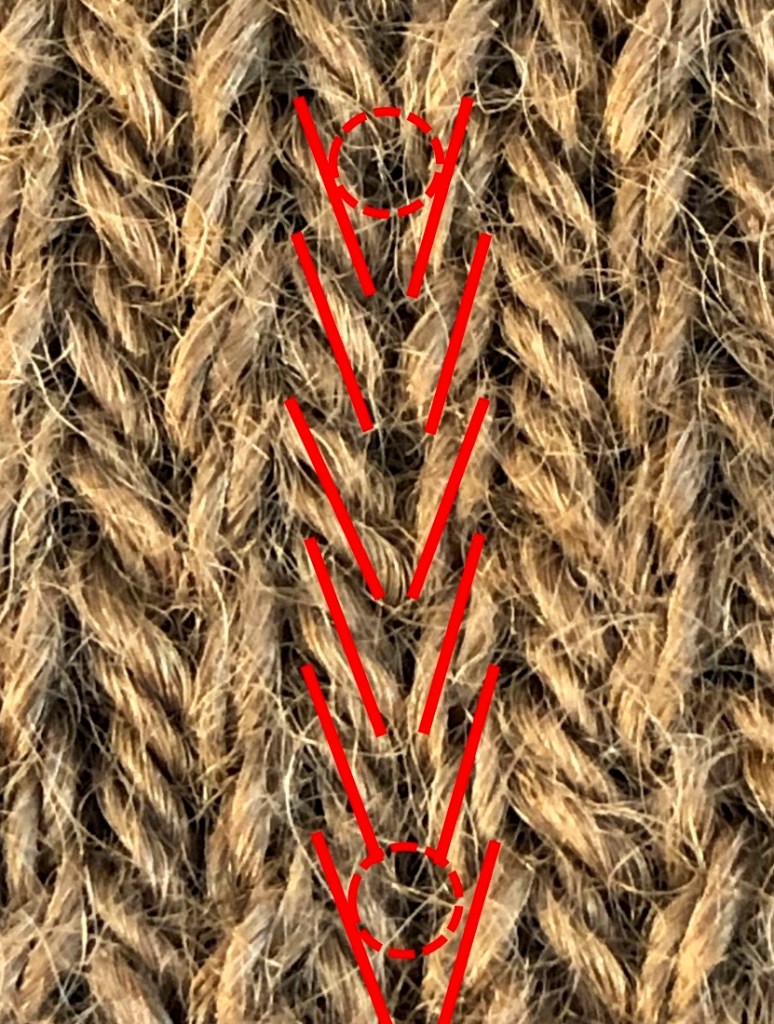
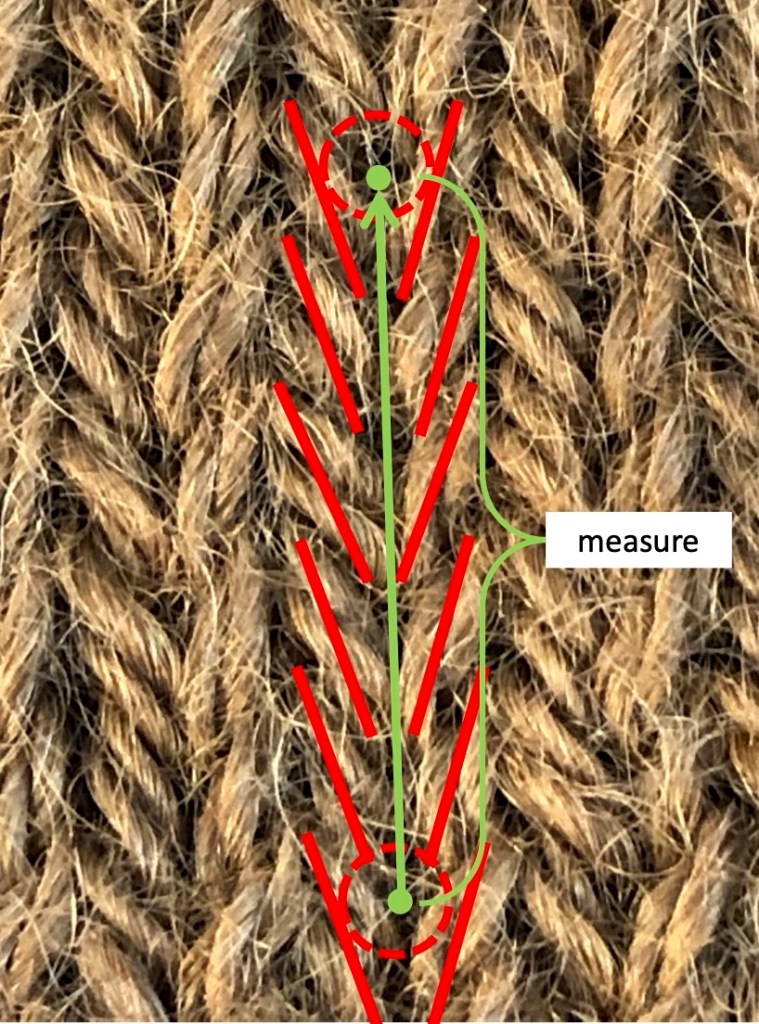
I’ve worked 40 rows between the garter stitch edges of my swatch. I locate the center spaces of the stitch at the bottom row of the body of the swatch. I follow the column of stitches up to the top and place a pin in the center space of the stitch in the last row of stockinette stitches. Measure between the pins and calculate.

Mark the top and bottom center spaces. 
I measure 5 1/8 (5.125) inches or 13.1 cm from top to bottom pin. 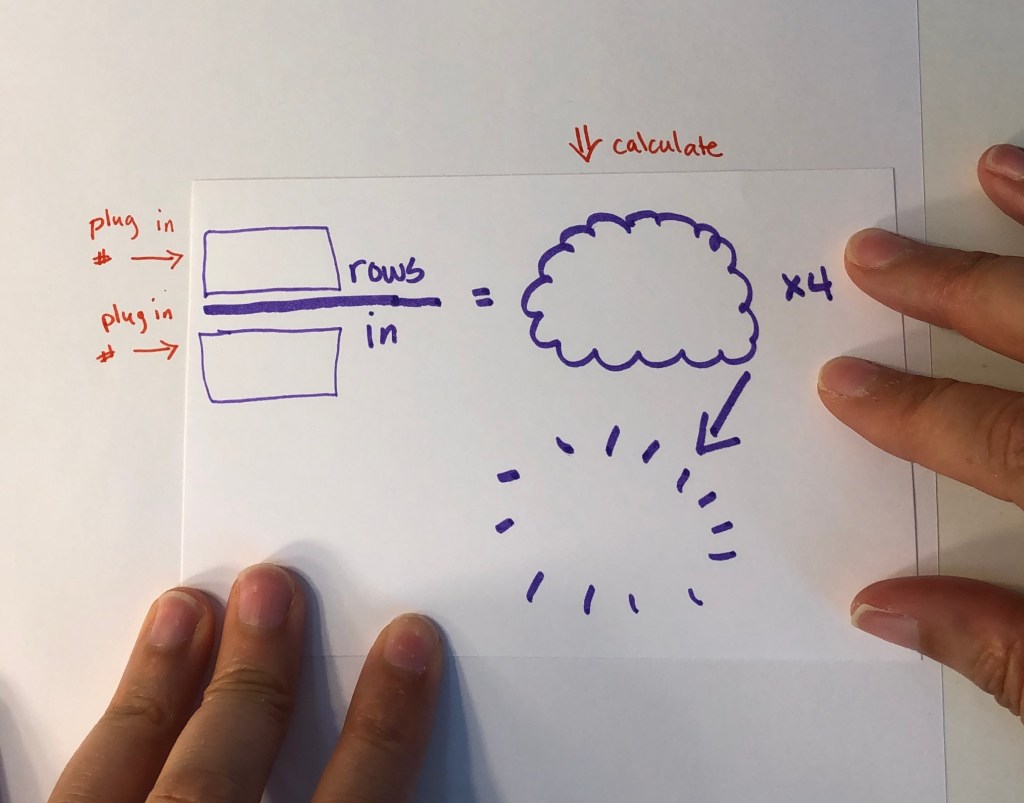
Divide number of rows by length and multiply by 4 to get the number of stitches in 4 inches. 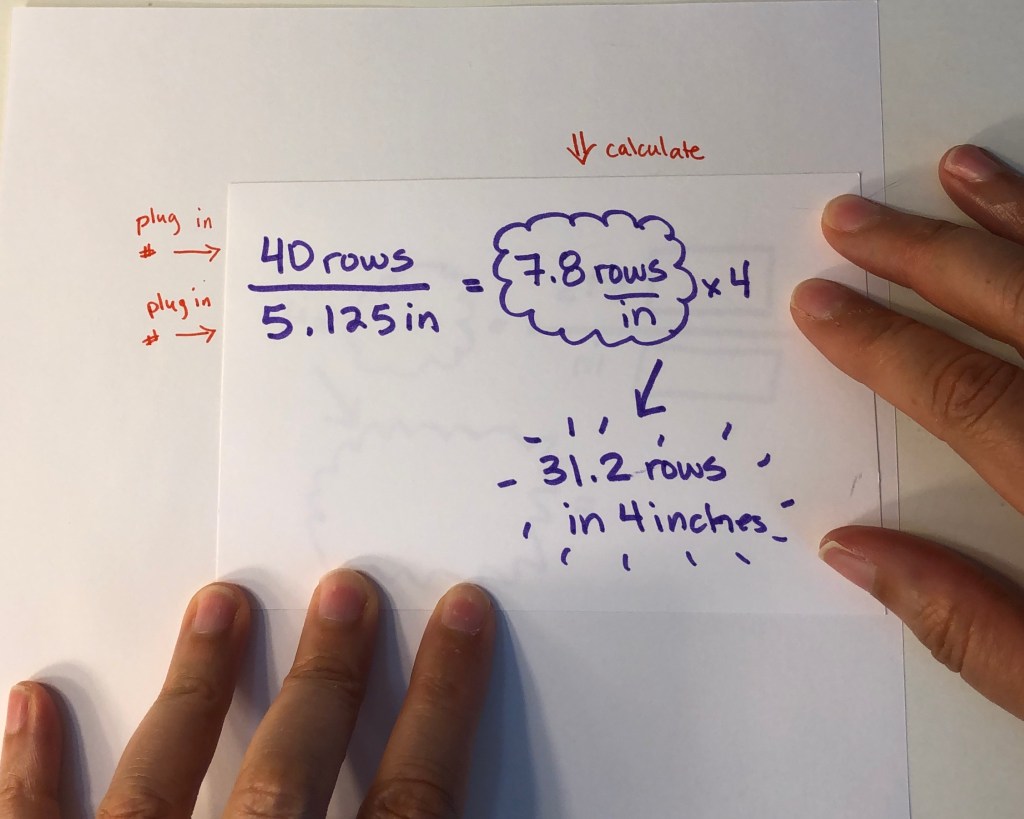
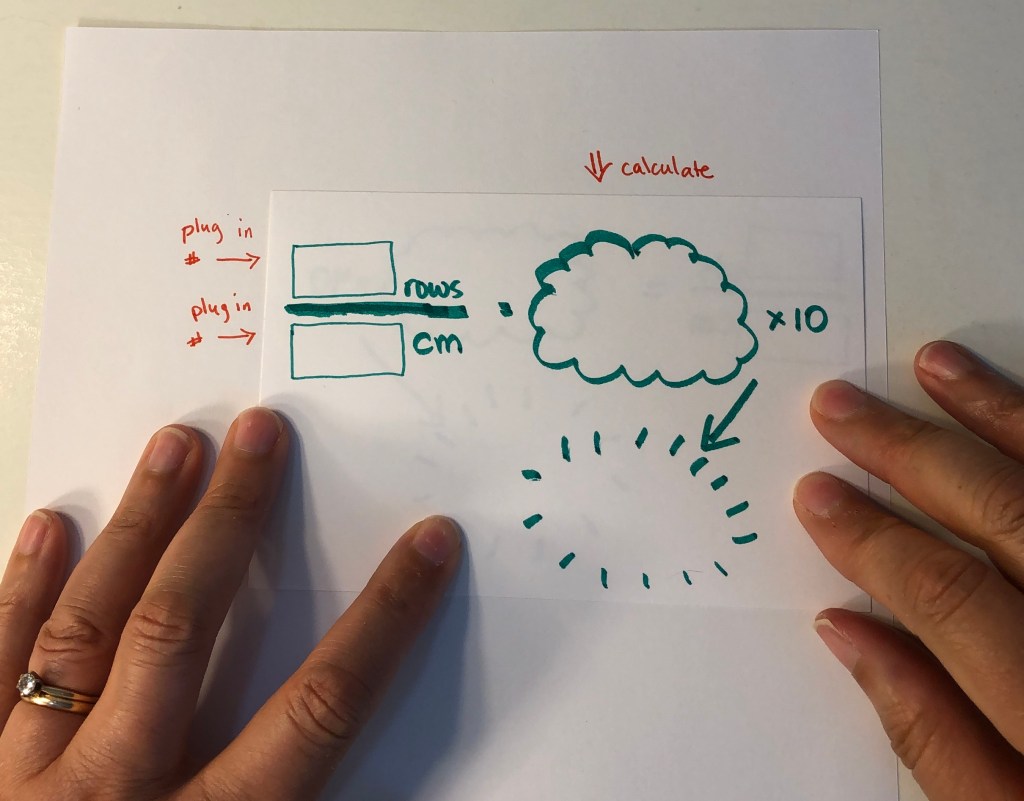
Divide the number of rows by the length (in centimeters) and multiply by 10 to get the number of stitches in 10 cm. 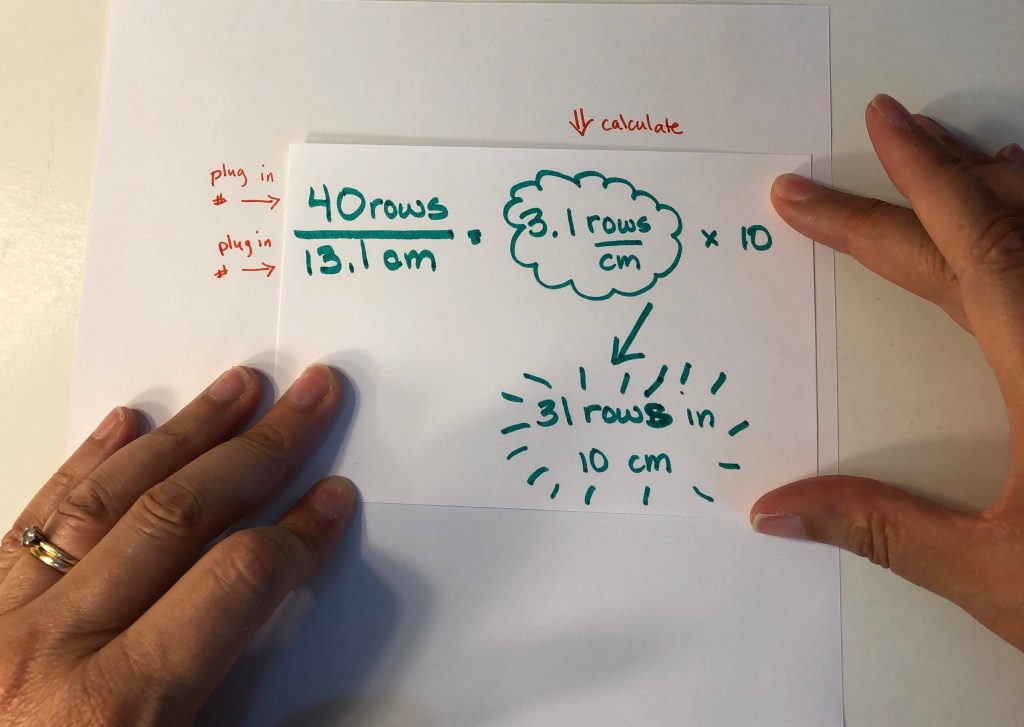
My calculated gauge is 22.4 sts x 31.2 rows in a 4 x 4 inch swatch, or 22 sts x 31 rows in a 10 x 10 cm swatch.
Cheers,
Mindy
